Working with Galleries
About Galleries
Galleries are collections
or groups of reports that are generated by SAS IT Resource Management
and placed in the SAS Content Server. Creating and working with galleries
enables you to identify and group reports based on report properties.
Grouping reports into manageable subsets enables you to view, evaluate,
and analyze the performance and capacity of your IT infrastructure
efficiently. For more information about the report properties that
you can use as criteria for including reports in a gallery, see the
chapters about report definitions and the ITRM Report Definition task
in the SAS IT Resource Management 3.7: Reporting Guide. For more information
about creating and using filters in the Gallery workspace,
see Filter Reports.
Create a Gallery
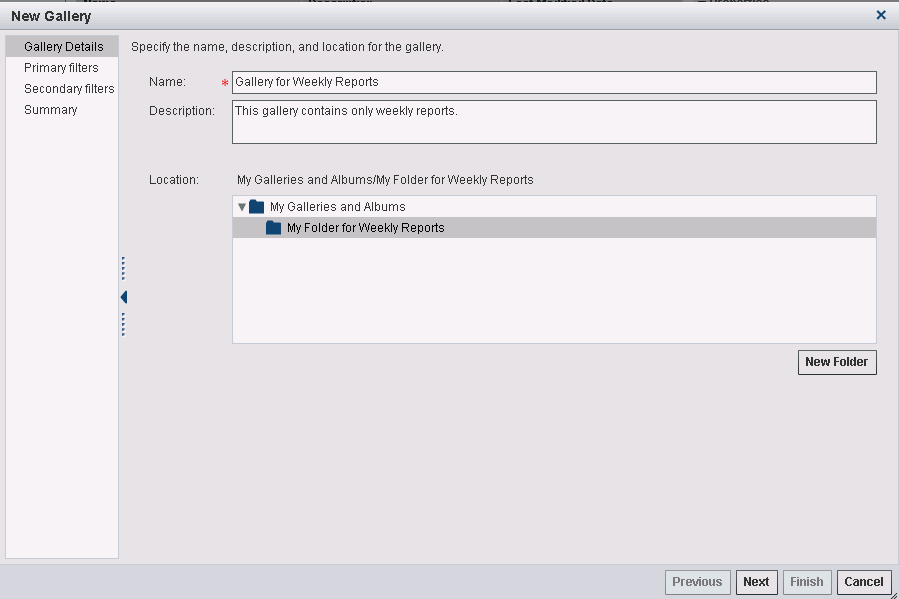
Gallery Details: Step 1 of 4
Members of groups with
the IT Resource Management: Report Center User role and members of
IT Resource Management Report Center Administrators groups can create
galleries. To create a gallery, perform the following steps:
-
-
In the Location group box, select the folder where you want to store this new gallery. If you do not want to use one of the existing folders, then click the New Folder button. This action launches the New Folder dialog box that enables you to create and define a new folder. When you are finished, you are returned to the Create Gallery wizard.Note: The contents of a folder have the same sharing status as their parent folder.
-
Click Next to specify the primary filters that you want use to subset the reports in the gallery. Continue to Primary Filters: Step 2 of 4.
Primary Filters: Step 2 of 4
After you complete Gallery Details: Step 1 of 4, specify the primary filters.
-
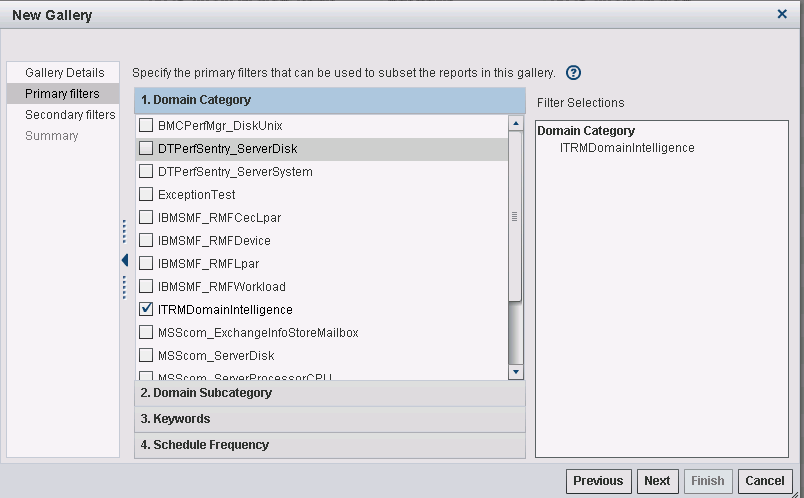
On the Primary filters page, select the primary filters that designate the criteria for reports that make up the gallery. Filters limit the number of reports that are in the gallery. For example, you might choose to create a gallery that includes only reports that were defined to run weekly (Schedule Frequency) and that are available for a particular adapter data source (Domain Category) or keyword.The following example shows the domain ITRMDomainIntelligence selected as a primary filter for a gallery. This domain is used to identify the sample reports that ITRM Report Center provides.The values that appear in this list are based on the properties of the reports that are in the SAS Content Server at the time.ITRM Report Center uses these report properties to identify, filter, and sort the reports. For more information about working with these report properties, see Chapter 7, “Working with the ITRM Report Definition Task in SAS Enterprise Guide” in the SAS IT Resource Management 3.7: Reporting Guide.Here are the four groups of primary filters that you can use to refine the set of reports in the gallery:
-
Domain Category for the appropriate domain category that is associated with the adapter. Selecting a value for the domain is required.
-
Domain Subcategory for the appropriate domain subcategory that is associated with the domain category.
-
Keywords for other terms or variables by which you might filter the reports, such as “CPU.”
-
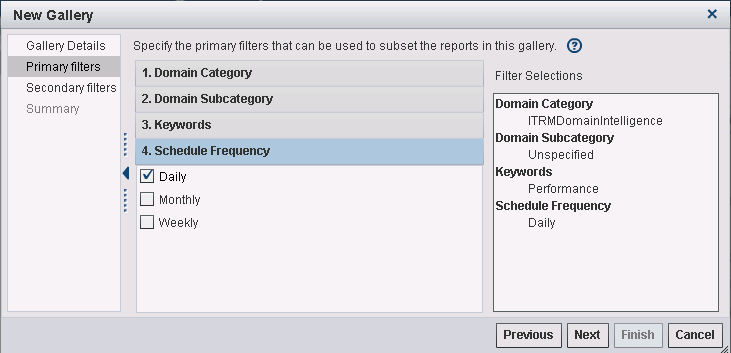
Schedule Frequency for the time period on which the reports are run, such as daily, weekly, and monthly.Note: The Schedule Frequency filter, specified in the SAS Enterprise Guide ITRM Report Definition task, is a filter value that suggests when the corresponding report job should run. It does not schedule report jobs and is not necessarily indicative of the date properties of the corresponding reports.
To select primary filters, perform the following steps:-
Click the primary filter group to display the filters that are available. The primary filters that are available include only the variables that are present for at least one of the reports in the SAS Content Server. Check the box next to the filter that you want to select.Note: You must select a domain category.
Note: As shown in the following display, the primary filters that you selected appear in the right pane of the page. -
-
Click Next to specify the secondary filters that are used to further subset the reports into the gallery.Note: By default, report limits for the primary and secondary filters are set to 100,000 and 3,000 respectively. By default, primary filters must reduce the number of reports to no more than 100,000 before you can continue to subset the reports further with secondary filters. Otherwise, an error message appears and you cannot continue. To continue, you must specify more primary filters to reduce the number of potential reports for the gallery. By default, secondary filters must reduce the number of reports to 3,000. Your ITRM Report Center administrator can configure these default report limits to different values for your organization if necessary. However, regardless of the values specified for the default report limits for the primary and secondary filters, ITRM Report Center permits no more than 5,000 reports in a single gallery.TipTo update the default report limits for the primary and secondary filters, use the SAS Administrative ID. For more information, see the “Reset the Maximum Number of Reports to Be Returned from the Create Gallery Filters “ topic in Chapter 10, “Administrative Tasks” in the SAS IT Resource Management 3.7: Reporting Guide.Continue to Secondary Filters: Step 3 of 4.
Secondary Filters: Step 3 of 4
After you complete Primary Filters: Step 2 of 4, specify the secondary filters.
-
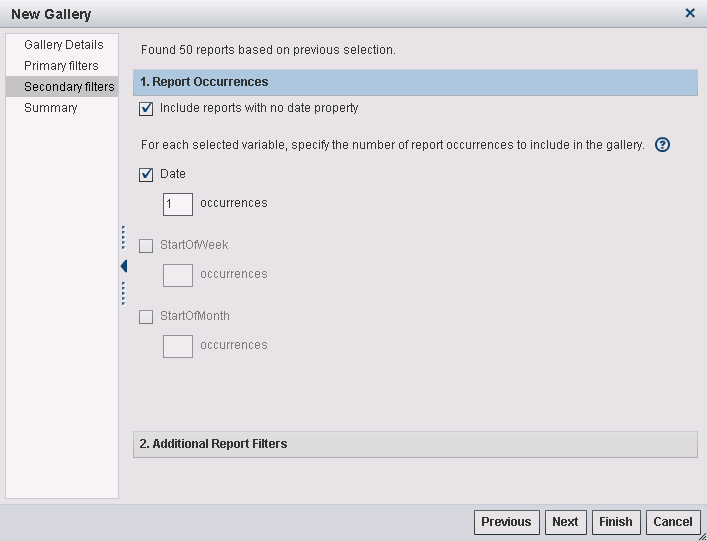
On the Secondary filters page, select the secondary filters that designate additional criteria for reports that make up the gallery. Secondary filters enable you to further subset the reports that meet the primary filter criteria that you selected on the previous page.This page shows the number of SAS IT Resource Management reports that are in the SAS Content Server and meet the criteria that you specified with the primary filters on the previous page. You can select Finish to accept the default filters for Date, StartOfWeek, and StartOfMonth. Alternatively, you can continue to reduce the number of reports in the gallery by selecting secondary filters.To select secondary filters, perform the following steps:
-
Check the box next to the date-based variable for which you want to specify the number of occurrences to include in the gallery.Reports can include the following date variables:
-
Date specifies that Date is in the BY variable of the report.
-
StartOfWeek specifies that StartOfWeek is in the BY variable of the report.
-
StartOfMonth specifies that StartOfMonth is in the BY variable of the report.
Note: These options for date variables are filters. However, if you want to exclude all reports with a date BY variable of Date, StartOfWeek, or StartOfMonth, then deselect the appropriate check box. -
-
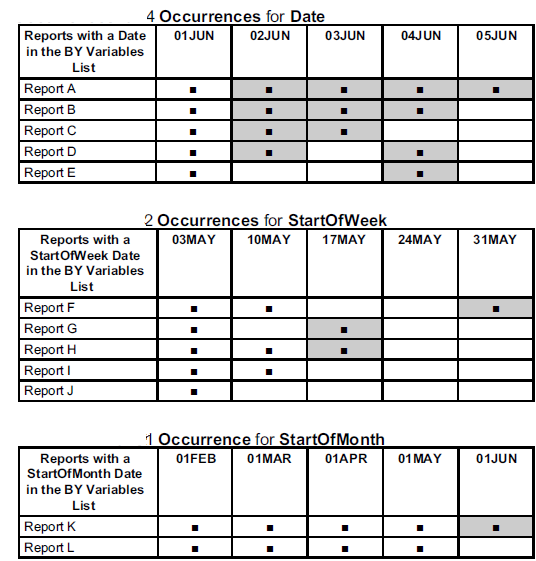
In the occurrences field for the selected date-based variable, specify the maximum number of instances (1 to 99) of the date variable that you want to include in the gallery. If a report includes a corresponding date variable that is within this range, then the report is included in the gallery.The range begins with the date of the most recent BY variable for the given time variable (Date, StartOfWeek, or StartOfMonth) and includes the next latest dates within the range.For example, the following figure shows the date-based reports that are in a single gallery if occurrences are specified for all three date variables Date, StartOfWeek, and StartOfMonth. This figure uses the following conventions to represent reports:
-
A black square (■) indicates that a report for the given date is available in the SAS Content Server and meets the primary filter criteria.
-
A shaded cell indicates that the report is included in the gallery.
-
-
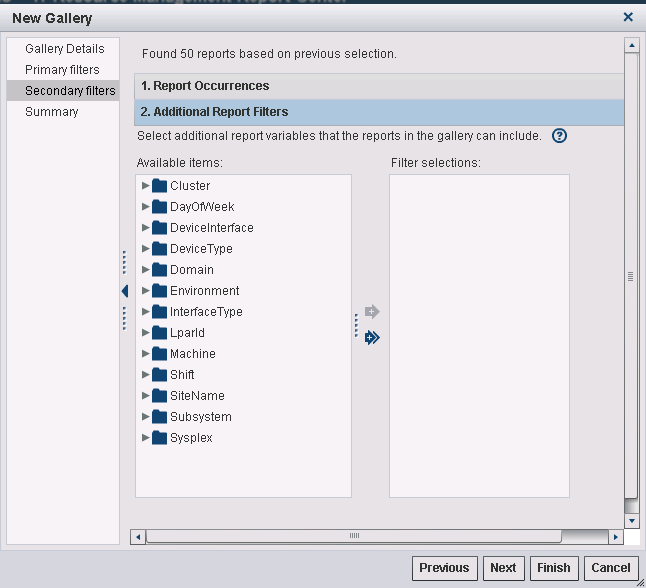
Click Additional Report Filters to further subset the reports in the gallery. The following page appears.These secondary filters are listed in the Available items box and are based on the primary filters that you selected on the previous page. Use the right arrow to move selected filter variables to the Filter selections box. To deselect a filter variable, select the filter in the Filter selections box and click the left arrow to move the filter back to the Available items box.If you do not select an additional report variable, then the reports in the gallery can include any of the variables for that secondary filter category. If you select at least one variable, then the reports in the gallery can include only the variables that you selected from the secondary filter group.Note: The gallery contains reports that have all of the selected BY variables. For example, in a domain category for VMware, the BY variables might be Host and Cluster. You might want to view only reports that contain a certain host within a certain cluster. To do so, when you create the gallery, on the Secondary filters page, select the desired values for Host and for Cluster from the Available items box. Later, when you view the gallery, reports that contain the selected Host and Cluster values are returned.
-
Note: If the gallery that is created contains reports in excess of the SecondaryReportCount value (a value set by the SAS Administrator), then this error message appears:
<nn>
                                    reports are fetched which has exceeded the administrator's recommended
                                    limit of <value-of-the-secondary-report-count>.
                                    You can proceed and create this gallery understanding that only <value-of-the-secondary-report-count>
                                    reports will be included.
Your SAS administrator can configure this report limit to a lower value for your organization if necessary. For more information, see Chapter 10, “Administrative Tasks” in the SAS IT Resource Management 3.7: Reporting Guide.Continue to Summary: Step 4 of 4.
Summary: Step 4 of 4
After you complete Secondary Filters: Step 3 of 4, view the summary.
-
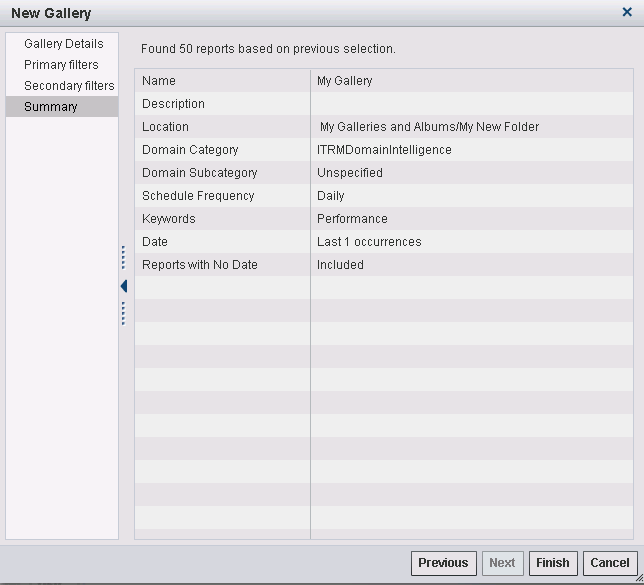
On the Summary page, review your previous selections and ensure that they reflect the results that you expected.This page provides the number of SAS IT Resource Management reports that are in the SAS Content Server and meet the criteria that you specified with the primary and secondary filters on the previous pages.If the gallery includes more reports than you want, click Previous and modify your filter settings to further subset the reports.
Copy a Gallery
To copy a gallery, perform
the following steps:
-
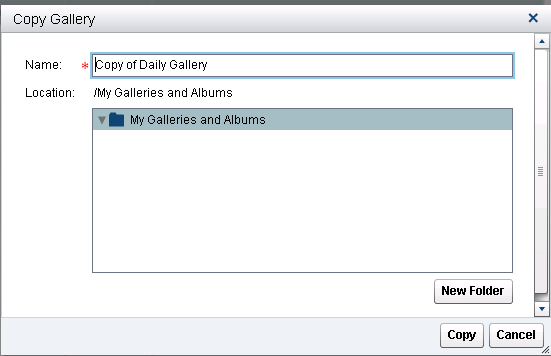
In the left pane of the Gallery workspace, select the folder that contains the gallery that you want to copy from. You can select My Galleries and Albums or Shared Galleries and Albums or, for ITRM Report Center administrators, Users’ Galleries and Albums.In the center pane of the Gallery workspace, select the gallery that you want to copy.Note: You can select only one gallery at a time in this pane.
-
In the Location group box, select a folder where you want to copy this gallery. The copy inherits the sharing status of the folder where it is located.You can also use the New Folder button to create a new folder for your copied gallery. This action launches the New Folder dialog box that lets you create and define a new folder. When you are finished, you return to the Copy Gallery dialog box.
-
After the gallery is copied successfully, you are asked if you want to edit the copied gallery.
-
Note: While you are copying a gallery from Shared Galleries and Albums, the Edit Gallery wizard might not appear. If so, navigate to the location of the copied gallery. Then, select the copied gallery and click the Edit icon (
 ).
).
-
Click No to return to the Gallery workspace.
-
If a gallery with the
same name exists under the selected folder, then this message is displayed:
The
                     location you specified already contains the object with this name.
                     Specify a different location to copy.
Delete a Gallery
You can delete a gallery
to remove it from ITRM Report Center. Deleting a gallery does not
delete the reports that it contains from the SAS Content Server.
Note: Members of groups that are
members of the supplied IT Resource Management: Report Center User
role can delete only the galleries that they created. Members of
the supplied IT Resource Management Administrators group can delete
any gallery.
To delete a gallery,
perform the following steps:
Edit a Gallery
You can change the name,
description, location, and filters of the galleries that you created.
To edit a gallery,
perform the following steps:
-
In the center pane of the Gallery workspace, select the gallery that you want to edit. Click the Edit icon (
 ). The first page of the Edit Gallery wizard
appears.
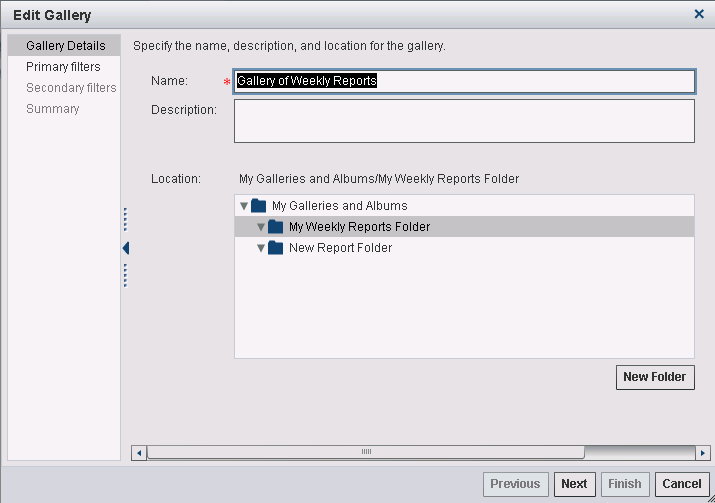
On this page, you can modify the name, description, and location of the gallery. You can also use the New Folder button to create a new folder for this gallery.
 -
On the other pages of the wizard, you can modify the values in the Primary Filters and Secondary Filters pages as needed. For more information about how to complete the fields on these pages, see Create a Gallery.Note: If you change the domain category on the Primary Filters page, then all other gallery filters are reset to default values. In this case, you have to explicitly re-specify your previous selections.
Copyright © SAS Institute Inc. All rights reserved.
