Working with Formulas
You can create, rename, delete a formula. You can
also modify a formula and change its expression.
Creating a Formula
How to Create a Formula
You can create a formula
and save it in any of the
Formulas folders
to which you have Write privileges. For example, you can create a
formula in the Formulas folder of Shared
Data or in your private folder within My
Folder.
If you want to use a
formula in a wizard, you can specify the location of that formula.
If the formula is not found in your specified location, then the wizard
will search for the formula in this location:
Shared
Data/SAS IT Resource Management/IT Formulas. If the
formula is still not found, the wizard will search for it in this
location: Products/SAS IT Resource Management/IT Formula.
Create a Formula By Using the New Formula Wizard
-
On the General Information page of the New Formula wizard, specify the name, description, and location of the new formula.
-
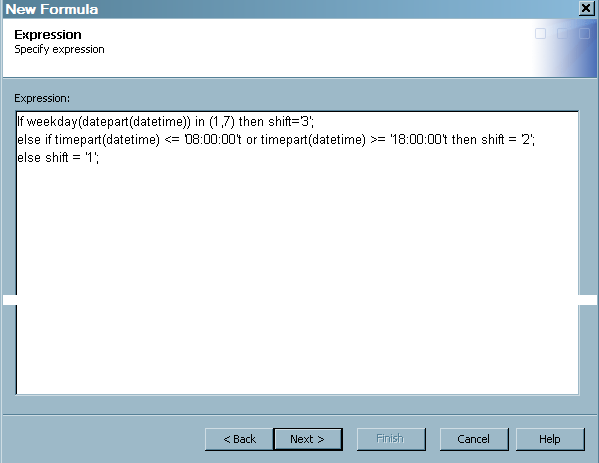
On the Expression page of the New Formula wizard, enter the expression that specifies the combination of functions and mathematical operations that are used to derive a value. A value is required in this field.In addition to the conventional rValue expression (where the expression consists of code that is appropriate only for the right-hand side of an assignment statement), SAS IT Resource Management also supports more complex expressions. For example, your expression can use SAS code that might include loops, IF statements, and so on. As shown in the following display, this code must be written in valid SAS DATA step syntax.Note: You can use a SAS macro in a formula expression or in the expression for a computed column. The SAS macro definition needs to be available to the SAS session that executes the staging or aggregation job that populates the computed column. For example, you might need to add a new autocall library using the SASAUTOS SAS option in the SAS configuration.
Create a Formula By Copying an Existing Formula
-
Right-click the formula that you want to copy. From the list that is displayed, select Copy. Then navigate to the folder where you want to store your new formula and click Paste.If you are copying and pasting the formula to the same folder, then the name of the new formula is retained unless a formula of the same name already exists at this location. In that situation,
Copy ofis appended to the original name of the formula. This ensures that the formula name is unique within its folder.Note: You can select the Copy to Folder option, which opens the Select a Location dialog box in which you can navigate to the folder where you want to store the copied formula. You can also select the Move to Folder option, which opens the Select a Location dialog box in which you can navigate to the folder where you want to store the formula. -
On the new copy of the formula, modify the fields as required. For information about changing the fields of a formula, see Modify a Formula.
Delete a Formula
-
Deleting a formula does not change the expression that used the formula, and the columns that are computed using that expression are not affected. The columns will continue to be created according to the specified expression. However, when a formula that is used in an expression no longer exists, then modifications to that expression can no longer be performed simply by changing the formula. The modifications must be changed in every column where the expression is used.
Modify a Formula
You can change any
formula to which you have Write privileges. To do so, perform the
following steps:
-
Select the Expression tab to change the combination of functions and mathematical operations that are used to derive a value.If you modify the expression text for a formula, then the system checks to see whether the original formula is used by any computed column of any table. If the formula is being used, an Update Formula dialog box opens that lists the computed columns that will be affected by the change. You can select Yes to change the formula in the computed columns that use it or No. If you click Yes, then the modified expression for the formula is saved and applied in all instances where it is used.
Consequences of Changing a Formula
Formulas can be shared
across multiple computed columns and across multiple IT data marts.
For example, the SHIFT computed columns for a particular IT data mart
can all be based on the same SHIFT formula. If you want to change
the site-specific definition of SHIFT, you can make a change to the
SHIFT formula and click OK. If this expression
is used in any other formula, the Update Formula dialog
box appears and displays the computed columns where this formula is
used. Click Yes to cause all computed columns
that use the formula to inherit the change. Otherwise, click No.
Computed columns in
staged or aggregation tables are calculated using the latest version
of the formula. In other words, if you change the expression for a
computed column in a staged table or an aggregation table and redeploy
the job, then the next time the job is run, the values for that column
in that staged table or aggregation table will be computed according
to the new expression. This computation occurs whether the expression
is from a formula or only for that computed column.
CAUTION:
If the
expression of a computed column is changed and if that column was
already used as input to a subsequent transformation that in turn
created a target table, then the values in that target table are not
automatically re-created.
To make the old and
new values of the computed columns consistent with each other, redeploy
and rerun all the previous ETL jobs that contain the new formula,
according to the following guidelines.
If you subsequently
change the expression for RATE to RATE=BYTES/MINUTE, and redeploy
the job, in the next ETL, the values of the staged table's RATE column
will be computed according to BYTES/MINUTE. However, the values in
the aggregation table that already exist (that is, they were already
aggregated) will still reflect the previous BYTES/SECOND calculation.
According to the guidelines in Case 1, if you want the statistics
that are generated to reflect the rate change in the aggregated data,
you should rerun all the associated staging and the aggregation jobs.