Overview of the SAS IT Resource Management Client

Introduction to the SAS IT Resource Management Client

SAS IT Resource Management leverages and enhances SAS Data Integration Studio to administer and manage IT resource data. (The SAS IT Resource Management solution provides features and functionality in addition to that which is provided by SAS Data Integration Studio.) SAS Data Integration Studio is a visual design tool that provides a single point of control for managing data repositories and performing extraction, transformation, and loading (ETL) processes. It offers a variety of built-in transformations that enable you to perform the following tasks:
  • build and manage data repositories
  • construct and maintain data integration projects
  • import data from and export data to a variety of sources
  • create, modify, and deploy ETL jobs
The SAS IT Resource Management client uses SAS Data Integration Studio in order to create and manage metadata objects that define sources, targets, and the transformations that connect them. It also enables you to create the jobs that contain those transformations. SAS IT Resource Management uses metadata to create or retrieve SAS code that reads input from any data source that can be read by using SAS software. The metadata objects are stored in the SAS Metadata Repository that can be shared by multiple users.
SAS IT Resource Management enhancements to SAS Data Integration Studio provide additional object types, transformations, the Adapter Setup wizard, and other wizards that facilitate the process of generating and displaying analysis and report-ready data about your IT resources.
This chapter introduces the features and functions that are available with the SAS IT Resource Management client and provides basic information about the features and functions of SAS Data Integration Studio.
Note: To locate specific topics in the Help for SAS Data Integration Studio, you can use the Index or the Search feature.
  • From the menu bar of SAS IT Resource Management, select Helpthen selectContents and Index.
  • Click the Index tab or the Search tab. Then type the name of the topic in the Find field and press the ENTER key.

Getting Started

To access the online data manipulation and administrative services that are provided by the SAS IT Resource Management client, you must first log on to and connect to a metadata server:
  1. To start SAS IT Resource Management from Microsoft Windows, select Startthen selectProgramsthen selectSASthen selectSAS IT Resource Management Client 3.3. The following dialog box appears.
    Open a Connection Profile Dialog Box
    Open a Connection Profile Dialog Box
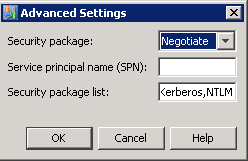
  2. Select (or create) a connection profile to connect to the server that contains the metadata for the SAS IT Resource Management objects such as jobs, templates, data, IT data marts, tables, information maps, report definitions, and transformations that you want to work with. The connection profile contains the information that identifies the server that contains that repository and the user who will be accessing the information from that repository.
    Note: At run time, SAS IT Resource Management authenticates to the metadata server using the one-time password technique documented for SAS 9.2 and later. This means that the user submitting the code (whether interactively or in batch) should have a User object defined in metadata and a Login object defined for each authentication domain, with the correct user ID and password for each. In SAS Management Console, the User Manager can be used to create and modify Users. For each User object, the Logins can be created or modified on the Accounts tab of the User dialog box. For more information, see the “Security Overview” chapter in SAS 9.3 Intelligence Platform: Overview.

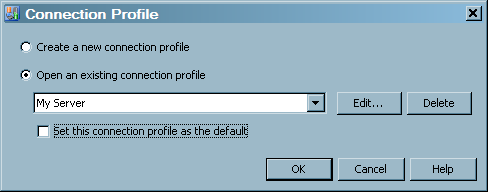
Working with the Connection Profile Dialog Box

To manage your connection profiles, select Filethen selectConnection Profile. From the dialog box that appears, you can perform the following tasks:
  • Create a new connection profile.
    If you select this task and click OK, the Connection Profile wizard appears. Enter the information that is requested by the wizard.
    In the following display, values for the Machine, Port, User ID, and Password fields have been entered.
    New Configuration Profile Wizard
    New Configuration Profile Wizard
    Click Finish to create the new connection profile.
  • Open an existing connection profile.
    If you select this task, from the drop-down list of existing connection profiles, select the profile that you want to open and click OK.
  • Edit an existing connection profile.
    If you click Edit, the Connection Profile wizard appears. Enter the changes to the information that is requested by the wizard. Click Finish to open the updated connection profile.
  • Delete an existing connection profile.
    If you click Delete, from the drop-down list of existing connection profiles, select the profile that you want to delete and click Delete. In the confirm deletion message box, click Yes to delete the connection profile.

Using the Connection Profile Wizard
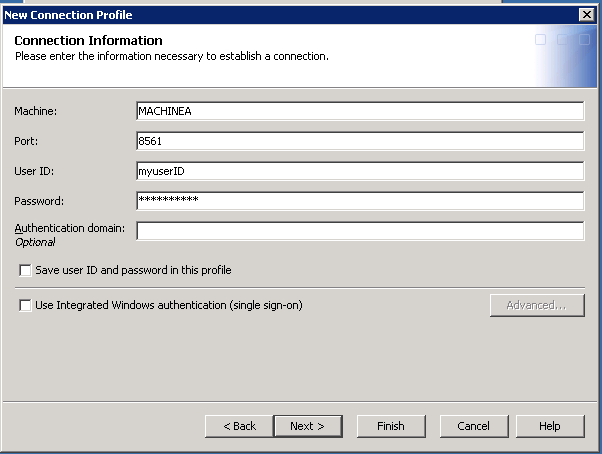
The Connection Profile wizard guides you through the steps that are needed to build (or edit) a connection profile that enables you to connect to a metadata server. The wizard prompts you to enter (or revise) the following information:
  • the name of the connection profile. If you want to set this profile as the default connection profile, check the corresponding box.
  • the fully qualified name of the machine on which the repository server operates.
    CAUTION:
    Do not enter “localhost” in the Machine field.
    SAS IT Resource Management jobs fail to run if the metadata host in the configuration profile is set to localhost.
  • the TCP port on which the metadata server is listening for connections. To enter a port number, type directly in the field.
  • the user ID (and domain if applicable) that is used to log on to the metadata server. In order to specify the domain for this profile, you must also specify a value in the Authentication Domain field.
    Note: You must authenticate to the operating environment where the metadata server is running.
  • the password that is required for the specified user to log on to the metadata server. If you want to save the user ID and password in this connection profile, check the corresponding box.
  • the authentication domain for the metadata server. If you specify a value for this field, the credentials that are specified for the metadata server are used to access servers or databases that are in the same authentication domain.
    Note: You must authenticate to the operating environment where the metadata server is running.
  • If you want to save the user ID and password in this profile, check the corresponding box.
  • If you want to use the Integrated Windows authentication (single sign-on), check the corresponding box. When you check this box, the Advanced option is enabled.
    Click the Advanced option to open the Advanced Settings dialog box.
    Advanced Settings for the Configuration Profile
    Advanced Settings for the Configuration Profile
    This dialog box enables you to specify the method for authenticating your credentials to the server and to SAS application servers. For information about how to specify the security package, the service principal name (SPN), and the security package list, click Help.
  • After the required information is entered, the wizard displays a summary page that lists the options that you specified for this connection profile. If necessary, you can go back to previous pages of the wizard and modify your specifications.
  • When you click Finish, the connection profile is created (or updated).