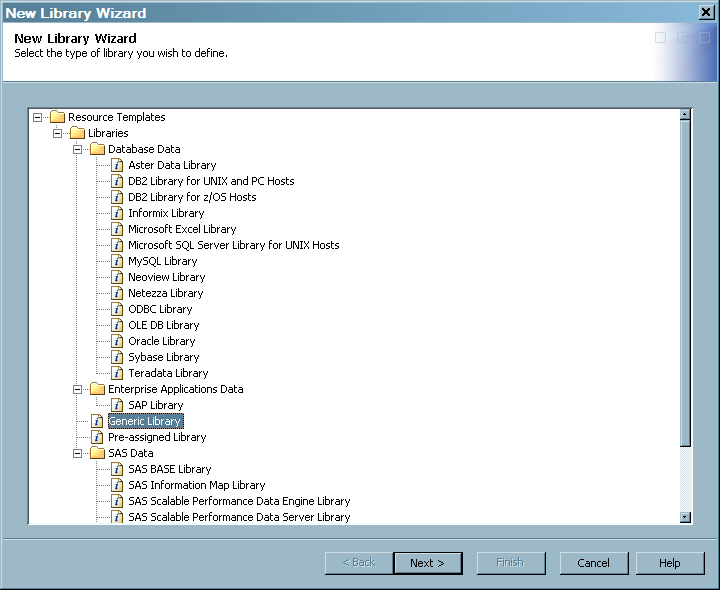
Accessing Raw Data for Database Adapters

What Are the Database Adapters?

Several adapters extract raw data from databases. The following adapters are database adapters:
  • HP Reporter
  • MS SCOM
  • VMware
  • SAP ERP

Preparing a Database Adapter for Staging

The data sources for the HP Reporter, MS SCOM, and VMware adapters add performance data to relational databases as follows:
  • For the VMware adapter, the relational database can be an ORACLE or DB2 database on a UNIX or Windows operating system or a Structured Query Language (SQL) database
  • For the HP Reporter adapter, the relational database can be an ORACLE database on a UNIX or Windows operating system, a Structured Query Language (SQL) database, or a Microsoft Data Engine (MSDE) on a Windows operating system.
  • For the MS SCOM adapter, the relational database must be a Microsoft SQL Server database.
  • For the SAP ERP adapter, the raw data must be in SAS data sets.
Note: If an ODBC server definition must be created that points to that database, see the “ODBC Sources” topic in the “Overview of Common Data Sources” chapter in the SAS Intelligence Platform: Data Administration Guide at http://support.sas.com/documentation/onlinedoc/intellplatform/index.html. Find the section that corresponds to the type of database that contains your data, and follow the instructions for that section. These instructions include the steps required to set up the ODBC driver on your system if necessary, define the database server, and create the library that points to your database. If you want to establish connectivity to a SQL Server Database by using ODBC, follow the instructions for “Establishing Connectivity to an Oracle Database by Using ODBC.” (The descriptions of ODBC connections to Oracle and Microsoft Access databases can be helpful when you connect to similar data sources.)
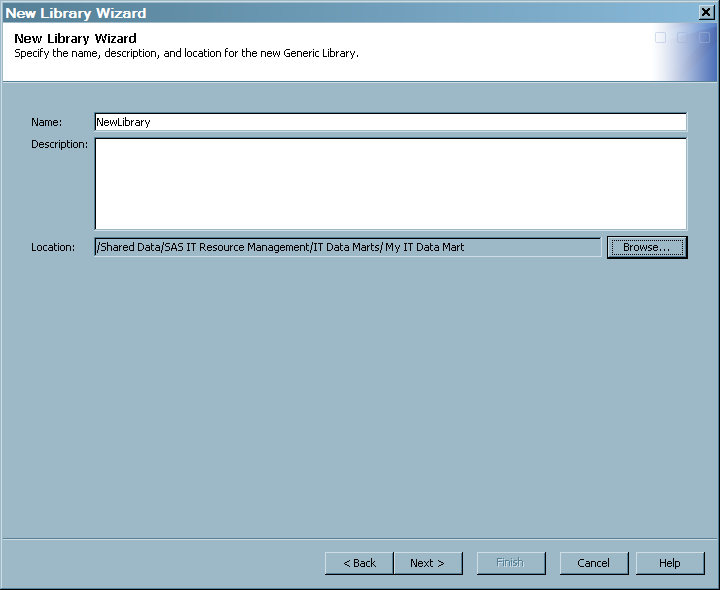
The data from one of these databases is input directly into the Adapter Setup wizard. You can set up the library that points to the database in SAS IT Resource Management or in SAS Management Console. After the library is defined, it can be specified as the input database to the appropriate staging transformation.
  • To use the SAS IT Resource Management client to define the library that points to the database, follow the instructions in the section called Registering SAS Libraries in the "Getting Started” chapter of the SAS Data Integration Studio: User’s Guide. (SAS IT Resource Management uses many features, including registering SAS libraries, that are provided by SAS Data Integration Studio.)
    Note: You do not need to specify the metadata for all tables that you want to access in the library. When the staging transformation runs, it specifies the metadata for the tables automatically.
  • To use SAS Management Console to define the library that points to the database, follow the instructions that are documented in the “Connecting to Common Data Sources” chapter of the SAS Intelligence Platform: Data Administration Guide.

Duplicate-Data Checking for Database Adapters

The staging transformations for the SAP ERP, HP Reporter, MS SCOM, and VMware adapters do not provide a parameter for duplicate-data checking. Duplicate-data checking is always enabled for these adapters.
However, if you want to backload data for HP Reporter, MS SCOM, and VMware staged tables that are added to the PFD after the staging job has already run once, you can override the default action of subsetting the incoming data based on the duplicate-data control data sets. To do so, set the macro variables ITRM_LoadFromDate and ITRM_LoadToDate to valid start and end datetime values. Then, this datetime range will be used to subset the data from the database instead of the ranges in the duplicate data control data sets.
%let ITRM_loadFromDate=14FEB2010:00:00:00; 
%let ITRM_loadToDate=15FEB2010:23:59:00;
Note: When these macro variables are used with the VMware adapter, you must specify the values for these macro variables in Coordinated Universal Time (UTC). (UTC time is the same as Greenwich Mean Time (GMT).)

Notes about Accessing HP Reporter Data

HP Reporter, formerly HP OpenView Reporter, captures enterprise systems management measurement data from Windows systems and many UNIX variants such as HP-UX, SunOS Solaris, IBM AIX, Tru 64 UNIX, and Linux.
For information about the performance areas that are collected by HP Reporter, see HP Perf Agent and HP Reporter Adapters.
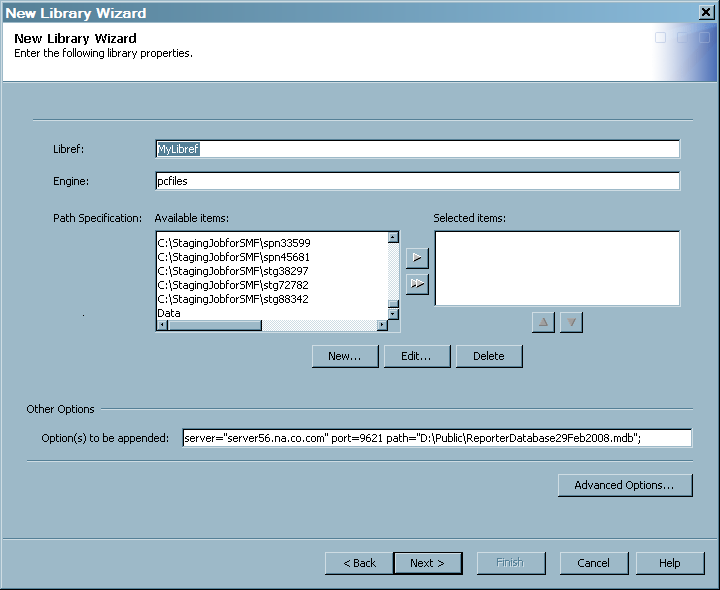
If the HP Reporter raw data is in a Microsoft Access database and the SAS IT Resource Management server tier is on a 64-bit Windows machine, you need to set up a PC files library. To do so, perform the following steps:
  1. Log on to SAS Management Console as an unrestricted user.
    To access SAS Management Console, from your Windows desktop, select Startthen selectProgramsthen selectSASthen selectSAS Management Console.
  2. Navigate to the Data Library Manager.
  3. Right-click Libraries and select New Library from the drop-down list. The New Library Wizard opens.
    As shown in the following display, select Generic Library from the list of Resource Templates.
    New Library Wizard
    New Library Wizard
  4. On the next page of the wizard, enter the name of the new library. Use the Browse button to display the list of folders from which you can select the Location that you want to use for your library.
    Enter Identifying Information for the New Library
    Identify the Library
  5. On the next page of the wizard, from the list of available servers select SASITRM.
  6. On the next page, specify the fields as shown in the following display.
    Enter Information for the Libref
    Enter Information for the Libref
    • In the Libref field, enter the name by which you want to refer to the new library.
    • In the Engine field, enter pcfiles.
    • In the Option(s) to be appended field, enter the specifications for the server, port, and path.
      The following example shows how to enter these specifications.
      server="server56.na.co.com" port=9621 path="D:\Public\ReporterDatabase29Feb2008.mdb";
    Note: You do not need to specify a path in the Path Specification box. The path should be entered in the Option(s) to be appended field, as shown in the preceding code fragment.
  7. Click Next and then Finish to create the new library.

Notes about Loading Tasks and Events Data for VMware

Limiting the Data in the Events and Tasks Staged Table

Tip
Users should take care when staging the VMware Tasks and Events tables due to the potentially huge amount of data that exists in the input database for these tables.
The table in the vCenter database that contains data for the Events staged table contains a record for each event that is the result of a task or alarm in vCenter. The table in the vCenter database that contains data for the Tasks staged table contains a record for each task (power on or off of a virtual machine, alarm created, and so on) that occurs in vCenter. To limit the potential for large amounts of data for these two tables, you can do either one of the following precautions:
  • Define a datetime range for which data should be loaded for each of these staged tables.
  • Specify the last number of days for which data should be loaded for each of these tables.

Limiting the VMware Data in the Events Table

If the Events staged table is added to a VMware vCenter staging job, do one of the following two procedures:
  • To define a datetime range for which data should be loaded for each of these staged tables, edit the generated code for the staging job by adding the following code:
    %let ITRM_LoadEventsFromDate = <start-datetime>;
    %let ITRM_LoadEventsToDate = <end-datetime>;
    For example,
    %let ITRM_LoadEventsFromDate = 12APR2010:00:00; 
    %let ITRM_LoadEventsToDate = 13APR2010:00:00;  
    By setting these two macro variables to a valid datetime range, the staging job would load data for the Events table that falls within the specified range.
  • To specify the last number of days for which data should be loaded for each of these tables, edit the generated code for the staging job by adding the following code:
    %let ITRM_LoadEventsForDays = <number-of-days>;
    For example,
    %let ITRM_LoadEventsForDays = 3;
    By setting this macro variable to a valid positive integer, the staging job loads data for the Events table for the last number of days that you specified. In the preceding example, the staging job populates the Events staged table with data for the last three days.
Note: Specify the values for these macro variables in Coordinated Universal Time (UTC). (UTC time is the same as Greenwich Mean Time (GMT).)

Limiting the VMware Data in the Tasks Table

If the Tasks staged table is added to a VMware vCenter staging job, do one of the two following procedures:
  • To define a datetime range for which data should be loaded for each of these staged tables, edit the generated code for the staging job by adding the following code:
    %let ITRM_LoadTasksFromDate = <start-datetime>;
    %let ITRM_LoadTasksToDate = <end-datetime>;
    For example,
    %let ITRM_LoadTasksFromDate = 12APR2010:00:00;  
    %let ITRM_LoadTasksToDate = 13APR2010:00:00; 
    By setting these two macro variables to a valid datetime range, the staging job would load data for the Tasks table that falls within the specified range.
  • To specify the last number of days for which data should be loaded for each of these tables, edit the generated code for the staging job by adding the following code:
    %let ITRM_LoadTasksForDays = <number-of-days>;
    For example,
    %let ITRM_LoadTasksForDays = 3;
    By setting this macro variable to a valid positive integer, the staging job loads data for the Tasks table for the last number of days that you specify. In the preceding example, the staging job populates the Tasks staged table with data for the last three days.
Note: Specify the values for these macro variables in Coordinated Universal Time (UTC). (UTC time is the same as Greenwich Mean Time (GMT).)

Working with the VMware Lookup Table

How to Set Up the VMware Lookup Table

The VMware adapter provides a SAS data table that enables you to provide memory specifications for the hosts in your environment. This table is located by default in the SASHELP library, and contains no data. If you want to use this table to provide memory information, perform the following steps:
  1. Locate, or create, the IT data mart that you want to use for staging VMware data.
  2. Locate the Administrative folder. Right-click the library within that folder. (The library is called Admin nnnnn, where nnnnn is a random number that was generated when the IT data mart was created.)
    Select View Libname.
  3. Select the entire LIBNAME statement in the displayed box. Then right-click the LIBNAME statement and select Copy.
  4. Launch an interactive session of SAS. Use the Paste function to paste the LIBNAME statement into an Editor window.
  5. Submit the LIBNAME statement.
  6. In the Explorer window, locate the SAS data table called ITMS_VMware_HostMemory by drilling down into the SASHELP library.
  7. Use the Copy and Paste functions to copy this table to the Admin nnnnn library.
  8. Now you can edit the table that you copied to the Admin nnnnn library. To do so, use VIEWTABLE to add and update rows. (To access VIEWTABLE, double-click the table in the Explorer window.)
The ITMS_VMware_HostMemory lookup table has the following six columns:
  • Cluster
    name of the cluster.
  • Host
    name of the host.
  • EsxHostTotalRam
    the total amount of physical RAM in the ESX host machine that is seen by VMware ESX.
  • EsxHostSystemRam
    the total amount of RAM that is allocated to the VMkernel. This amount does not include virtualization overhead. This amount is the fixed amount of RAM that is available based on the host's total RAM.
  • EsxHostVirtualMachinesRam
    the total amount of RAM that is configured for the Service Console.
  • EsxHostServiceConsoleRam
    the amount of physical memory that is remaining for virtualization. This value is calculated by subtracting the Service Console memory and the System Memory from the total amount of RAM in the host.
The value in the cluster column should be the name of the cluster and the value in the host column should be the name of the host for this observation. (Case does matter. The names in the Host column should match the names in vCenter up to the first period. For example, Machine.abcdefg.company.com should be listed as Machine.) You can also update this table programmatically if it has the correct columns, as described previously.
When this table is populated and you run the staging code, the columns EsxHostTotalRam, EsxHostSystemRam, EsxHostVirtualMachinesRam, and EsxHostServiceConsoleRam in the HostSystem staged table will have with the correct values from the lookup table. If values for the memory metrics are not provided for a cluster and host, then those variables are set to missing values for that cluster and host. If the lookup table does not exist in the ADMIN library or is empty, then all values for the four mentioned memory variables are set to missing.
Note: If the lookup table does not exist in the ADMIN library or is empty, the HA and DRS supplied reports that depend on the EsxHostTotalRam, EsxHostSystemRam, EsxHostVirtualMachinesRam, and EsxHostServiceConsoleRam metrics will not provide useful reports.

How to Populate the VMware Lookup Table

The Virtual Center (vSphere Client) contains information that can be used to load the VMware lookup table. To populate the VMware lookup table, perform the following steps:
  1. Log on to the VMware vSphere Client.
  2. In the menu bar, select Inventorythen selectHost & Clusters. The name of each cluster is displayed in the left panel next to the symbol Cluster Icon.
  3. For each cluster that is listed, perform steps 4 and 5.
  4. Click the + to expand the contents of the cluster. All the hosts that are associated with that cluster are listed.
  5. For each host that is listed, perform the following steps:
    1. Click the name of the host. The Host Details page opens in the right pane. In the right pane, click the Configuration tab.
      Host Details Page of VMware vSphere Client
      Host Details Page of VMware vSphere Client
    2. In the Hardware section, click Memory. The four memory values are displayed. Enter the four values for the appropriate host in the VMware lookup table as follows:
      • Copy and paste the Total value into the EsxHostTotalRam column.
      • Copy and paste the System value into the EsxHostSystemRam column.
      • Copy and paste the Virtual Machines value into the EsxHostVirtualMachinesRam column.
      • Copy and paste the Service Console value into the EsxHostServiceConsoleRam column.

Accessing Raw Data for SAP ERP

Preparing SAP ERP Data for SAS IT Resource Management

Enterprise Resource Planning (ERP) Software from SAP (formerly SAP R/3), via the SAS IT Management Adapter for SAP, collects SAP ERP and SAP Business Warehouse (BW) workload performance measurements. The SAS server that is used to run the batch ETL work for SAS IT Resource Management can also run the Remote Function Call (RFC) server. The SAP Advanced Business Application Programming (ABAP) code that is executed on the SAP system sends the requested data to the RFC server. The data is stored on that RFC server or on a disk drive that can be accessed on the network.
To enable this communications process, perform the tasks that are listed in the following topics.

Install the Components of ITM Adapter for SAP ERP

Part of the server installation includes transport files that must be moved to the SAP system and installed there. These files include the ABAP programs that enable the extraction of the performance data. For information about how to install these files, see the SAS IT Management Adapter for SAP: User’s Guide.
The SAS server installation process also installs the sasrfc_server and sasrfc_serveru executable programs into the SAS tree at !sasroot\access\sasexe. One or both of these programs should be installed as Windows services in order to create the RFC server. The sasrfc_serveru executable is to be used when the SAP ERP system is running in Unicode.
The SAS client installation includes the itmadaptsapc component, which contains the itmadaptsap.spk file. When this file is imported into SAS Data Integration Studio, it contains all the sample jobs that are required to set up and extract the SAP performance data. The client installation also includes plug-ins for SAS Data Integration Studio and SAS Management Console.

Establish Communications between SAS and SAP

To establish communications between SAS and SAP, perform the following steps:
  1. Set up an RFC connection on the SAP system.
    The SAP administrator should use transaction SM59 to create an RFC Connection to enable communication to your RFC server. Select a TCP connection and enter a meaningful description. For ease of identification, select "Registered Server Program" with a program ID that matches the RFC name. If the SAP system is running in Unicode, ensure that the Unicode flag is set.
  2. Create a program variant on the SAP system.
    The SAP administrator should use transaction SA38 to create a variant for program /SAS/Z_SAS_READ and update the parameters that are passed to the ABAP programs.
    • To facilitate identification, name the program variant after the RFC server.
    • For the G_BUFMAX parameter, enter 100000.
    • For the G_DEST parameter, enter the RFC server name.
  3. Configure Windows services to create the RFC server. To start the RFC server, use the following type of command: sasrfc_server -i2 -V <variant-name> -n "<name>,<description>" -p <port_number> where
    • variant_name is the name of the variant of the SA38 transaction that you assigned in step 2.
    • name is a name that you can choose for the service.
    • description is a description that you can choose for the service. This description field displays as the name of the service when you display the list of services on the Services window. You can access services by selecting Windowsthen select Control Panel then selectServices.
    • port_number is the port number that you have assigned. The default port number is 6999.
    Note: If the SAP system is running in Unicode, change the command so that it refers to the Unicode version instead:
    sasrfc_serveru -i2 -V <variant-name> -n "<name>,<description>" -p <port_number>
    If a mixture of Unicode and non-Unicode servers is running, install both services, but assign them to different ports.
  4. Test the connectivity between your SAS session and the SAP system by using the RFC server that you started in step 3. Start SAS and submit the following code:
    libname mysap r3 user=<sap_userid> password=<sap_password> client=800
            ashost=<sap_application_server_hostname> sysnr=<sap_system_number>
            host=<rfc_server_host> port=<port_number> batch=Y;
    data work.t000;
    set mysap.t000;
    run;
    libname mysap clear; 
    where
    • sap_userid and sap_password are the user ID and password, respectively, that are associated with the SAP system.
    • sap_application_server_hostname is the host name of the SAP system.
    • sap_system_number is the system number of the SAP system.
    • rfc_server_host is the host name of the server that is running the RFC service.
      Note: This value is typically localhost.
    • port_number is the assigned port number to be used.

Create SAS Metadata Objects Using SAS Management Console

To create SAS metadata server objects that represent SAP systems, authentication domains, and data libraries, perform the following steps:
  1. Invoke SAS Management Console.
  2. From the File menu, select Connection Profile. Then connect to the profile that is being used for SAS IT Resource Management. In the Repository field, select Foundation.
  3. Add an SAP authentication domain for the user ID that you want to be used to access the SAP system. To do this, open the User Manager, right-click the user ID and select Properties. On the Accounts tab, click New to add a new domain for SAP authentication. If you have multiple SAP systems with different user IDs or passwords, add one authentication domain per unique user ID and password pair.
  4. Define new SAP servers, one for each SAP system. To do this task, perform the following steps:
    1. Right-click the Server Manager.
    2. Select New Server to invoke the New Server wizard.
    3. From the list of Resource Templates, select SAP Server.
    4. On the next page, enter a name for the server and a description. The description is optional.
    5. On the page that displays server properties, accept the default values.
    6. On the page that displays connection properties, enter the requested information in the following fields:
      • Authentication Domain: select the appropriate authentication domain that was specified in step 3.
      • Client: enter the appropriate client. (This value is typically 800.)
      • Language: enter the appropriate language. (This value is typically EN.)
    7. In the Select Connection Type part of the page, click the Application Server radio button, and select Options. The Application Server Options dialog box appears.
    8. In the Application Server Host field, enter the name of the SAP application server host.
    9. In the System Number field, enter the system number. Click OK.
    10. Select Advanced Options. In the Advanced Options dialog box, select RFC Server Batch Mode. Then click OK. Click Next to display the information that you specified for this server.
    Note: Repeat step 4 in this task for each SAP system. If you have different pairs of user IDs and passwords for the SAP systems, repeat step 3 to ensure that you are using the correct authentication domain for each system.
  5. Define new SAP libraries that represent the newly defined SAP servers. To do this task, perform the following steps:
    1. In SAS Management Console, expand the entry for the Data Library Manager.
    2. Right-click Libraries.
    3. Select New Library to invoke the New Library wizard.
    4. Select SAP Library and click Next.
    5. Enter the name and a description for the new library. The description is optional.
    6. On the Select SAS Server page, select the SAS application server where this library is to be assigned. (This server is typically SASITRM).
    7. On the next page, enter a unique libref and click Next.
    8. On the next page, select a database server.
      (If you want to define a new server, click New and follow the instructions in step 4.
      Click Next to display the specifications for your library.
    9. Click Finish.
  6. Create two Base SAS Engine libraries to hold the extracted raw data and other administrative data. To create the libraries, perform the following steps:
    1. In SAS Management Console, expand the Data Library Manager node.
    2. Right-click Libraries.
    3. Select New Library to invoke the New Library wizard.
    4. Select SAS Base Library.
    5. Enter the name and a description for the new library. The description is optional.
    6. On the Select SAS Server page, select the SAS application server where this library is to be assigned. (The server that is typically assigned is SASITRM.)
    7. On the next page, enter a unique libref, such as rawdata or sapadmin.
    8. In the Path Specification part of the page, select a path for the data library. Alternatively, click New to create a new data library.
    9. Click Next to display the specifications for the library that you defined.
    10. Click Finish to create the library that you defined.

Configure Sample Data Extraction Jobs Using SAS Data Integration Studio

To configure sample jobs that extract the SAP ERP data, perform the following steps:
  1. Start SAS IT Resource Management.
  2. Select Filethen selectImportthen selectMetadata to invoke the Import Metadata Wizard. (You might be prompted to enter the location of your SAS License file.) When prompted by the wizard, enter the following information:
    • Enter the name of the SAS package file to be imported: itmadaptsap.spk.
    • Enter the location where the SAS package was installed: c:\program files\SAS\SASITMAdapterSAP\3.21\ETLComponentsPackage. (This location is the default location for the installation of the SAS package file.)
    • Clear the Include access controls check box.
    • Select the option to import All Objects.
    • Select the SAS application server where this library is to be assigned. (The server that is typically assigned is SASMain.)
    • In the Library field, enter the SAP library that was defined in the previous step.
    • In the fields for the physical locations of the administrative data and the raw data, enter the locations that were created in step 6 of the task called “Create SAS Metadata Objects Using SAS Management Console.”
    Select Finish to create a folder called ITM Adapter 3.1 for SAP.
  3. Each sample job is used to achieve a particular step. Samples are provided for scenarios with single SAP servers and multiple SAP servers, so be sure to select the appropriate sample for your environment. Copy and paste only the sample jobs that you need. These sample jobs were installed into the Jobs folder in the IT data mart that is designated for the SAP adapter when the Metadata Import Wizard ran in step 2.
    Note: The following two SAS options should be added to the SAS config file or to the individual adapter batch jobs when they are executed on a z/OS workspace server:
    options nocardimage; 	            options linesize= 300 ;
    The following scenario describes the jobs that handle multiple SAP servers:
    • Use 0010B Step 1 Select SAP Servers to identify multiple SAP servers from which you want to extract performance data. Using the Custom View, locate the Shared Data folder in the Foundation repository. Then, locate the SAP Server Library that you defined in SAS Management Console. Drag that library onto the drop zone labeled "Place library here" in the Process Editor window. Repeat for as many libraries as you defined.
    • Use the job named 0020 Step 2 Suggest Destinations for Selected SAP Servers to extract host information from those SAP servers.
    • Use the job named 0030 Step 3 Create Final List of Servers and Destinations to check for duplicate servers and release compatibility.
    • Use the job named 0040 Step 4 Create Mapping for SAP Program types to create a mapping table of SAP programs to applications.
    • Use the job named 0110A Extract Default SAP Performance Data to actually extract the SAP performance data.
    Note: This job is the only one that you should have to deploy or schedule. It extracts the SAP ERP performance data and stores it in the rawdata SAS library. Make sure it is run on a regular basis, often enough to ensure that you lose no performance data. (Some sites run it as frequently as every hour.) This job writes to the rawdata library, appending data each time it is run, so that no data is overwritten.
  4. The rawdata library must be specified as the input rawdata library to the SAP ERP staging transformation. The ETL job that this transformation generates reads the rawdata library into the IT data mart. However, it does not clear the contents of the rawdata library.
    Recommendation: Automate a backup job that copies the rawdata library to an archive location and then empty the rawdata library before the execution of the next extraction job.
Note: For more detailed information about these tasks, see the SAS IT Management Adapter for SAP: User’s Guide.
For information about the performance areas that are collected by SAP ERP, see SAPR3 Adapter - Systems, Machines, Tasks, and Transactions and SAPR3 Adapter - SAPBTCH (Batch Job) and SAPWKLD (Workload).