Importing, Exporting, and Promoting Metadata
About Importing, Exporting, and Promoting Metadata
SAS IT Resource Management
metadata objects are managed as all other SAS metadata objects are
managed. The SAS Intelligence Platform provides several tools to assist
you in copying, promoting, importing, and exporting your metadata.
For information about how metadata can be managed, see the “Using
the Promotion Tools” chapter in the SAS Intelligence
Platform: Data Administration Guide.
Note: SAS IT Resource Management
does not support the exporting or importing IT data marts that contain
duplicate named items, even if those items are in different folders.
If you want to export (and then import) IT data marts that contain
duplicate items, you should first export (and then import) the IT
data mart without including its dependent objects. After that, as
subsequent steps, you can export (and then import) each separate first-level
subfolder including its dependent objects.
About Promoting an IT Data Mart
The IT data mart object
is unique to SAS IT Resource Management and enables you to perform
actions on the whole IT data mart. One of these actions is the ability
to promote the IT data mart by means of the import and export tools.
These tools enable you to move the definition of an IT data mart from
one metadata server to another. For example, you might want to move
(or promote) an IT data mart for one of the following reasons:
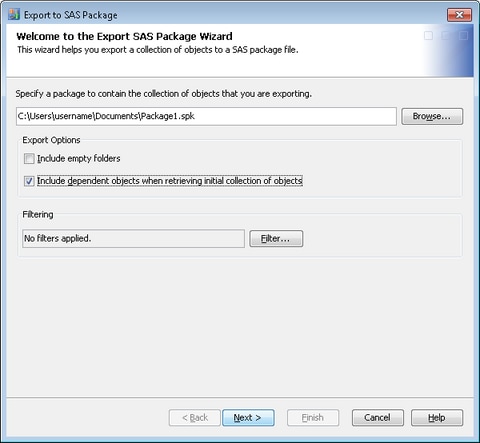
How to Export an IT Data Mart
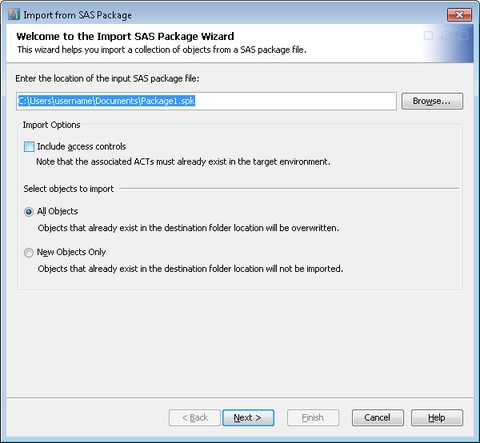
How to Import an IT Data Mart
If the exported IT data
mart contains any staging jobs whose rawdata input is a database,
the Import wizard might require you to select
a library to which the exported library can map. If the library that
points to the input database is located within the IT data mart that
is being promoted, then you will not be required to specify a new
library definition.
In addition, if the
exported IT data mart contains any staging jobs whose rawdata input
is a database, the Import from SAS Package wizard will require you to select a database server definition.
This database server is associated with the library that is specified
on the staging job as rawdata. If you want to work with a database
server definition that does not exist, you must create one. For information
about how to register a database server, see the “Connecting
to Common Data Sources” topic in the SAS Intelligence
Platform: Data Administration Guide.
Tip
If you need to specify either
a library or a database server, do so before you invoke the Import from SAS Package wizard.
For best results, make
sure that the name of the IT data mart that you are importing is unique
within the metadata server. If the metadata server already contains
an IT data mart with the same name as the one being imported, the
name of the IT data mart is automatically changed to “Copy
of <original-name>”
or, if that name is already in use, “Copy n of <original-name>” .
Note: You might be importing the
IT data mart to a machine that is running a different version of SAS
IT Resource Management from the one where the source data mart resides.
Similarly, you might be importing the IT data mart to a different
machine from the one where the source IT data mart resides. In either
case, any deployed jobs within the imported data mart on the target
system should be deleted and then deployed again. You should not redeploy
them.
-
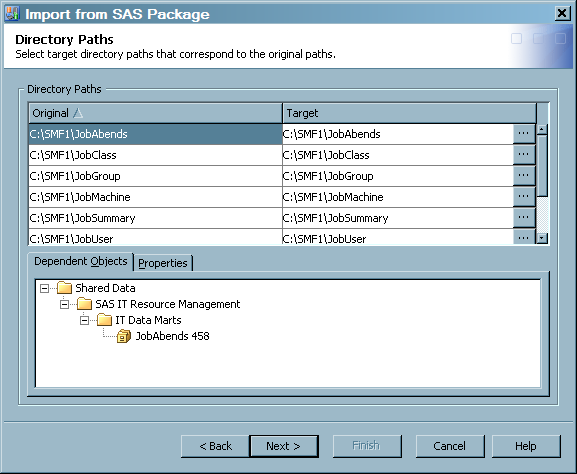
The next page of the Import from SAS Package Wizard displays a note that explains that you might need to create metadata definitions for some of the objects that you want to import. For example, libraries that are associated with tables must be created before the import process is started. You can create a new library definition with the New Library wizard. To access this wizard from the SAS IT Resource Management client menu bar, select File
 NewLibrary. Respond to the prompts of the wizard as needed. In
addition, some adapters (such as MS SCOM, SNMP, or VMware) have a
raw data source that is a database. If an IT data mart contains that
type of adapter, then a database server definition must be created
that points to that database. For information about how to create
a database server definition, see the “Overview of Common Data
Sources” chapter in the SAS Intelligence Platform:
Data Administration Guide
at http://support.sas.com/documentation/onlinedoc/intellplatform/index.html. In the topic that discusses your database, you can find
the section called “Register the Database Server.”
NewLibrary. Respond to the prompts of the wizard as needed. In
addition, some adapters (such as MS SCOM, SNMP, or VMware) have a
raw data source that is a database. If an IT data mart contains that
type of adapter, then a database server definition must be created
that points to that database. For information about how to create
a database server definition, see the “Overview of Common Data
Sources” chapter in the SAS Intelligence Platform:
Data Administration Guide
at http://support.sas.com/documentation/onlinedoc/intellplatform/index.html. In the topic that discusses your database, you can find
the section called “Register the Database Server.”