Creating and Editing Data
The following steps describe how to enter data into a data table. The data in this example are quarterly sales for two employees, June and Bob.
-
Create a new data set by selecting → → from the main menu.
The New Data Set dialog box appears so that you can create the first variable.
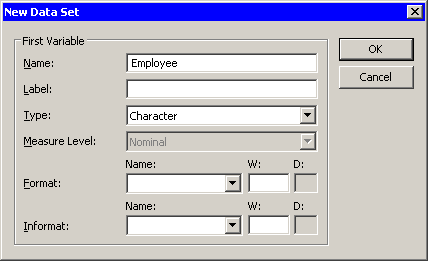
The first variable will contain the name of the sales staff, so you must specify a valid SAS variable name. Fill in the dialog box as follows (see Figure 3.1):
a In the Name field, type
Employee.b In the field, select .
c Click .
-
Create a new variable by selecting → → from the main menu.
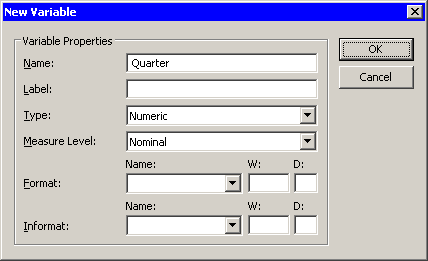
The second variable will indicate the quarter of the financial year for which sales are recorded. Because the only valid values for this numeric variable are the discrete integers 1–4, you specify the measure level as nominal. Fill in the dialog box as follows (see Figure 3.2):
a Type
Quarterin the Name field.b Select from the menu.
c Click .
-
Create a third variable by selecting → → from the main menu.
The third variable will contain the revenue, in thousands of dollars, for each salesperson for each financial quarter.
Fill in the dialog box as follows (see Figure 3.3):
a Type
Salesin the Name field.b In the Label field, type
Sales (Thousands).c In the list, select . Type
4in the W field. -
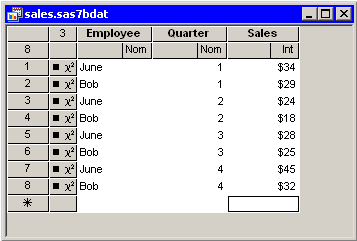
Now you can enter the data shown in Table 3.1 as observations for each variable. Notice that the new data set was created with one observation that contains a missing value for each variable. (A missing values for a numerical variable is displayed as a dot.) Type the first observation in the first row.
When you enter data in the data table row marked with an asterisk (
 ), a new row is created. When you are entering (or editing) data, the ENTER key takes you down to the next observation. The
TAB key moves the active cell to the right, whereas holding down the SHIFT key and pressing TAB moves the active cell to the
left. You can also use the keyboard arrow keys to navigate the cells of the data table.
), a new row is created. When you are entering (or editing) data, the ENTER key takes you down to the next observation. The
TAB key moves the active cell to the right, whereas holding down the SHIFT key and pressing TAB moves the active cell to the
left. You can also use the keyboard arrow keys to navigate the cells of the data table.
Table 3.1: Sample Data
Employee
Quarter
Sales
June
1
34
Bob
1
29
June
2
24
Bob
2
18
June
3
28
Bob
3
25
June
4
45
Bob
4
32
Note: When you enter the data for the
Salesvariable, do not type the dollar sign. The actual data is , but because the variable has a DOLLAR4. format, the data table displays a dollar sign in each cell.
The data table looks like the table in Figure 3.4.
-
Select → from the main menu. Navigate to the
Data Setssubdirectory of your personal files directory and save the file assales.sas7bdat.Note: The default location of the personal files directory is given in the The Personal Files Directory section in Chapter 34: Configuring the SAS/IML Studio Interface. When you want to open your data later, you can select → → from the main menu. The dialog box that appears has a button near the bottom that says . For this reason, it is convenient to save data in your personal files directory.