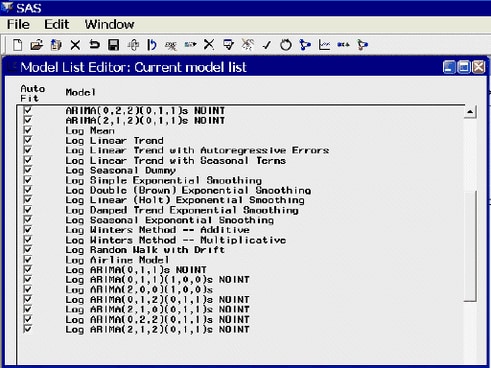
Model Selection List Editor Window
Use the Model Selection List Editor window to edit the model selection list, including adding your own custom models, and to specify which models in the list are to be used in the automatic fitting process. Access it from the Options menu in the Develop Models, Automatic Model Fitting window, Produce Forecasts, and Manage Projects windows.
The window initially displays the current model list for your project. You can modify this set of models in several ways:
Open one or more alternate model lists to replace or append to the current model list. These can be either model lists included with the software or model lists previously saved by you or other users.
Turn the autofit option on or off for individual models. Those that are not flagged for autofit will be available by using the Models to Fit window but not by using automatic model fitting.
Delete models from the list that are not needed for your project.
Reorder the models in the list.
Edit models in the list.
Create a new empty list.
Add new models to the list.
Having modified the current model list, you can save it for future use in several ways:
Save it in a catalog so it can be opened later in the Model Selection List Editor.
Save it as the user default to be used automatically when new projects are created.
Select close to close the Model Selection List Editor and attach the modified model selection list to the current project.
Select cancel to close the Model Selection List Editor without changing the current project’s model selection list.
Since model selection lists are not bound to specific data sources, care must be taken when including data-specific features such as interventions and regressors. When you add an ARIMA, Factored ARIMA, or Custom model to the list, you can add regressors by selecting from the variables in the current data set. If there is no current data set, you will be prompted to specify a data set so you can select regressors from the series it contains.
If you use a model list that has models with a particular regressor name on a data set that does not contain a series of that name, model fitting will fail. However, you can make global changes to the regressor names in the model list by using Set regressor names. For example, you might use the list of dynamic regression models found in the sashelp.forcast catalog. It uses the regressor name "price." If your regessor series is named "x," you can specify "price" as the current regressor name and "x" as the "change to" name. The change will be applied to all models in the list that contain the specified regressor name.
Interventions cannot be defined for models defined from the Model Selection List Editor. However, you can define interventions by using the Intervention Specification Window and apply them to your models by turning on the Include Interventions option.
Auto Fit
The auto fit column of check boxes enables you to eliminate some of the models from being used in the automatic fitting process without having to delete them from the list. By default, all models are checked, meaning that they are all used for automatic fitting.
Model
This column displays the descriptions of all models in the model selection list. You can select one or more models by clicking them. Selected models are highlighted and become the object of the actions Edit, Move, and Delete.
Menu Bar
- File
-
- New
creates a new empty model selection list.- Open
opens a dialog for selecting one or more existing model selection lists to open. If you select multiple lists, they are all opened at once as a concatenated list. This helps you build large specialized model lists quickly by mixing and matching various existing lists such as the various ARIMA model lists included in SASHELP.FORCAST. By default, the lists you open replace the current model list. Select the "append" radio button if you want to append them to the current model list.- Open System Default
opens the default model list supplied with the product.- Cancel
exits the window without applying any changes to the current project’s model selection list.- Close
closes the window and applies any changes made to the project’s model selection list.- Save
opens a dialog for saving the edited model selection list in a catalog of your choice.- Save as User Default
saves your edited model list as a default list for new projects. The location of this saved list is shown on the message line. When you create new projects, the system searches for this model list and uses it if it is found. If it is not found, the system uses the original default model list supplied with the product.
- Edit
-
- Reset
restores the list to its initial state when the window was invoked.- Add Model
enables you to add new models to the selection list. You can use the Smoothing Model Specification window, the ARIMA Model Specification window, the Factored ARIMA Model Specification window, or the Custom Model Specification window.- Edit Selected
opens the appropriate model specification window for changing the attributes of the highlighted model and adding the modified model to the selection list. The original model is not deleted.- Move Selected
enables you to reorder the models in the list. Select one or more models, then select Move Selected from the menu or toolbar. A note appears on the message line: "Select the row after which the selected models are to be moved." Then select any unhighlighted row in the table. The selected models will be moved after this row.- Delete
deletes any highlighted models from the list. This item is not available if no models are selected.- Set Regressor Names
opens a dialog for changing all occurrences of a given regressor name in the models of the current model selection list to a name that you specify.- Select All
selects all models in the list.- Clear Selections
deselects all models in the list.- Select All for Autofit
checks the autofit check boxes of all models in the list.- Clear Autofit Selections
deselects the autofit check boxes of all models in the list.
Mouse Button Actions
Clicking any model description in the table selects (highlights) that model. Clicking the same model again deselects it. Multiple selections are allowed.
Clicking the auto fit check box in any row toggles the associated model’s eligibility for use in automatic model fitting.
Right-clicking the right mouse button opens a pop-up menu.