Loading a Dimension Table with Type 1 Updates
Problem
You want to load a dimension table using type 1 updates. You need to generate a surrogate key for each target row and optimize performance for large source tables.
Solution
You can create a job that includes the SCD Type 1 Loader transformation. The SCD Type 1 Loader transformation
supports either a direct in-memory lookup (hash object) or a sequential disk-based
lookup (DATA step merge). The hash lookup method offers better performance than the
DATA step merge lookup method, but it requires that the entire cross-reference table fit into system memory. If sufficient system memory is not available, the DATA step
merge lookup method can be used instead.
The sample job uses the direct lookup method. For information about the data merge
method, see Use a Sequential Data Merge.
Perform the following
tasks:
Tasks
Create and Populate the Job
Perform the following
steps to create and populate the job:
-
Create an empty SAS Data Integration Studio job.
-
Drag the SCD Type 1 Loader transformation to the Diagram tab of the job.
-
Locate a source table for the job, such as CUSTOMER_DAY1. Drag it to the left side of the Diagram tab of the job.
-
Drag the cursor from the source table output of the SCD Type 1 Loader transformation to the source table. This action connects the transformation to the table.
-
Locate a target table for the job, such as CUSTOMER_TARGET.
-
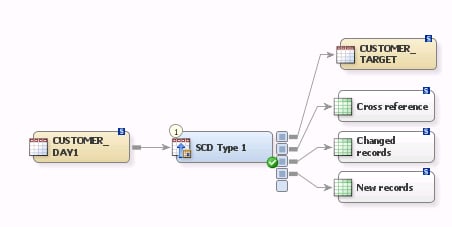
Drag the cursor from the target table output of the SCD Type 1 Loader transformation to the target table. This action connects the transformation to the table.The following display shows the completed process flow:SCD Type 1 Loader Process Flow
Configure the Job
Perform the following
steps to configure the job:
-
Open the properties window for the SCD Type 1 Loader transformation and select the Keys tab.
-
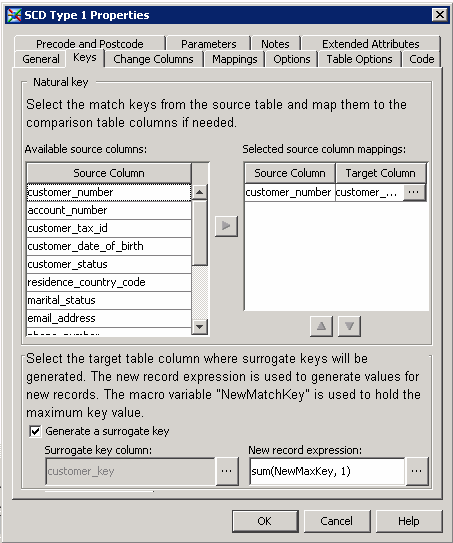
Select the match keys for your job in the Available source columns field and move them to the Selected source column mappings field. The sample job uses the column representing the customer number for each record. If necessary, you can map these columns to the appropriate target table columns on the Mappings tab.
-
Select the Generate a surrogate key check box. Use the browse button to enter the column in the target table that you will use as your surrogate key into the Surrogate key column field. The optional surrogate key ensures that each record is uniquely identified. The surrogate key is calculated in the expression found in the New record expression field. If you need to define the max key used in this expression, click Define Max Key.The Keys tab is shown in the following display:Keys Tab
-
Click Change Columns to select the change columns for your job.
-
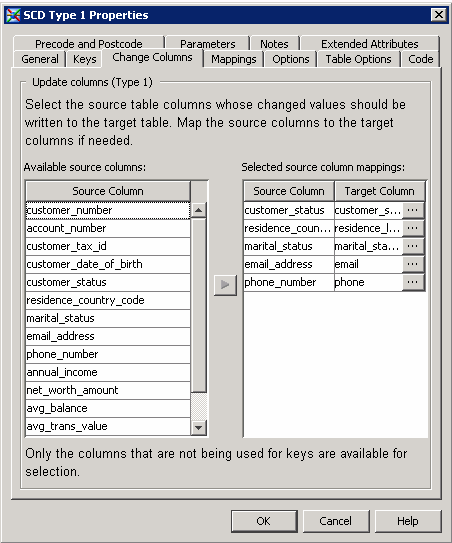
Select the change columns for your job in the Available source columns field and move them to the Selected source column mappings field. The sample job uses the columns shown in the following display:Change Columns Tab
 If necessary, you can map these columns to the appropriate target table columns on the Mappings tab.
 -
Click Options. Set the Use direct lookup (hash table) option in the General category to Yes. This setting ensures that the SCD Type 1 Loader transformation will use the hash lookup method, which enhances processing performance. Note that you can also adjust the hash object’s internal table size. Selecting the appropriate value can result in significant performance increases. The internal table size for the sample job is set to 10.The value of HASHEXP is used as a power-of-two exponent to create the hash table size. For example, a value of 4 for HASHEXP equates to a hash table size of 24, or 16. The maximum value for HASHEXP is 20. You should specify the hash table size relative to the amount of data in the hash object in order to maximize the efficiency of the hash object lookup routines. Try different HASHEXP values until you get the best result.Note: If your source tables contain any duplicate business keys, remove the keys before you use the hash lookup method by adding a Sort transformation between each source and the transformation. If the source table does not contain duplicate business keys, a sort is not required. A sort is always required, however, when a DATA step merge lookup is performed. Finally, the cross-reference table should be redirected to a register library to improve performance. This approach prevents you from having to recreate the change-digest for each record in the target table on each job execution.
-
Click OK to save the properties for the transformation.Note that you can save the temporary output tables for cross references, changed records, and new records that are attached to the SCD Type 1 Loader transformation. This approach creates permanent tables to collect these outputs. Right-click each table and click Register Table. Then, use the Register Table window to perform the registration.You should not delete these temporary output tables and replace them with previously registered tables. In addition, you should always wait until after you have performed the following SCD configuration steps:
-
adding natural and surrogate keys
-
selecting surrogate keys and a lookup table
-
connecting the target table
-
selecting change columns
-
selecting a last-update column in the Last update date field in the General section on the Options tab
-
selecting a create data in the Load time column field in the Additional Loader Options section on the Options tab
-
Run the Job and View the Output
Perform the following
steps to run the job and view the output:
-
Right-click on an empty area of the job, and click Run in the pop-up menu. SAS Data Integration Studio generates code for the job and submits it to the SAS Application Server for execution.
-
If error messages are displayed on the Status tab, read and respond to the messages as needed.
-
If the job completes successfully, you can review the output. Right-click the target table and click Open in the pop-up menu.
-
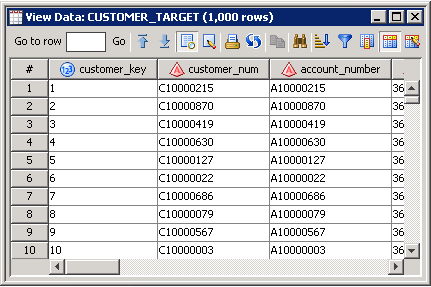
Review the output displayed in the View Data window for the target table, as shown in the following display:Target Table Output
-
Close the View Data window when you are finished.
-
Right-click the cross references table and click Open in the pop-up menu.
-
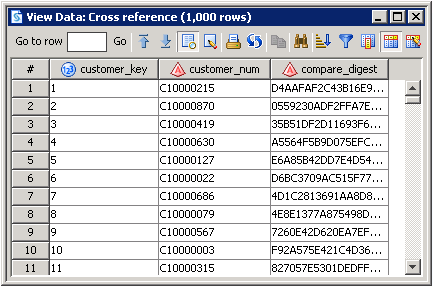
Review the output displayed in the View Data window for the cross reference records table, as shown in the following display:
-
Close the View Data window when you are finished.
-
Right-click the changed records table and click Open in the pop-up menu.
-
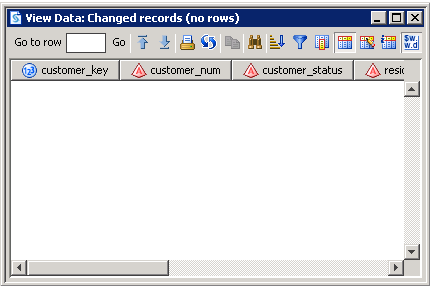
Review the output displayed in the View Data window for the changed records table, as shown in the following display:Changed Records Table Output
-
Close the View Data window when you are finished.
-
Right-click the new records table and click Open in the pop-up menu.
-
Review the output displayed in the View Data window for the new records table, as shown in the following display:New Records Table Output

-
Close the View Data window when you are finished.Note the following results:
-
1000 target table rows
-
-
0 changed rows
-
1000 new rows
-
Use a Sequential Data Merge
Perform the following
steps to configure the SCD Type 1 Loader transformation to use a sequential
data merge:
-
Open the properties window for the SCD Type 1 Loader transformation.
-
Click Options. Set the Use direct lookup (hash table) option in the General category to No. This setting saves memory at a potential cost to processing performance.
-
Click OK to save your settings and close the properties window.Note: The DATA step merge lookup method requires the source table to be presorted by business key with duplicate business keys removed. If the source table is not presorted by business key or the source table contains duplicate business keys, you should add a Sort transformation before you sort and remove duplicate business keys with the SCD Type 1 Loader transformation. In the Sort transform, navigate to the Options tab and change the first SAS Sort option entitled Remove duplicate records to Remove rows with duplicate keys (NODUPKEY). You should remove duplicate business keys from source tables before you use the SCD Type 1 Loader transformation to avoid unexpected results.
-
Insert a Sort transformation between the source table and the SCD Type 1 Loader transformation.
-
Open the Sort transformation and click Sort Columns.
-
Move the columns that you want to use for the match keys in the source table to the Sort by columns field.
-
Click OK to save your settings and close the properties window.
Copyright © SAS Institute Inc. All Rights Reserved.
Last updated: January 16, 2018