Creating Transposed Data from Table Data
Overview
Use a Transpose transformation to create a target table that contains transposed data. You can control many aspects of how the target
table is created, including the following:
-
the type of data to be transposed
-
which columns are analyzed
The TRANSPOSE procedure
creates an output data set by restructuring the values in a SAS data
set, transposing selected variables into observations. The TRANSPOSE
procedure can often eliminate the need to write a lengthy DATA step
to achieve the same result. Further, the output data set can be used
in subsequent DATA or PROC steps for analysis, reporting, or further
data manipulation. A transposed variable is a variable that the procedure
creates by transposing the values of an observation in the input data
set into values of a variable in the output data set.
PROC TRANSPOSE does
not produce printed output. To print the output data set from the
PROC TRANSPOSE step, use the List Data transformation or another SAS
publishing, summary, or reporting tool.
The target table that is created by this transformation contains only the columns
selected to
be analyzed. In addition, there is an informational column, _NAME_, which contains
the name of the column that is to be used as the transposed column. There are also
additional columns needed, depending on which type of transposition you are performing.
Note: You should set Update
the table metadata for the target tables to Yes.
This action ensures that the proper columns are included in the target
table. Alternatively, you can create the columns in the output table
on the Mapping tab of the Transpose transformation
property window. You must create the _NAME_ column and any other columns
in the target table so that data is included in the final table.
Executing the Transpose Transformation Inside HADOOP or TERADATA
In order to execute
the Transpose transformation inside HADOOP or TERADATA, you must ensure
that the following in-database requirements are met and other options
are set correctly:
-
Verify that either the SQLGENERATION=System Option or the SQLGENERATION=LIBNAME Option is set appropriately. See “SQLGENERATION=System Option” and “SQLGENERATION=LIBNAME Option” in the SAS/ACCESS(R) 9.4 for Relational Databases: Reference.
-
Set the following options in the Properties window of the Transpose transformation:
-
Specify one or more BY columns by selecting Options
 Assign
columnsSelect columns whose values define groups
of records to transpose (BY Statement).
Assign
columnsSelect columns whose values define groups
of records to transpose (BY Statement).
-
Specify one or more ID columns by selecting OptionsAssign
columnsSelect a column for output column names
(ID Statement).
-
Specify the LET and INDB=YES transpose options by selecting OptionsOther optionsSpecify PROC TRANSPOSE
optionsand entering a value of ‘LET
INDB=YES’ for this option.
-
-
Ensure that all additional requirements for running PROC TRANSPOSE inside the database have been satisfied. For more information, see “Running PROC TRANSPOSE inside the Database (Preproduction)” in the SAS(R) 9.4 In-Database Products: User's Guide.
Problem
You want to create a target table that contains transposed data.
Solution
You can use the Transpose transformation in a job that transposes the data in a table and creates an ODS document that displays the
transposed table. The transformation uses the TRANSPOSE procedure to load transposed
data into a target table. Transposing the data in a table turns the rows in a table
into columns and
the columns into the rows.
For example, you can create a job similar to the sample job featured in this topic.
This sample job generates a target table that contains information about baking. The
values in the Age column are transposed
into columns in the SAS column generated in the job. This data is then written to
the target table and to a report that is generated with ODS. The sample job includes
the following tasks:
Tasks
Create and Populate the Job
Perform the following steps to create and populate a new job:
-
Create an empty SAS Data Integration Studio job.
-
Select and drag a Transpose transformation from the Data folder in the Transformations tree. Then, drop it in the empty job on the Diagram tab in the Job Editor window.
-
Select and drag the source table out of the Inventory tree. Then, drop it before the Transpose transformation on the Diagram tab.
-
Drag the cursor from the source table to the input port of the Transpose transformation. This action connects the source to the transformation.
-
Right-click the Transpose transformation, and click Add Output Port from the Ports option in the drop-down menu. This step enables you to add an output port to the transformation.
-
Because you want to have a permanent target table to contain the output for the transformation, right-click the temporary work table attached to the transformation and click Replace in the pop-up menu. Then, use the Table Selector window to select the target table for the job. The target table must be registered in SAS Data Integration Studio.
The following display shows a sample process flow diagram for a job that contains
the Transpose transformation:
Sample Process Flow
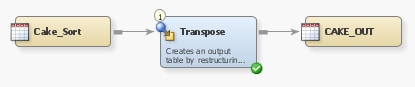
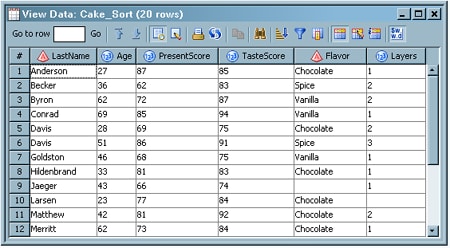
Note that the source table for the sample job is named Cake_Sort and that the target
table is named CAKE_OUT.
Configure Analytical Options
Use the Options tab in the properties window for the Transpose transformation to configure the SAS
tables that are generated in the job and shape the output of your analysis. Note that
the Options tab
is divided into two parts, with a list of categories on the left side
and the options for the selected category on the right side. Perform
the following steps to set the options that you need for your job:
-
Open the properties window for the Transpose transformation in the Diagram tab in the Job Editor window. Then, click the Options tab.
-
Click Assign columns to access the Assign columns page. Use the column selection prompts to access the columns that you need in the SAS tables generated in your job. For example, you can click
 for the Select analysis columns (VAR
statement) to access the Select Data Source
Items window, as shown in the following display:
Sample Select Data Source Items Window
for the Select analysis columns (VAR
statement) to access the Select Data Source
Items window, as shown in the following display:
Sample Select Data Source Items Window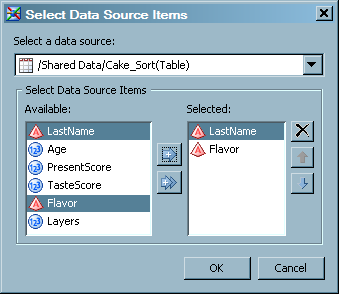 All of the values in the rows of the columns that you select in this window become values in a single row after the transposition is completed. In the sample job, the VAR statement columns are LastName and Flavor.
 -
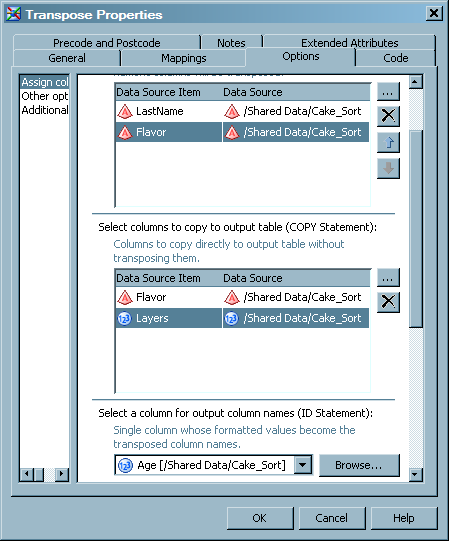
Specify additional columns as needed. For example, the COPY statement in the sample job includes the Flavor and Layers columns, and the ID statement includes the Age column. The following display shows the columns that are specified for the sample job:Sample Column Options
-
Click Additional Options to access the Additional Options page. Make sure that the Update the metadata for the target tables option is set to Yes. This step ensures that the target tables contain the columns needed for the Transpose transformation to run successfully.
-
Set remaining options as needed. For example, the sample job specifies system options, TRANSPOSE procedure options, and metadata update options.
Run the Job and View the Output
Perform the following steps to run the job and view the output:
-
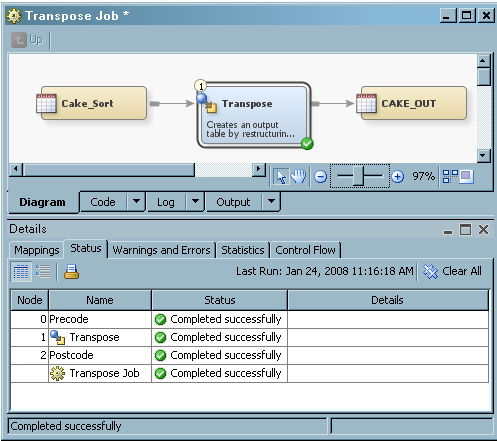
Right-click on an empty area of the job, and click Run in the pop-up menu. SAS Data Integration Studio generates code for the job and submits it to the SAS Application Server for execution. The following display shows a successful run of a sample job:Sample Completed Job
-
If error messages are displayed, read and respond to the messages as needed.
-
You can compare the source table to the target table to see the results of the TRANSPOSE procedure. The source table for the sample job, Cake_Sort, is shown in the following display:Source Table in the View Data Window
 The target table for the sample job, CAKE_OUT, is shown in the following display:
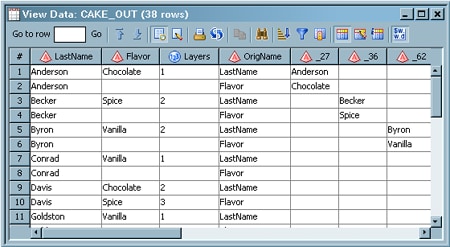 Note that the values in the rows in the Age column in the source table have been transposed into columns in the target table (such as _27, _36, and _62).
Copyright © SAS Institute Inc. All Rights Reserved.
Last updated: January 16, 2018