Using a SAS Data Loader for Hadoop Saved Directive in a Job
Overview
The Data Loader Directive transformation enables you to run a saved directive from
SAS Data Loader for Hadoop in the context of a SAS Data Integration Studio job.
You might need to add a SAS Data Loader for Hadoop saved directive to a job to take
advantage of a SAS Data Loader for Hadoop function that is not otherwise
available in SAS Data Integration Studio. In that case, you first must create a directive
with the needed function. Then you can save that directive in SAS Data Loader for
Hadoop. Finally, you can create a job in SAS Data Integration Studio uses the Data
Loader Directive transformation and points to the previously created and saved directive.
Prerequisites
In order to run a
SAS Data Loader for Hadoop directive, the following prerequisites
must be met:
-
The directive must be created in SAS Data Loader for Hadoop 3.1 or later and saved to a SAS folder.
-
The Hadoop cluster must be secured with Kerberos, or the SAS Data Integration Studio users who run the directive must have stored their passwords in metadata through the User Manager in SAS Management Console.
Problem
You need to perform a function that is available in SAS Data Loader for Hadoop but
not available in SAS Data Integration Studio. The function will be performed in a
SAS Data Integration Studio job.
Solution
Create and save directives in SAS Data Loader for Hadoop that contain the function
that you need. You can execute these saved directives in SAS Data Integration Studio
job by dropping and configuring a Data Loader Directive transformation.
Tasks
Create a Job and Select the Saved Directive
Perform the following
steps to create a SAS Data Integration Studio job that contains a
SAS Data Loader for Hadoop saved directive:
-
Create a directive in SAS Data Loader for Hadoop. Ensure that the directive is saved to the metadata folder in a repository that will be accessed in SAS Data Integration Studio.
-
Select the Data Loader Directive transformation in the Hadoop folder in the transformation tree. Add the Data Loader Directive transformation to the Diagram tab of a SAS Data Integration Studio job.
-
Open the Properties window in the Data Loader Directive transformation and click Directive.
-
Click . . . (Select a directive) to access the Select a directive window.
-
Click Inventory and open the Directive list.Select the appropriate saved directive, as shown in the following display:
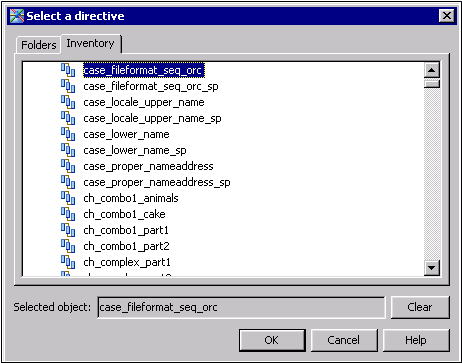
-
Click OK to select the saved directive and return to the Directive tab. You can click Properties to review basic properties and set authorizations for the saved directive. Click OK to return to the Properties window. You can click Open to launch SAS Data Loader for Hadoop and navigate to Saved Directives to review the specified directive. If you have not already logged on to SAS Data Loader for Hadoop, you need to authenticate on the Sign In to SAS page.
Configure and Run the Job
Perform the following
steps to configure the Data Loader Directive transformation:
-
Click Output Table in the Properties window of the Data Loader Directive transformation.
-
Select the Directive Response Links row, and click View output table columns.
-
Review the list of directive response links columns and make any necessary changes. All of the columns are selected by default, but you can use the controls in the Directive Response Links Columns window to return selected columns to the Generated Columns list. These columns will not be populated when the job is run. The columns listed in this window are the only columns that are available for the Directive Response Links output table. You can use this table to access information about the SAS Data Loader for Hadoop saved directive.Note: The Add Table button in the Output Table tab is enabled only when the default Directive Response Links row is deleted. In that case, you can click Add Table to generate a new Directive Response Links table. The Add Table button does not add any other output table to the transformation.
-
Click OK to return to the Properties window.
-
Click Options to review the options for the SAS Data Loader for Hadoop saved directive in the Data Loader Directive pane.
-
Specify whether you want to wait for the saved directive to finish before processing the rest of the job.
-
Specify how many minutes for the job to wait before querying the status of the saved directive. This field requires a numeral.
-
Specify a value in the Number of minutes to wait for directive to finish field. This field requires an integer as input. A numeral such as 1.5 fails validation when you leave the tab. When a blank or 0 value is entered in the Number of minutes to wait for directive to finish field, the job waits indefinitely until the saved directive is completed.
-
Click OK to close the Properties window.
-
Right-click the Data Loader Directive transformation to view the contextual menu. Add an output port or a work table to hold the output of the job. (Note that this output table is not listed in the Output Tables tab in the Properties window.You can connect the output table or work table to additional transformations. Adding an output table or worktable enables you to create a longer job in SAS Data Integration Studio. This job uses the output from the Data Loader Directive transformation as the input to another SAS Data Integration Studio transformation.
-
When the job is complete, run it and review the output.
Note: The SAS Data Loader for Hadoop
saved directive in the Data Loader Directive transformation does not
support import or export. If you import or export a SAS Data Integration
Studio job that contains a Data Loader Directive transformation, the
imported or exported transformation will be missing the saved directive.
The transformation will be marked as incomplete on the target or import
metadata server.
Copyright © SAS Institute Inc. All Rights Reserved.
Last updated: January 16, 2018