Registering a Delimited External File
Problem
You want to use a delimited external file in a SAS Data Integration Studio job.
Solution
Use the delimited external file wizard to register the file. The wizard enables you to create metadata for external files that contain
delimited data. This metadata is saved to a SAS Metadata Server, where SAS Data Integration
Studio can access it.
Tasks
Run the Delimited External File Wizard
Perform the following steps to use one method to register an external file in the
delimited external file wizard:
-
Right-click the destination folder for the external file metadata. Then, select New
 External FileDelimited to access the General page in the New User Written External File wizard. Enter an
appropriate name and description of the external file that you want to register. Click
Next to access the External File Location
page.
External FileDelimited to access the General page in the New User Written External File wizard. Enter an
appropriate name and description of the external file that you want to register. Click
Next to access the External File Location
page.
-
If you are prompted, enter the user ID and password for the default SAS Application Server that is used to access the external file.
-
Specify the physical path to the external file in the File name field. Click Next to access the Delimiters and Parameters page.
-
Select the check box for the appropriate delimiter in the Delimiters group box. Accept the default values for the remaining fields, and click Next to access the Column Definitions page.
-
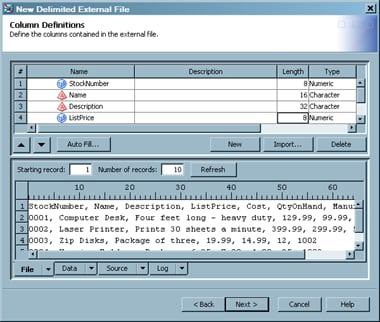
Click Refresh to view the raw data from the external file in the File tab in the view pane at the bottom of the page. Sample data is shown in the following display.Sample Column Definitions
 Note: If your external file contains fewer than 10 rows, a warning box is displayed. Click OK to dismiss the warning window.
 -
Click Auto Fill to access the Auto Fill Columns window and populate preliminary data into the columns component of the Columns Definition page.
-
The first row in most external files is unique because it holds the column names for the file. Therefore, you should change the value that is entered in the Start record field in the Guessing records group box to
2. This setting ensures that the guessing algorithm begins with the second data record in the external file. Excluding the first data from the guessing process yields more accurate preliminary data. -
Accept all of the remaining default settings. Click OK to return to the Column Definitions page.
-
Click Import to access the Import Column Definitions window and the import function to simplify the task of entering column names.
-
Select the Get the column names from column headings in the field radio button, and keep the default settings for the fields underneath it. Click OK to save the settings and return to the Column Definitions page. The names from the first record in the external file are populated in the Name column. You now can edit them as needed.Note: If you use the get column names from column headings function, the value in the Starting record field in the Data tab of the view pane in the Column Definitions page is automatically changed. The new value is one greater than the value in the The column headings are in file record field in the Import Column Definitions window.
-
The preliminary metadata that is populated into the columns component usually includes column names and descriptions that are too generic to be useful for SAS Data Integration Studio jobs. Fortunately, you can modify the columns component by clicking in the cells that you need to change and entering the correct data. Enter appropriate values for the external file that you are registering. The following display depicts a sample completed Column Definitions page.Sample Completed Column Definitions Page
-
To verify that the metadata that you have entered is appropriate for the data in the external file, click the Data tab and then click Refresh. If the metadata matches the data, the data is properly displayed in the Data tab. The Data tab looks similar to the View Data window for the registered external file. If the data does not display properly, update the column metadata and click Refresh to verify that the appropriate updates have been made. To view the code that is generated for the external file, click the Source tab. To view the SAS log for the generated code, click the Log tab. The code that is displayed in the Source tab is the code that is generated for the current external file when it is included in a SAS Data Integration Studio job.
-
Click Next and then Finish to save the metadata and exit the delimited external file wizard.
View the External File Metadata
After you have generated
the metadata for an external file, you can use SAS Data Integration
Studio to view, and possibly make changes to, that metadata. For
example, you might want to remove a column from a table or change
the data type of a column. Any changes that you make to this metadata
do not affect the physical data in the external file. However, the
changes affect the data that is included when the external table
is used in SAS Data Integration Studio. Perform the following steps
to view or update external file metadata:
-
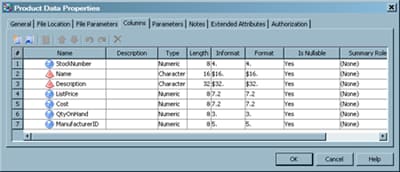
Right-click the external file, and click Properties. Then, click the Columns tab. The Columns tab is displayed, as shown in the following display.Sample External File Columns Tab
-
Click OK to save any changes and close the properties window.
View the Data
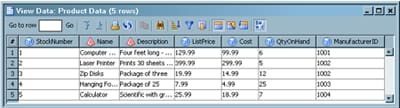
Right-click the external
file, and click Open as Table. The View
Data window is displayed, as shown in the following display.
Sample External File Data in the View Data Window
If the data in the external file displays correctly, the metadata for the file is
correct and the table is available for use in SAS Data Integration Studio. If you
need to review the original data for the file, right-click on its metadata object. Then, click Open.
Copyright © SAS Institute Inc. All Rights Reserved.
Last updated: January 16, 2018