Creating a Table That Contains the Sorted Contents of a Source
Problem
Solution
You can create a job that uses a Sort transformation to sort the data in a source
table and write it to a target table. The sample job includes the following tasks:
Tasks
Create and Populate the Job
Perform the following steps to create and populate a new job:
-
Create an empty SAS Data Integration Studio job.
-
From the Data folder in the Transformations tree, select and drag a Sort transformation and drop it in the empty job on the Diagram tab in the Job Editor window.
-
Select and drag the source table from its folder and drop it before the Sort transformation on the Diagram tab.
-
Drag the cursor from the source table to the input port of the Sort transformation. This action connects the transformation to the source.
-
Because you want to have a permanent target table to contain the output for the transformation, right-click the temporary work table that is attached to the transformation and click Replace in the pop-up menu. Then, use the Table Selector window to select the target table for the job. The target table must be registered in SAS Data Integration Studio. (For more information about temporary work tables, see Working with Default Temporary Output Tables.)
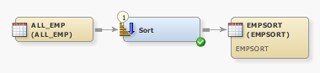
The following example shows the sample process flow. The source table is named ALL_EMP
and the permanent target table is named EMPSORT.
Sample Sort Process Flow Diagram
Specify How to Sort Information in the Target
Perform the following steps to specify how to sort information in the target table:
-
Open the Sort By Columns tab of the properties window for the Sort transformation.
-
Select the first variable for the new sort from the list in the Available Columns field. Move the variable to the Sort by columns field. Then, specify the sort direction for the variable with the drop-down menu in the Sort Order column.Note: You can double-click on the value in the Sort order column to change the value. However, if you double-click on the value in the Column name column, the column is removed from the Sort by columns list.
-
Move the other variables that you want to sort by to the Sort by columns field. Then, set the sort direction for each. The following display depicts the completed Sort By Columns tab for the sample sort job.Completed Sort Tab for Sample Job
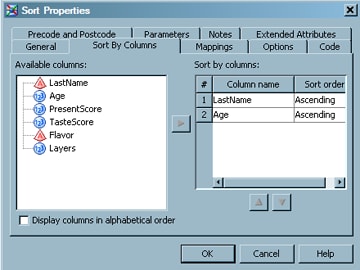
Note: Additional
sorting options can be specified on the Options tab.
Run the Job and View the Output
Perform the following steps to run the job and view the output:
-
Save the selection criteria for the target and close the properties window.
-
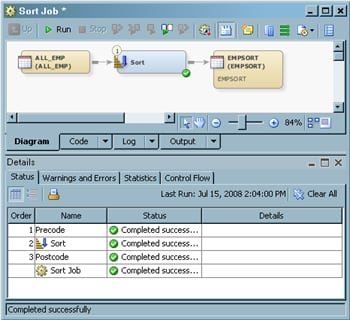
Right-click on an empty area of the job, and click Run in the pop-up menu. SAS Data Integration Studio generates code for the job and submits it to the SAS Application Server for execution. The following display shows a successful run of a sample job.Successfully Completed Sample Job
-
If error messages are displayed on the Status tab, read and respond to the messages as needed.
-
To view the target table, right-click the target and select Open. The following display shows the target table data for the sample job.Data in Sample Sorted Table
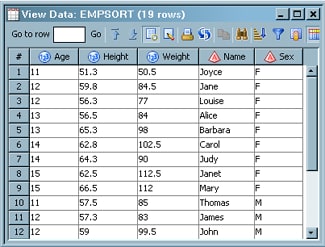
You can
review the View Data window to ensure that the data from the source table was properly sorted. Note that
the Age and Sex columns in the sample target table are sorted, but the other columns
remained unsorted.
Copyright © SAS Institute Inc. All Rights Reserved.
Last updated: January 16, 2018