Creating a Process Flow for a Job
Problem
Solution
You can use the New Job Wizard to create an empty job. Then, you can populate the
job in the Job Editor window with the source tables, transformations, and target tables that you need to
accomplish your task. Note that some transformations do not
support permanent target tables.
Tasks
Create and Populate a Sample Job
Perform the following steps to create and populate a job:
-
Create an empty job. For information, see Creating an Empty Job.
-
Drop the source table on the Diagram tab of the Job Editor window. Sources must be registered in SAS Data Integration Studio. You can also right-click a source table (or any object that can be dropped into a job) in an Inventory tree and click Add to Diagram in the pop-up menu. This action adds the selected object to the Diagram tab of the active job on the desktop. Of course, this option is available only when at least one job is open.
-
Drop a transformation from the Transformations tree on the Diagram tab.
-
Drag the cursor from the source table to the input port of the transformation. This action connects the source to the transformation. If the input port that you need is not available, right-click the transformation and click Ports in the pop-up menu. Then, click Add Input Port in the sub-menu. This feature is available for most transformations. It enables you to perform the following tasks:
-
Add an input port.
-
Delete an input port.
-
Add an output port.
-
Delete an output port.
Note: You can include a particular table more than once in a process flow. For example, you can use the same table as the source table and the target table for a SAS Data Integration Studio job. You can use this approach to change the structure of a physical table. However, the control flow tab might not report control flow warnings correctly if you do this. -
-
Because you want to have a permanent target table to contain the output for the transformation, right-click the temporary work table that is attached to the transformation and click Replace in the pop-up menu. Then, use the Table Selector window to select the target table for the job. The target table must be registered in SAS Data Integration Studio. (For more information about temporary work tables, see Working with Default Temporary Output Tables.)
The following display shows a process flow diagram for a sample job that contains
the Sort transformation.
Sample Process Flow
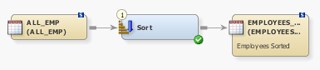
Note: Note the source
table is named ALL_EMP and target table is named EMPLOYEES_SORTED.
You can also see that icon overlays have been added to the tables
to indicate the type of data that they contain. In this case, both
tables contain SAS data and feature that icon ( ). These icon overlays will be shown in all of the
process flows that are displayed in future editions of the SAS Data Integration Studio User's Guide.
). These icon overlays will be shown in all of the
process flows that are displayed in future editions of the SAS Data Integration Studio User's Guide.
). These icon overlays will be shown in all of the
process flows that are displayed in future editions of the SAS Data Integration Studio User's Guide.
You can
set global options for jobs on the Code Generation tab of the Options menu. The Options window is available from the Tools menu on the SAS Data Integration Studio menu bar. You can set local
options on the Options tab that is on the
properties window for each table. For detailed information, see Specifying Options for Jobs.
If you change a job in any way, you must save the job in order to save the changes.
You should save the
whole job even when you click Save or Save As on the Code tab for a job or transformation or the Precode and Postcode tab for a transformation in a job.
These save options save the updated code to the metadata or to a file,
but the link between the saved code and the job is not established
unless the job is saved.
Note: A one-minute
screencast (video demonstration) of this task is available at http://support.sas.com/documentation/onlinedoc/etls/.
Copyright © SAS Institute Inc. All Rights Reserved.
Last updated: January 16, 2018