Maintaining Column Mappings
Problem
You want to create or maintain the column mappings between the source tables and the target tables in a SAS Data Integration Studio job. Mapping is the ability to create a relationship between a source and target column.
The following mapping types are supported:
1-to-1
no expression is needed to create the column in the target from the source.
derived
an expression is required to create the column in the target based on the source.
Solution
You create or maintain
column mappings in the Mappings tab. The Mappings tab is available in the following places in a job:
-
the Details section in the Job Editor window (when a transformation node is selected in the Diagram tab of the Job Editor window.
-
the properties window for a transformation when the transformation has been added to the Diagram tab in the Job Editor window. The Mappings tab is not displayed in the properties window for a transformation in a tree or a folder.
Perform the following
tasks:
Tasks
Create Automatic Column Mappings
You can review the mappings that are automatically generated when a transformation
is submitted for execution in the context of a SAS Data Integration Studio job. The
mappings are depicted on the Mappings tab.
A Mappings tab from a sample job is shown
in the following display.
Automatic Column Mappings
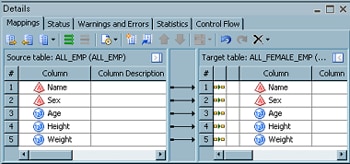
The arrows in the preceding display represent mappings that associate source columns
with target columns. By default, SAS Data Integration Studio automatically creates
a mapping
when a source column and a target column have the same column name, data type, and
length. Events that trigger automatic mapping include:
-
connecting a source and a target to the transformation on the Diagram tab
-
clicking Propagate in the toolbar or in the pop-up menu in the Job Editor window
-
clicking Propagate on the Mappings tab toolbar and selecting a propagation option
-
clicking Map all columns on the Mappings tab toolbar
Note: When a transformation that
is included in a job has multiple source or target tables, a drop-down
menu is added to the top of the field. This menu enables you to select
each individual table or all of the tables at once.
SAS Data Integration Studio might not be able to automatically create all column mappings
that you need in a transformation. It automatically creates a mapping when a source
column and a target column have the same column name, data type, and length. However,
even though such
mappings are valid, they might not be appropriate in the current job.
You can also disable or enable automatic mapping for a transformation. For example,
suppose that both the source table and the target table for a transformation have
two columns that have the same column name, data
type, and length, as shown in the preceding display. These columns are mapped automatically
unless you disable automatic mapping for the transformation. If you delete the mappings
between these columns, the mappings are restored upon a triggering event, such as
clicking Propagate or Map
all columns.
You can use the following
methods to disable automatic mapping:
-
disable automatic mapping globally for new SAS Data Integration Studio jobs. Select or deselect Automatically map columns on the Job Editor tab in the Options window. To access the Options window, click Options in the Tools menu on the SAS Data Integration Studio menu bar.
-
disable automatic mapping for the job. Deselect Automatically Map Job on the drop-down menu that is displayed when you click Settings on the toolbar at the top of the Job Editor window.
-
disable automatic mapping for the transformation in a job. Deselect Include Transformation in Mapping on the drop-down menu that is displayed when you click Settings on the toolbar at the top of the Mappings tab.
Note: If you disable automatic
mapping for a transformation, you must maintain its mappings manually.
Create One-to-One Column Mappings
You need to manually map between a column in the source table and a column in
the target table. Perform the following steps to map between two columns:
-
Open the Mappings tab.
-
Click the column in the source table.
-
Hold down the CTRL key and click the column in the target table.
-
Click Map selected columns on the Mappings tab toolbar.
You can also create
a mapping in the Mappings tab by clicking on a source column and dragging a line to the appropriate target
column.
Create Derived Column Mappings
A derived mapping is a mapping between a source column and a target column in which the value of the
target column is a function of the source column.
For example, you can use a derived column to accomplish the following tasks:
-
Write the date to a Date field in the target when there is no source column for the date.
-
Multiply the value of the Price source column by
1.06to get the value of the PriceIncludingTax target column. -
Write the value of the First Name and Last Name columns in the source table to the Name field in the target table.
You can use the techniques
that are illustrated in the following table to create different types
of derived column mappings. All of the techniques are used on the Mappings tab
in the properties window for the transformation.
|
Technique
|
Description
|
|---|---|
|
Directly enter an expression
into an Expression field
|
You can create any type
of expression by entering the expression directly into an Expression field. The expression can be a constant or an expression that uses the values of
one or more source columns. For example, you can create a sample expression that writes
today's date
to a Date column in a target table. Perform the following steps:
|
|
Create expressions that use no source columns
|
Some transformations such as Extract, Lookup, and SCD Type 2 Loader provide an Expression
column in the target table. You can perform the following steps to enter an expression
into this column
that does not use source columns:
|
|
Create expressions that use a single source column
|
Assume that you want to define the value of a DiscountedPrice column in the target
by using the Price source column in an expression. This is possible if the discount
is a constant, such as
6 percent. That is, you might want to define an expression as
Price * .94.
You could perform the following steps:
|
|
Create expressions that use two or more source columns
|
You can create a derived mapping that uses two or more source columns. Perform the
following steps:
|
Delete Column Mappings
You can delete a column mapping in the Mappings tab
by using one of the following methods:
-
Click the arrow that connects a column in the Source table field to a column in the Target table field. Then, press the DELETE key.
-
Right-click the arrow that connects a column in the Source table field to a column in the Target table field. Then, click Delete Mappings in the pop-up menu.
Note: You must disable automatic
mapping for a transformation in order to delete mappings that are
otherwise automatically created.
Use the Options for Mappings
You can use the toolbar or the pop-up
menu in the Mapping tab of the properties
window to control the behavior of the tab. To access the Help for
the Mapping tab, click on the Help button
at the top of the SAS Data Integration Studio window. Under the folder
for Windows and Other Components, select the Popup Menus icon.
Click on the Pop-Up Menu Options for Mapping link.
Customize Mapping Rules
All mappings other than
user-defined mappings are created by using rules from a rules file.
When you initially start SAS Data Integration Studio, if a mappings
rule file does not exist, a file is created in your home folder, such
as C:\User\user_name\AppData\SAS\SASDataIntegrationStudio\<version>.
The mapping rules are used to determine whether two columns should
be mapped automatically when you select a mapping option such as Map
All. Three rules are provided by default:
-
mappings based on Source.Name=Target.Name (case insensitive), Source.Length= Target.Length, Source.Type=Target.Type
-
mappings based on an auto conversion Numeric to Character columns when Source.Name=Target.Name (case insensitive)
-
mappings based on an auto conversion Character to Numeric columns when Source.Name=Target.Name (case insensitive)
You can customize the
rules in the mappings rule file, where you can either add your own
rules or edit the default rules. For example, you might define a mapping
rule for all column names that begin with the letters WP.
Copyright © SAS Institute Inc. All Rights Reserved.
Last updated: January 16, 2018