Parallel Processing Using the Fork, Fork End, and Wait for Completion Transformations
Overview
The Fork transformation enables you to run multiple flows in parallel in a job. Each piece to be run in parallel is demarcated by a Fork transformation and a Fork
End transformation. A third transformation, Wait for Completion, acts as a gatekeeper
to hold the fork or forks as directed before additional processing resumes. The Fork
transformation also supports grid processing when Grid is available, and works similarly
to the Loop transformation.
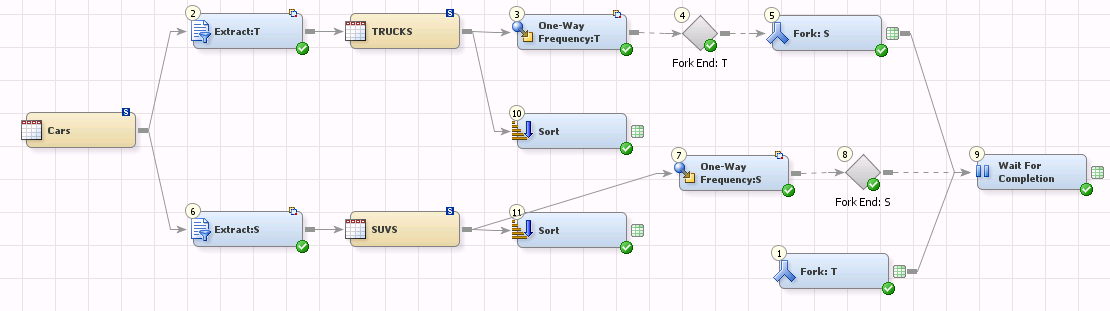
The following image
shows how the Fork transformation spawns a new parallel SAS process
when it is run inside a job. Each piece to be run in parallel is
demarcated by the Fork transformation and the Fork End transformation.
Sample Fork Example
Problem
You need to run two
queries on the same table, and then you want to sort both results.
Solution
Use the Fork transformation
and the Fork End transformation to process the queries. Use the Wait
for Completion transformation to keep the processing together before
sorting and finalizing the results.
Tasks
Create the Fork Job
Perform the following steps to create the job:
Note: It is important to create
the job in the processing order.
-
Create an empty job.
-
Add a data source named Cars that contains information about a variety of vehicles, but you want only the information about the trucks and SUVs.
-
Select and drag the Fork transformation from the Control folder in the Transformations tree to the Job Editor window.
-
Right-click the Fork transformation, select Properties. On the General tab, enter Fork:T in the Name field.
-
Select the Fork Options tab in the properties window. Set the Location on host for log and/or output files option to your preferred location. In this example, it is
C:\\temp. Select the One process for each available CPU node check box in the Maximum number of concurrent processes group box. -
Open the Options tab. In the Advanced Options pane, set the Prefix for handle names on iterations option to T_. Close the Fork:T Properties window.
-
Add an Extract transformation to the job. Right-click and select the Properties window. In the General tab, rename the transformation to Extract:T for trucks.
-
On the Where tab of the Properties window, enter Type = "Truck" in the Expression Text field.
-
(Optional) In the Precode and Postcode tab, select the Postcode check box and add the following code in the postcode section:
data _null_;
  call sleep(10,1);
run;
This sets 10 seconds between attempts if the sign on attempt fails. Select OK to save the changes. -
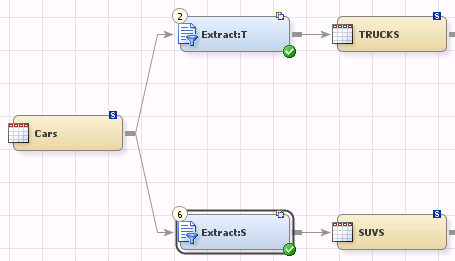
Delete the worktable from the Extract transformation and add an output table named Trucks. Connect from the output port of the Extract transform to the output table as shown in the following image:

-
Select the One-Way Frequency transformation from the Analysis folder and drag it into the job above the Sort transformation. Connect the Trucks output table to the One-Way Frequency transformation.
-
Open the One-Way Frequency Properties window and rename it One-Way Frequency:T.
-
(Optional) Open the One-Way Frequency:T transformation’s Precode and Postcode tab. Select the Precode check box and add the following code:
%let time=%sysfunc(putn(%sysfunc(time()),time8.));
This captures summary statistics about this step for performance reporting. -
Select the Options tab on the One-Way Frequency:T transformation. Set the following options:Options TabOptionSettingSpecify other optionsSpecify number of variable levels (NLEVELS)YesTitles and footnotesHeading 1Trucks: &timeODS OptionsODS ResultsUse HTMLODS OptionsLocationFor this example, the location is C:\temp\Test\Truck.html
-
Add the Fork End transformation to the job. Open the transformation’s properties window to the General tab. In the Name field, rename it Fork End:T. The One-Way Frequency:T transformation automatically connects to the Fork End:T.
-
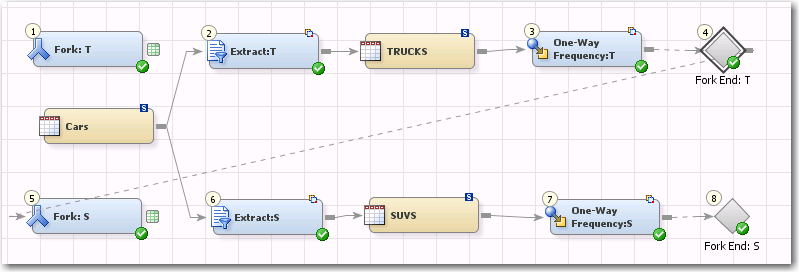
Add a second Fork Transformation and rename it Fork:S for the SUV fork process. The Fork End:T transformation automatically connects to the Fork:S transformation as shown in the following image:

-
From here, create the second half of the flow by repeating step 5 through 15 with the following differences:
-
On the Fork transformation Options tab, set the Prefix for handle names on iterations option to S_.
-
Add and rename the Extract transformation Extract:S.
-
On the Extract:S Properties window, Where tab, enter Type = "SUV" in the Expression Text field.
-
Add a source table called SUV and connect the object as shown in the following image:
-
Add and rename the One-Way Frequency transformation to One-Way Frequency:S.
-
-
Once you have added the additional parts, you should have a job flow that looks like this:
Add the Wait for Completion Transformation
The Wait for Completion
transformation acts as a gatekeeper for your process. You have the
option to select one of two behaviors:
-
Wait for ALL fork processes to complete, which waits for every fork to complete
-
Wait for ANY one to complete and execute subsequent code, which waits until any one process completes before the job moves on to subsequent processing
Tip
When you add the Wait for
Completion transformation, it is advisable to have the Fork transformation
in close proximity to make the connections easier.
To add a Wait for Completion
transformation to your job, select the transformation from the Control folder
and drop it onto the job.
-
The Fork End:S should automatically connect to the Wait for Completion transformation.
-
Connect the worktables of the Fork:T and Fork:S transformations to the input port of the Wait for Completion transformation.
-
Right-click the Wait for Completion transformation and select Properties.
-
On the Options tab, select the Wait for Completion Options pane and specify the Wait for ALL fork processes to complete option.
-
On the Code tab, you can add user-written code if you want other specific job processing.
Add Additional Processing
You can add additional
processing after the Wait for Completion transformation. In this example,
you want to sort the output.
-
Select and drag the Sort transformation from the Data folder into the job.
-
Connect from the output node of the Trucks target to the input node of the Sort transformation.
-
Right-click the Sort transformation and select Properties. In the Properties window, select the Sort by Columns tab and set the following columns:
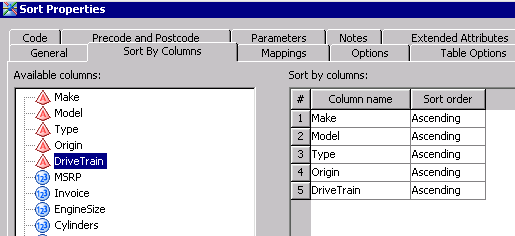
-
Add a second Sort transformation and connect it to the SUVS target table. Set the columns on the Sort By Columns tab.
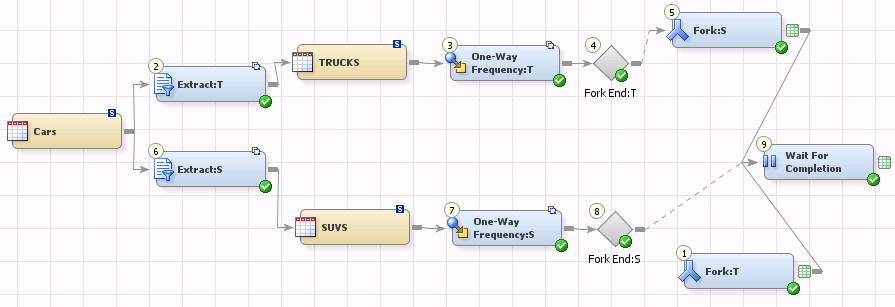
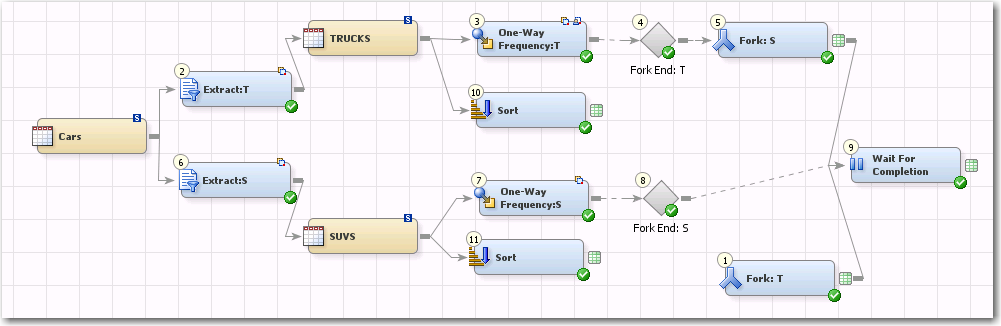
Once you have completed
all of the steps, your final job should look something like the following
image:
Copyright © SAS Institute Inc. All Rights Reserved.
Last updated: January 16, 2018