Deploying Jobs for Scheduling
Problem
You want to schedule a SAS Data Integration Studio job to run in batch mode at a specified date and time.
Solution
Scheduling a job is a two-stage process:
-
Use SAS Data Integration Studio to deploy the job for scheduling. See Deploy a Job for Scheduling.
-
Use other software to schedule the job for execution. For more information, see Scheduling in SAS. For information about scheduling prerequisites, see Prerequisites for Deploying a Job for Scheduling.
Tasks
Deploy a Job for Scheduling
Perform the following steps to deploy a job for scheduling:
-
Right-click the job that you want to deploy. Then, select Scheduling
 Deploy in the pop-up menu to
access the Deploy for a job for scheduling window.
The following display shows the window if you select only one job
for deployment.
Deploy for a Job for Scheduling Window for a Single Job
Deploy in the pop-up menu to
access the Deploy for a job for scheduling window.
The following display shows the window if you select only one job
for deployment.
Deploy for a Job for Scheduling Window for a Single Job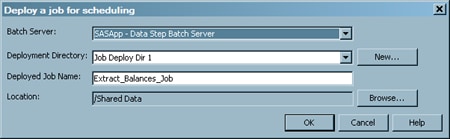 By default, the deployed job file (in this case, Extract Balances Job.sas) is named after the selected job. The following display shows the Deploy for a job for scheduling window used to deploy multiple jobs for scheduling.Deploy for Scheduling Window for Multiple Jobs
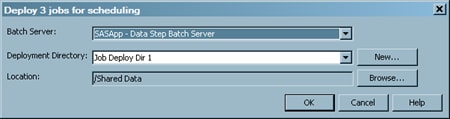
-
When you deploy more than one job, a separate SAS file is created for each job that you select. Each deployed job file is named after the corresponding job.Note: If you want to run multiple deployed jobs on multiple Data Step Batch Servers, you need to create a separate deployment directory for each Data Step Batch Server. If you run multiple deployed jobs that are defined for different Data Step Batch Servers in a single deployment directory, all of the jobs are run on the Data Step Batch Server that is defined for the first job that is run. This process even occurs when the Preserve deployed value option in the properties window for the deployed job is enabled for all of the jobs in the directory.
-
In the Batch Server field, accept the default server or select the server that is used to store the SAS file for the selected job. The next step is to select the job deployment directory. One or more job deployment directories (source repositories) were defined for the selected server when the metadata for that server was created.
-
Check the Deployment Directory field to ensure that the deployed job is stored in the appropriate directory. If the wrong directory is displayed, select another director from the drop-down list, or click New to create a new directory if you have permission to create directories on the server.
-
If you selected one job, you can edit the default name of the file that contains the generated code for the selected job in the Deployed Job Name field of the Deploy for a job for scheduling window. The name must be unique in the context of the directory specified in the Deployment Directory field.
-
To deploy the job or jobs, click OK.
Code is generated for the selected job or jobs and is saved to the directory that
is specified in the Deployment Directory field. Metadata
about the deployed jobs is saved to the current SAS Metadata Server.
A status window is displayed and indicates whether the deployment
was successful. In the Inventory tree, metadata for the deployed job
is added to the Deployed job folder. Also,
a blue triangle overlay is added to the icon for the job in the Job folder.
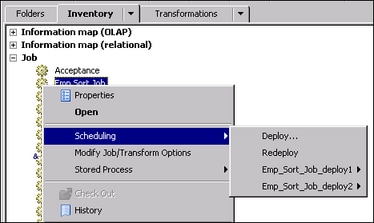
In the next display, the icon for a job named Emp Sort
Job has the blue triangle overlay.
This job is now available for scheduling.
A Job Can Be Deployed to Multiple Locations
A single job can be deployed to multiple locations. Each deployed instance has its
own name. For
example, the following display shows that a job named Emp
Sort Job has two deployed instances: Emp_Sort_Job_deploy1 and Emp_Sort_Job_deploy2.
Copyright © SAS Institute Inc. All Rights Reserved.
Last updated: January 16, 2018