Using the Cloud Analytic Services Transfer Transformation
Overview
The Cloud Analytic Services
Transfer transformation allows users to move data to and from the
SAS Viya platform. This transformation uses SAS Connect Server technologies,
SAS LIBNAME engine, and features of the UPLOAD procedure and the DOWNLOAD
procedure. For an overview of Cloud Analytic Service functionality,
see SAS Cloud Analytic Services 3.1: Language Reference.
Prerequisites
In order to run a Cloud Analytic Services Transfer job, the following prerequisites must be met:
-
Add an application server that includes a SAS Connect Server to the SAS Viya platform from the fourth maintenance release of SAS 9.4 or later.Note: This is done to allow SAS Data Integration Studio to communicate to the SAS Viya platform for registering of Cloud Analytic Services table metadata, as well as the viewing, uploading and downloading data in SAS Viya.
-
Add a SAS Server definition for the SAS Cloud Analytic Services Server.
-
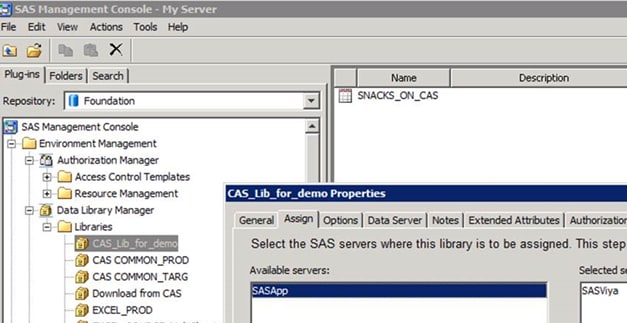
Add a SAS Library definition that references the SAS Viya Application Server as shown below:
-
Register tables that are accessible from the SAS Cloud Analytic Services library.
Problem
You need to load a data
set from a SAS library into memory on a SAS Cloud Analytic Service.
Solution
You can load a data
set using the Cloud Analytic Services Transfer transformation.
Load a Data Set from a SAS Library into Memory on a SAS Cloud Analytic Service
In this example, a
SAS table named “BASEBALL” is to be loaded to COMMON_TARG
library on SAS Cloud Analytic Service.
-
Drop the Cloud Analytic Services Transfer transformation onto a new job in the Job Editor window.
-
Select the “BASEBALL” table from the Inventory tree and drop it to the left of the transformation.
-
Drag the cursor from the source table to the input port of the transformation.
-
Click the Physical Storage tab, and assign a name in the Physical name field. For this example, it is named “baseball_cas”.
-
Select the library for the target table in the Library field by clicking
 to open the Select a library window.
-
Once you have a selected the CAS COMMON_TARG library, click OK in the Register Table window.
-
Use the Promote option on the Cloud Analytic Services Transfer transformation to request that the table is added with global scope. This makes the table visible to all sessions connected to the server. To set this option, right-click the transformation, select Properties
 Table OptionsTables: <baseball_cas>(Output) field, and then select the SAS Cloud Analytic
Services Transfer Options tab. Set the Promote option
to
Table OptionsTables: <baseball_cas>(Output) field, and then select the SAS Cloud Analytic
Services Transfer Options tab. Set the Promote option
to Yes.Note: For more information about the PROMOTE Statement, see SAS Cloud Analytic Services: Language Reference -
Run the job and verify that the job created the desired output.
Note: Just as you can upload data
to a Cloud Analytic Service library, the reverse is also true. You
can use a Cloud Analytic Service library as a source and download
data from Cloud Analytic Service Library to another target library
(CAS, SAS, or any other RDBMS).
Update the Metadata on a Cloud Analytic Service Table
You registered your
“baseball_cas” table and used it in several jobs, but
you added a column and need to update the metadata. Since it is a
CAS table, you cannot use the usual Update Metadata feature.
Instead, complete the following steps:
-
Find the table in the Folders tree or the Inventory tree and rename it. For example, change the name from “baseball_cas” to “baseball_cas2”.
-
Right-click on the table in the Inventory tree and select Register Tables to register the table “baseball_cas”. Note that we had to rename the existing table or Register Tables would not have been able to register it again.Note: You can also register the table by selecting FileRegister
Tables on the SAS Data Integration Studio
toolbar.
-
To determine which jobs use the renamed table “baseball_cas2”, right-click on the table and select Analyze. A list of jobs using the “baseball_cas2” table is displayed in the Impact Analysis tab and Reverse Impact Analysis tab.
-
-
Right-click on the table “baseball_cas2” in the job and select Replace from the menu. Then locate and select the table “baseball_cas” that you just registered.
-
Perform this process for each use of the table in every job where it is used.
Using User-Written Code with the Cloud Analytic Services Transfer Transformation
Overview
The SAS Data Integration
Studio user can leverage code generated by this transformation to
perform other Cloud Analytic Services tasks. You can include your
user-written code to perform a number of Cloud Analytic Service actions.
To add your user-written
code, do the following:
-
Create a job with Cloud Analytic Services Transfer Transformation.
-
Add a source and target that cover Cloud Analytic Service libraries of interest to the user.
-
Right-click the Cloud Analytic Services Transfer transformation, select Properties, and then select the Code tab.
-
In the Code generation mode field, select the All user written option.
-
Leave boiler plate code related to SAS Connect services.
-
Comment out or remove PROC DATASETS, PROC UPLOAD, and PROC DOWNLOAD code and substitute user-written code in its place.
Note: To learn more about Cloud
Analytic Services tasks that can be enhanced with user-written code,
see the CASUTIL procedure in the SAS Cloud Analytic Services 3.1: Language Reference.
For examples of how
you can leverage code generated by this transformation, see:
Example: Using User-written Code to Load Data in Parallel
You can use PROC CASUTIL
with the option
datatransfermode=”parallel” to
upload data in parallel. Data is loaded into the Cloud Analytic Service
faster in parallel than in a serial load, depending on the number
of nodes available. In this example, the physical SAS data set called
directiveresponselinks.sas7bdat is loaded into SAS Cloud Analytic
Service memory and called “customer_cas”. The following
PROC CASUTIL code needs to be substituted as user-written code:proc casutil incaslib="COMMON_TARG" outcaslib="COMMON_TARG" ;
load casdata="customer" casout="customer_cas"
importoptions={filetype="basesas", datatransfermode="parallel" } ;
PROMOTE CASDATA="customer_cas" INCASLIB="COMMON_TARG" ;
run;
Example: Save a Cloud Analytic Services Table That Is in Memory to a Physical Location
In this example, we
want to save a table called “baseball” in the “COMMON_PROD”
library to a physical location that “COMMON_PROD” points
to. The name of the file output is “baseball_physical”.
proc casutil incaslib="COMMON_PROD" outcaslib="COMMON_PROD";
save casdata="baseball" casout="baseball_physical" REPLACE ;
run;
Run the job and verify that the new output files appear.
Copyright © SAS Institute Inc. All Rights Reserved.
Last updated: January 16, 2018