Loading a Fact Table Using Dimension Table Lookup
Solution
You can create a job that uses the Lookup transformation, which loads fact data from a source table and uses a lookup process to load foreign keys from the dimension table.
The lookup process compares the business key in each source row to the business keys in the dimension table. When the business
keys match, the foreign key from the dimension table is loaded into the fact table target.
This sample job assumes that you have already loaded data into your dimension table
before you run the job that loads your fact table. Loading the dimension table first
ensures that new foreign keys are available in the dimension table.
The sample job includes the following tasks:
Tasks
Create and Populate the Job
Perform the following steps to load a fact table:
-
Because you want to store the output of the transformation in a permanent target table, right-click the temporary work table that is attached to the transformation and select Replace. Then, use the Table Selector window to select the target table for the job. The target table must be registered in SAS Data Integration Studio. (For more information about temporary work tables, see Working with Default Temporary Output Tables.)
-
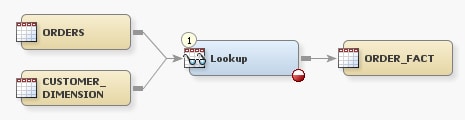
Drag the cursor from an output port of the Surrogate Key Generator transformation to the target table. This action connects the transformation to the target. The following example shows the sample process flow.Note: In the display, the red icon indicates that the new Lookup transformation requires source column mappings. Click the red icon to display information about errors.
Map Source Columns Into the Target

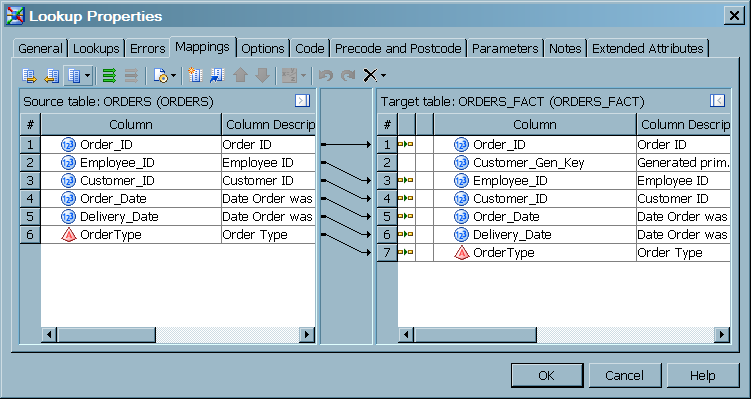
Map Key Columns between the Source and Lookup Tables
Perform the following steps to define the conditions under which values from a lookup
table are loaded into the target.
-
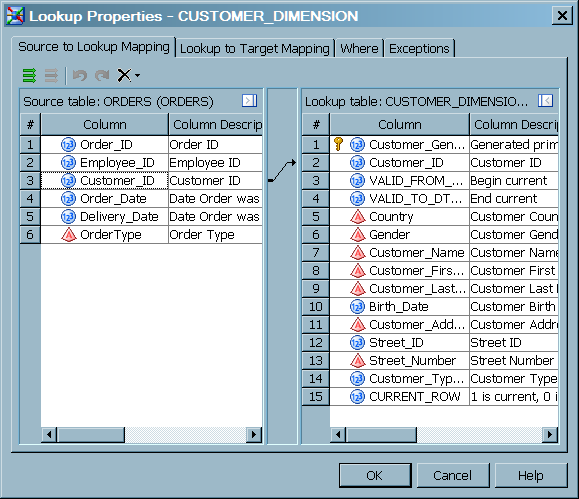
Use the Source to Lookup Mapping tab to specify the source and lookup columns that are compared at run time. If values match, then the lookup value is added to the target. If a match is not found, then an exception condition exists.In the sample job, the business key in the source is compared to the business key in the lookup table, which in this case is a dimension table that contains customer information. To map the columns, click the Customer_ID column in the Source Table list. Then right-click the Customer_ID column in the Lookup Table list, and select Map Selected. A mapping arrow appears between the two columns. The following display depicts the completed Source to Lookup Mapping tab.
-
If you want to define a WHERE clause that further refines the match between the business key columns, click the Where tab and build an expression. Click Apply to save changes.Note: If you use a WHERE clause, and if the lookup table uses a generated key, you can improve performance by creating an index on the generated key column, as described in About Generated Keys.
Map Lookup Columns Into the Target
Perform the following steps to map lookup columns into the target. Values are loaded
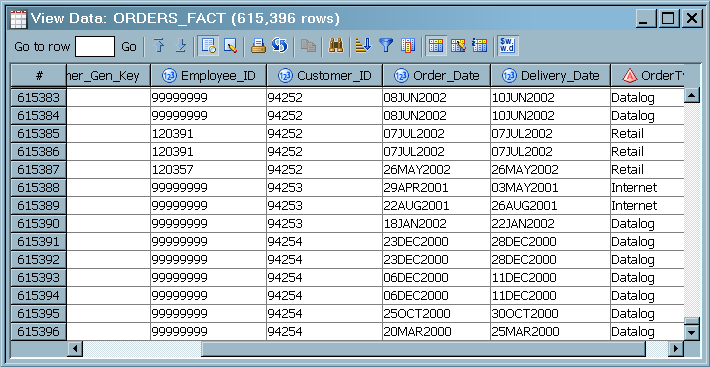
when keys match between the source table and lookup table. In the sample job, the
target receives lookup table key values. In the target, the key values connect
the factual events (orders) to detail data (customer information).
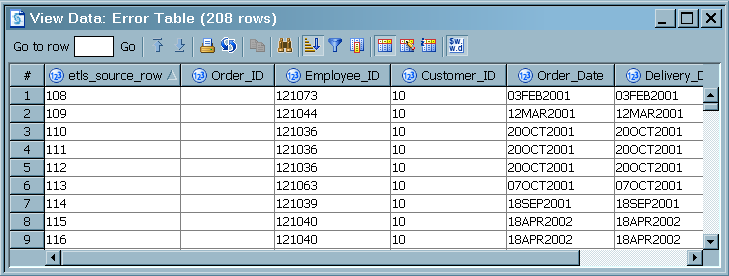
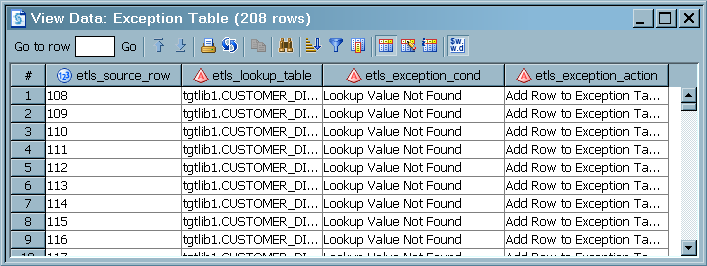
Create Error and Exception Tables
Configure Exception Handling
If you create an error table and an exception table, the Lookup transformation will,
by default, send non-matching source rows to the error table and send exception messages
to the exception table. This
sample job examines and accepts the default conditions and actions for exception handling.
Perform
the following steps to view the default exception handling:
-
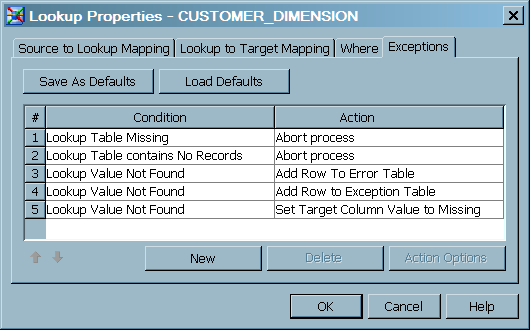
In the Lookup Properties window, open the Exceptions tab. The following display depicts the default configuration for exception handling.In this sample job, if the Customer_ID column in a source row does not match a Customer_ID value in the target, then the error and exception tables are updated and the lookup value (Customer_Gen_Key) is set to missing for that row in the target.
Run the Job and View the Output
Perform the following steps to run the job and view the output:
-
Right-click on an empty area of the job, and click Run in the pop-up menu. SAS Data Integration Studio generates code for the job and submits it to the SAS Application Server for execution.
Copyright © SAS Institute Inc. All rights reserved.