Importing New Metadata with a SAS Metadata Bridge

Problem

You want to import metadata for one or more tables that have never been registered on the current metadata server. The metadata is in a format that is accessible with a SAS Metadata Bridge.

Solution

You can use the Import Metadata Wizard and select the Import as new metadata option on the Import Selection page. This option specifies that metadata in the selected file is imported without comparing it to existing metadata.
Note: The Import as new metadata option eliminates some steps, but it can result in duplicate metadata, if any of the metadata that you are importing is for an object that has already been registered on the current metadata server.
Under change management, the imported metadata appears in your Checkouts tree, where you can review it before checking it in. Without change management, all metadata in the selected file is registered to the target metadata server.

Tasks

Import As New Metadata

The following preparation makes it easier to import metadata as new:
  • Identify the folder in the Folders tree that contains the imported metadata. You can create a new folder, if you need to do so.
  • Identify the path to the file that contains the metadata to be imported.
  • Identify the library in the target environment that contains the imported metadata. You can register a new library, if you need to do so.
Follow these steps to import metadata that is in a format that can be accessed by a SAS Metadata Bridge. The Common Warehouse Metamodel (CWM) format is one example.
Perform the following steps to import metadata for one or more tables that have never been registered on the current metadata server:
  1. Right-click the folder in the Folders tree that stores the imported metadata. Then, select Importthen selectMetadata to access the Select an import format page of the Metadata Import Wizard. This page lists the formats that are licensed for your site.
  2. Verify that the folder specified in the Folders field on the File Location page is the folder that you designated as the storage location for the imported metadata. If the folder is incorrect, click Browse to select a different folder.
  3. Specify a path to the file that contains the metadata to be imported in the File name field. The path must be accessible to the default SAS Application server or to a server you select with the Advanced button on this page. Click Next to access the Meta Integration Options page.
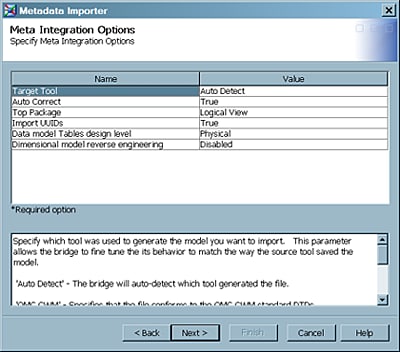
  4. Review the information on the Meta Integration Options page. Typically, you accept the default values.
    Note: The Meta Integration Options page enables you to specify how the wizard imports various kinds of metadata in the source file. To see a description of each option, select the option in the Name field, and a description of that option appears in the pane at the bottom of the page. Typically, you can accept the defaults on this page. The following display shows the Meta Integration Options page for the sample job.
    Meta Integration Options
    Meta Integration Options
    Click Next to access the Import Selection page.
  5. The Import Selection page enables you to select whether the metadata is imported as new or compared to existing metadata in the target environment. Because the sample job is a new metadata import, select Import as new metadata. Then, click Next to access the Metadata Location page.
  6. The Metadata Location page enables you to specify the library in the target environment that should contain the imported metadata. If necessary, you can click the ellipsis button in the Library field to select the library. The content in the DBMS and Schema fields is based on the library that you select. Click Next to access the Finish page.
  7. Review the metadata. Click Finish to import the metadata. When prompted to view the import log, respond as needed. After you skip or view the log, the Import Metadata wizard will close. Verify that the metadata was imported to the appropriate library and folder.
If you are not working under change management, all tables that are specified in the imported metadata are registered to the target metadata repository. Verify that the table metadata was imported into the correct folder and library.
Also, be aware that if you are working under change management, the imported tables might not appear in the Checkouts tree until you refresh the tree. Right-click the Checkouts tree and select Refresh.