Converting a SAS or DBMS Table to an XML Table
Overview
You can use the XML
Writer transformation to convert almost any data source to an XML
file. For example, you can convert data in a SAS data set (SAS proprietary
format) to a more generic XML format. You can also convert data from
any source that SAS can access, such as a text file or a DBMS table.
The XML file that is output by the writer can be generic or of a specific
type (Oracle, MSAccess, and so on). The XML file is easy to share
and can easily be read by any third-party software.
Solution
You can create a job
or update an existing job so that the SAS or DBMS table is the input
to an XML Writer transformation, and an XML file is the output for
the transformation. The process flow for the job would be similar
to the flow in the next display.
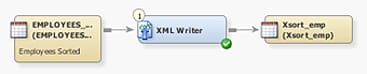
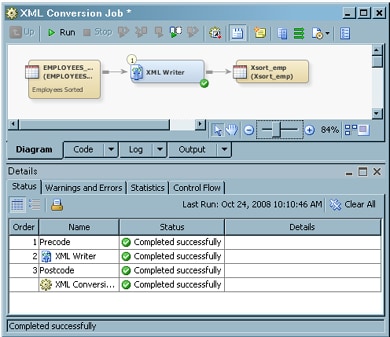
In the sample flow,
EMPLOYEES... (EMPLOYEES_SORTED) is an input table in SAS or DBMS format.
The XML Writer transformation reads the input table and writes its
content to Xsort_emp, an XML table. Assume that the SAS or DBMS input
table exists in physical storage, and that the XML target table does
not yet exist. The target table is created when the job is executed.
Tasks
Register an XML Library for the XML Target Table
The XML Writer transformation
uses a SAS XML library to access the file that contains the XML target
table. Accordingly, to use the XML Writer transformation, you must
have a SAS XML library that points to the file that contains the XML
target table.
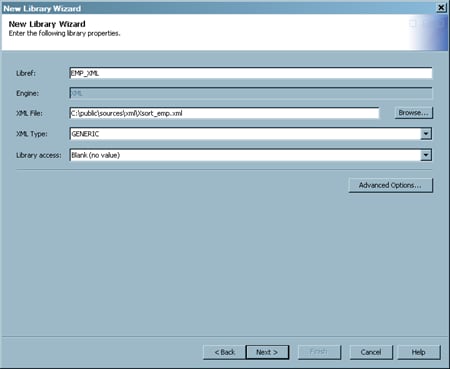
Perform the following
steps to register an XML library that points to the file that contains
an XML table:
-
Enter a libref for the new library in the Libref field and a path to an appropriate XML file in the XML File field. For the sample job, you would specify the path to the XML file (Xsort_emp.xml) that contains the target XML table. This file does not yet exist, but it is created when the job is executed. The following display shows the library properties for the sample job:
Register the XML Target Table
By registering the XML
library, you registered the location of the XML file that contains
the XML target table. You must also register the XML table itself,
to specify its columns and other attributes.
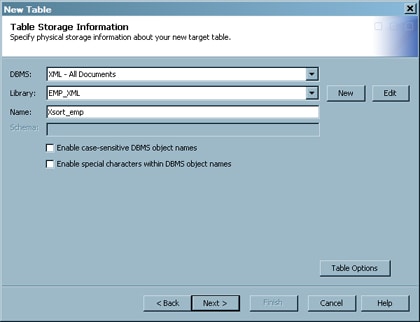
The New
Table wizard is used to register a table that does not
yet exist in physical storage, such as a table that is created when
a job is executed for the first time. This wizard enables you to copy
metadata from one or more registered tables into the metadata object
for the new table. For the sample job, assume that we want all columns
in the input table (EMPLOYEES...) to appear in the XML target table.
-
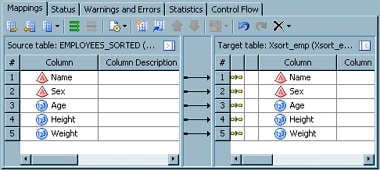
Navigate in the Available Tables field until you find the table containing the columns that you want to use for the target table definition. Then, move the columns to the Selected field. For the sample job, all of the columns in the EMPLOYEES... table are used. Click Next to access the Change Columns/Indexes page.
Copyright © SAS Institute Inc. All rights reserved.