Create Two Tables That Are Subsets of a Source

Overview

A Splitter transformation is a transformation that creates one or more subsets of a source. You can also use it to create one or more copies of a source.

Problem

You want to select two or more sets of rows from a source table and write each set to a different target table.

Solution

You can use the SAS Splitter transformation in a SAS Data Integration Studio job to support 
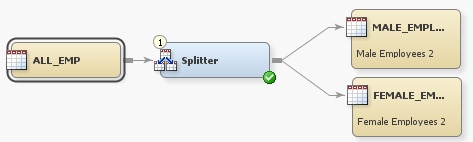
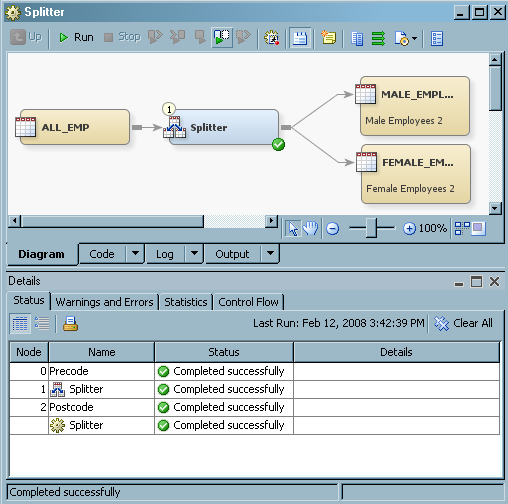
1-N outputs and one input. For example, you can create a job similar to the sample job featured in this topic. This sample job splits a 
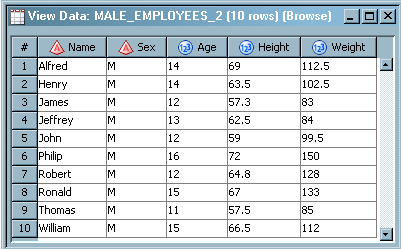
source table that contains employee data into two target tables: one for female employees and another for male employees. The sample job includes the following tasks:

Tasks

Create and Populate the Job

Perform the following steps to create and populate a new job:
  1. Create an empty SAS Data Integration Studio job.
  2. From the Data folder in the Transformations tree, select and drag a Splitter transformation and drop it in the empty job on the Diagram tab in the Job Editor window.
  3. Select and drag the source table from its folder and drop it before the Splitter transformation on the Diagram tab.
  4. Drag the cursor from the source table to the input port of the Splitter transformation. This action connects the transformation to the source.
  5. Because you want to have permanent target tables to contain the output for the transformation, right-click each of the temporary work tables attached to the transformation and click Replace in the pop-up menu. Then, use the Table Selector window to select the target tables for the job. The target tables must be registered in SAS Data Integration Studio.
The following display shows the sample process flow.
Splitter Process Flow Diagram
In the display, the source table is named ALL_EMP and the permanent target tables are named Female Employees 2 and Male Employees 2.

Specify Selection Conditions for the Target Tables

Use the Row Selection tab in the properties window for the Splitter transformation to specify the selection conditions for the two target tables. Perform the following steps:
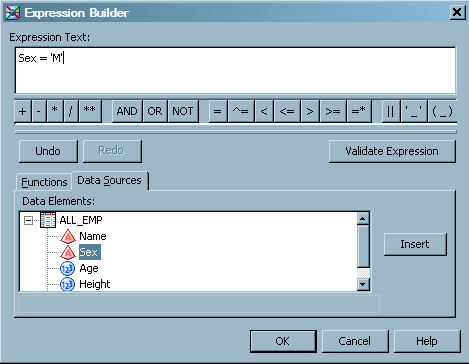
  1. In the Job Editor, open the properties window for the Splitter transformation. Then, click the Row Selection tab. The Target Tables field displays the targets that have been dropped on the current Splitter transformation. (Male Employees 2 and Female Employees 2 are the target tables in the sample job.) You must define unique selection criteria for each target.
  2. Click the name of the first target table in the Target Tables field. The first target table for the sample job is Male Employees 2.
  3. Select the Row Selection Conditions in the Row Selection Type field. Note that the Subset Data button is activated. Click Subset Data to display the Expression Builder window.
  4. Define the row selection criteria for the selected target table (Male Employees 2 in the sample job). You can either enter the selection criteria directly in the Expression Text field, or you can use the tools available on the Functions and Data Sources tabs. The selection condition for the Male Employees 2 table is
    SEX='M'
    .
    The following display shows the completed Row Selection tab for the first target table in the sample job.
    Row Selection Tab with Male Employees 2 Selection Criteria
    Row Selection Tab with Male Employees 2 Selection Criteria
  5. Perform the row selection conditions for the remaining target tables. In the sample job, the remaining target table is named Female Employees 2.
  6. Click OK to save the selection criteria for the target tables and close the properties window for the Splitter transformation.
You have defined a job that selects rows for female employees and writes the rows to the target table Female Employees 2. The job also selects rows for male employees and writes the rows to the target table Male Employees 2.

Run the Job and View the Output

Perform the following steps to run the job and view the output:
  1. Right-click on an empty area of the job, and click Run in the pop-up menu. SAS Data Integration Studio generates code for the job and submits it to the SAS Application Server for execution. The following display shows a successful run of a sample job.
    Successfully Completed Sample Job
    Successfully Completed Sample Job
  2. If error messages are displayed on the Status tab, read and respond to the messages as needed.
  3. To view the target table, right-click the target and select Open. The following display shows the data for the Male Employees 2 target table in the sample job.
    Male Employees 2 Target Table Data
    Male Employees 2 Target Table Data