Registering a Fixed-Width External File
Solution
Tasks
Run the Fixed-Width External File Wizard
Perform the following steps to use one method to register an external
file in the fixed-width external file wizard:
-
Right-click the destination folder for the external file metadata. Then, select New
 External FileFIxed Width to access the General
page in the New Fixed Width External File wizard. Enter an appropriate
name and description of the external file that you want to register.
Click Next to access the External File Location
page.
External FileFIxed Width to access the General
page in the New Fixed Width External File wizard. Enter an appropriate
name and description of the external file that you want to register.
Click Next to access the External File Location
page.
-
The Pad column values with blanks check box is selected by default. Deselect this check box if the columns in your external file are short. It is unnecessary to pad values in short columns, and padded values can hurt performance. In addition, select the Treat unassigned values as missing check box. This setting adds the TRUNCOVER option to the SAS code, which sets variables without assigned values to missing.
-
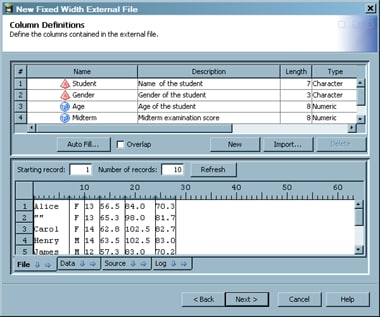
Click the appropriate tick marks in the ruler displayed at the top of the view pane. You can get the appropriate tick mark position numbers from the documentation that comes with the data to set the boundaries of the columns in the external file. The process is similar to the process that is used to set tabs in word processing programs. To set the first column boundary, click the tick mark on the ruler that immediately follows the end of its data. A break line displays, and the column is highlighted. For example, if the data in the first column extends to the eighth tick mark, you should click the ninth mark. Notice that the metadata for the column is also populated into the column component at the top of the page.
-
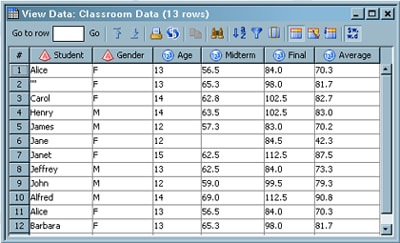
The preliminary metadata that is populated into the columns component usually includes column names and descriptions that are too generic to be useful for SAS Data Integration Studio jobs. Fortunately, you can modify the columns component by clicking in the cells that you need to change and by entering the correct data.Note: The only values that need to be entered for the sample file are appropriate names and descriptions for the columns in the table. The other values were created automatically when you defined the columns and clicked Auto Fill. However, you should make sure that all variables have informats that describe the data that you are importing because the auto fill function provides a best estimate of the data. You need to go in and verify this estimate. If appropriate informats are not provided for all variables in the fixed-width file, then incorrect results can be encountered when the external file is used in a job or when its data is viewed. A sample of a completed Column Definitions page is shown in the following display.You can click Data to see a formatted view of the external file data. To view the code that is generated for the external file, click the Source tab. To view the SAS log for the generated code, click the Log tab. The code that is displayed in the Source tab is the code that is generated for the current external file when it is included in a SAS Data Integration Studio job.

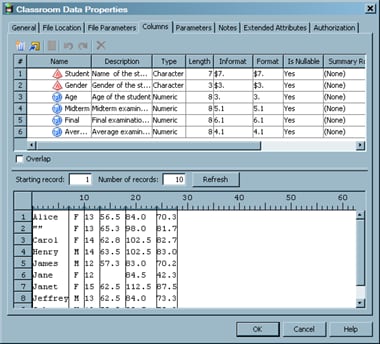
View the External File Metadata
After
you have generated the metadata for an external file, you can use
SAS Data Integration Studio to view, and possibly make changes to,
that metadata. For example, you might want to remove a column from
a table or change the data type of a column. Any changes that you
make to this metadata do not affect the physical data in the external
file. However, the changes affect the data that is displayed when
the external table is used in SAS Data Integration Studio. Perform
the following steps to view or update external file metadata:
Copyright © SAS Institute Inc. All rights reserved.