Exporting Metadata with a SAS Metadata Bridge
Problem
You want to export metadata
from SAS Data Integration Studio in a format that is supported by
a SAS Metadata Bridge. For example, you can export metadata for use
in a third-party data modeling application. Some SAS solutions rely
on this method.
Note: This method does not export
the metadata to a SAS Package. For information about SAS Packages,
see Working with SAS Package Metadata.
Solution
Use the Metadata
Export wizard to export the metadata. Later, you can
import the metadata in a third-party application or in SAS Data Integration
Studio. It is assumed that you have prepared for this task as described
in Preparing to Import or Export with a SAS Metadata Bridge..
Tasks
Document the Metadata That Will Be Exported (optional)
Metadata export and
import tasks are easier to manage if you create a document that describes
the metadata to be exported, the metadata that should be imported,
and the main metadata associations that must be reestablished in the
target environment. Otherwise, you might have to guess about these
issues when you are using the import and export wizards.
Export Selected Metadata
Perform the following
steps to export metadata from SAS Data Integration Studio in a format
that is supported by a SAS Metadata Bridge.
-
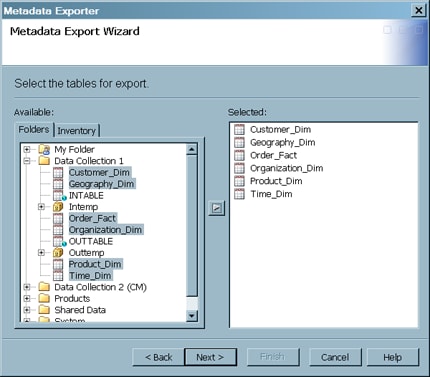
Navigate through the folder structure on Select the tables for export page until you locate the tables that you need to export. Then, select the tables in the Available field and move them to the Selected field. The following display shows the completed Select the tables for export page for a sample job.
-
Review the information located on the Meta Integration Options page. Typically, you accept the default values.Note: The Meta Integration Options page enables you to specify how the wizard imports various types of metadata in the source file. To see a description of each option, select the option in the Name field, and a description of that option appears in the pane at the bottom of the page. Typically, you can accept the defaults on this page.
Copyright © SAS Institute Inc. All rights reserved.