XML Property File Elements
Overview
The most basic properties
file consists of a single
Component element
with attributes, a single nested PropertyDescriptors element,
and a single nested Views element. In the
example properties file depicted above, the PropertyDescriptors and Views elements
are empty. As the discussion progresses, the PropertyDescriptors element
is populated with a variety of Property elements
and Control elements; the Views element
is populated with a variety of View elements, Group elements,
and PropertyRef elements. Some of these elements
are used to integrate the node into the SAS Enterprise Miner application.
Some elements link the node with a SAS program that you write to provide
the node with computational functionality. Other elements are used
to populate the node's Properties panel, which serves as a graphical
user interface (GUI) for the node's SAS program.
The Component Element
The
Component element
encompasses all other elements in the properties file. The attributes
of the Component element provide information
that is used to integrate the extension node into the SAS Enterprise
Miner environment. All extension nodes share three common Component attributes: type, resource,
and serverclass. These three attributes must
have the values that are displayed in the preceding example. The values
of the other Component attributes are unique
for each extension node.
These other
Component attributes
convey the following information:
-
name— the name of the node as it appears on the node's icon in a process flow diagram. -
displayName— the name of the node that is displayed in the tooltip for the node's icon on the node Toolbar and in the tooltip for the node's icon in a process flow diagram. The amount of text that can be displayed on an icon is limited but tooltips can accommodate longer strings. -
description— a short description of the node that appears as a tooltip for the node Toolbar. -
group— the SEMMA group where the node appears on the SAS Enterprise Miner node Toolbar. The existing SEMMA group values are as follows:-
Sample
-
Explore
-
Modify
-
Model
-
Assess
-
Utility
If you select a value from this list, your extension node's icon appears on the toolbar under that group. However, you can add your own group to the SEMMA toolbar by specifying a value that is not in this list. -
-
icon— the name of the two GIF files that are used to generate the SAS Enterprise Miner icons. The two GIF files share a common filename. -
prefix— a string used to name files (data sets, catalog, and so on) that are created on the server. The prefix must be a valid SAS variable name and should be as short as possible. SAS filenames are limited to 32 characters, so if your prefix is k characters long, SAS Enterprise Miner is left with 32 – k characters with which to name files. The shorter the prefix, the greater the flexibility the application has for generating unique filenames.
Consider the following
example:
<?xml version="1.0" encoding="UTF-8"?>
<!DOCTYPE Component PUBLIC
		"-//SAS//EnterpriseMiner DTD Components 1.3//EN"
		"Components.dtd">
<Component
	type="AF"
	resource="com.sas.analytics.eminer.visuals.PropertyBundle"
	serverclass="EM6"
	name="Example"
	displayName="Example"
	description="Extension Node Example"
	group="EXPLORE"
	icon="Example.gif"
	prefix="EXMPL" >

<PropertyDescriptors>
</PropertyDescriptors>

<Views>
</Views>

</Component>
The
displayName="Example" and description="Extension
Node Example" attributes together produce the tooltip
that appears when you position your mouse pointer over the extension
node's icon on the node Toolbar.
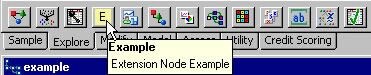
The
name="Example" attribute
produces the name on the icon in the following example. The displayName="Example" produces
the tooltip that is displayed when you position your mouse pointer
over the node's icon in the process flow diagram.

The
group="EXPLORE" attribute
informs SAS Enterprise Miner that the extension node's icon should
be displayed in the Explore tab of the node toolbar. The icon="Example.gif" attribute
informs SAS Enterprise Miner of the name of the GIF file used to produce
the icon on the node toolbar. The prefix="EXMPL" attribute
informs SAS Enterprise Miner that filenames of files generated on
behalf of this node should share a common prefix of EXMPL. The prefix
is also used as the Node ID in the Properties panel. When deployed,
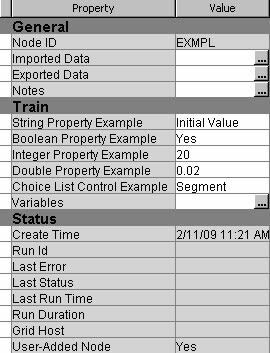
this extension node would have the following Properties panel:
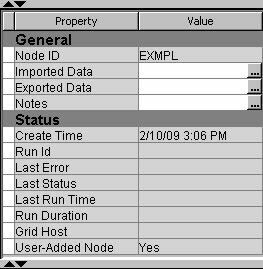
The General properties
and Status properties that are displayed here are common to all nodes
and are generated automatically by SAS Enterprise Miner.
The PropertyDescriptors Element
General Information
The
PropertyDescriptors element
provides structure to the XML document. Having all of the Property elements
encompassed by a single PropertyDescriptors element
isolates the Property elements from the rest
of the file's contents and promotes efficient parsing. The real
information content of the PropertyDescriptors element
is provided by the individual Property elements
that you place within the PropertyDescriptors element.
A variety of Property elements can be used
in an extension node. Each type of Property element
is discussed in detail here. Working examples for each type of Property element
are also provided.
In the following sections,
you will see example code that creates four different property types.
Those types are string, Boolean, integer, and double. The extension
node’s Properties Panel will resemble the following image:
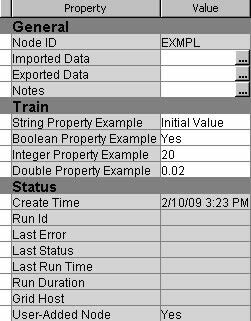
These four elements
are the most basic forms of the available
Property elements.
For some applications, the basic forms are sufficient. However, some
applications might require a more sophisticated interface. You might
also want to restrict the set of valid values that a user can enter.
Such capabilities are provided by Control elements.
Note: For this example, all of
the newly created properties were placed under the heading Train.
That heading was generated using a View element, discussed later.
Property Elements
The different types
of
Property elements are distinguished by
their attributes. The attributes that are currently supported for
extension nodes are as follows:
-
type— specifies one of four supported types ofPropertyelement. The supported types areString,boolean,int, anddouble. These values are case sensitive. -
name— a name by which thePropertyelement is referenced elsewhere in the properties file and in the node's SAS code. At run time, SAS Enterprise Miner generates a corresponding macro variable with the name &EM_PROPERTY_name. By default, &EM_PROPERTY_name resolves to the value that is declared in the initial attribute of thePropertyelement. If a user specifies a value for the property in the Properties panel, &EM_PROPERTY_name resolves to that new value. Macro variable names are limited to 32 characters. Twelve characters are reserved for the EM_PROPERTY_ prefix, so the value specified for the name attribute must be 20 characters or less. -
displayName— the name of thePropertyelement that is displayed in the node's Properties panel. -
description— the description of thePropertyelement that is displayed in the node's Properties panel. -
initial— defines the initial or default value for the property. -
edit— indicates whether the user can modify the property's value. Valid values areYandN.
Some
Property elements
support all of these attributes, and some support only a subset.
Examples of the syntax
for each of the four
type attributes are
provided below. These examples can be copied and used to create your
own properties file. All you need to do is change the values for the name, displayName, description, initial,
and edit attributes.
The String Property
<Property
	type="String"
	name="StringExample"
	displayName="String Property Example"
	description="write your own description here"
	initial="Initial Value"
	edit="Y" />
The value of a
String property
is displayed as a text box that a user can edit. Use a String property
when you want the user to enter a string value. For example, your
extension node might create a new variable, and you could allow the
user to provide a variable label.
The preceding example
is typical of a
String Property element that
corresponds to a specific option or argument of the node's SAS
program. However, there are two special String Property elements,
referred to as the Location Property and
the Catalog Property, that you must include
in the properties file. These two special String Property elements
are used to inform SAS Enterprise Miner of the location of the node's
SAS program. These two Property elements
appear as follows:
<Property
	type="String"
	name="Location"
	initial="CATALOG"/>

<Property
	type="String"
	name="Catalog"
	initial="SASHELP.EMEXT.Example.SOURCE"/>
The
Location
                        Property
should be copied verbatim. The Catalog
Property can also be copied. However, you should change
the value of the initial attribute to the name of the file that contains
the entry point of your SAS program in the Catalog Property.
As discussed earlier in the section on Server Code, your SAS program
can be stored in several separate files. However, there must always
be one file that contains a main program that executes first. The
value of the initial attribute of the Catalog Property should
be set to the name of this file. If you want to store the main program
in an external file, you still need to create a source file that is
stored in a SAS catalog. The contents of that file would then simply
have the following form:
filename temp 'filename';
%include temp;
filename temp;
Here,
filename is
the name of the external file that contains the main program.
The Integer Property
<Property
	type="int"
	name="Integer"
	displayName="Integer Property Example"
	description="write your own description here"
	initial="20"
	edit="Y">
</Property>
The value of an
Integer
                        Property
is displayed as a text box that a user can edit.
Use an Integer Property when you want the
user to provide an integer value as an argument to your extension
node's SAS program.
The Double Property
<Property
	type="double"
	name="Double"
	displayName="Double Property Example"
	description="write your own description here"
	initial="0.02"
	edit="Y">
</Property>
The value of a
Double
                        Property
is displayed as a text box that a user can edit.
Use a Double Property when you want the user
to provide a real number as an argument to your extension node's
SAS program.
The Control Element
General Information
In addition to specifying
the attributes for a
Property element, you
can also specify one of several types of Control elements. Control elements
are nested within Property elements. Each
type of Control element has its own unique
syntax.
Some common
Control elements
include the following:
-
ChoiceList— displays a predetermined list of values. -
Range— validates a numeric value entered by the user. -
SASTABLE— opens a Select a SAS Table window that enables the user to select a SAS data set. -
FileTransfer— provides a dialog box that enables a user to select a registered model. -
Dialog— opens a dialog box that provides access to a variables table from a predecessor data source node, an external text file, or a SAS data set. -
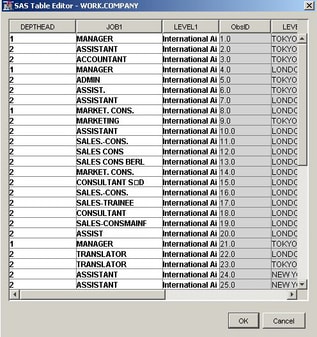
TableEditor— displays a table and permits the user to edit the columns of the table. -
DynamicChoiceList— displays a dynamically generated list of values. This type ofControlelement is used with aTableEditorControlelement. -
DirectorySelector— opens a Select Server Directory window that enables the user to select a directory.
Some
Control elements
require accompanying server code to provide functionality. These include
the TableEditor, DynamicChoiceList, Filetransfer,
and some Dialog Control elements.
See Controls that Require Server Code for examples of these types of Control element.
This chapter follows a discussion of extension node server code.
Examples of the syntax
for certain
Control elements that do not
require server code follow. These examples can be copied and used
to create your own properties file.
This document does not
cover all of the
Control elements that are
available for extension nodes. See the Ext Demo node and its documentation
for examples of other Control elements.
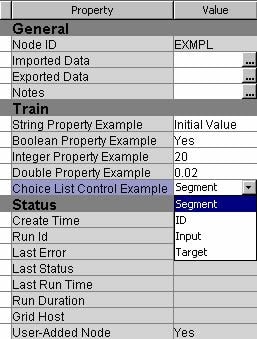
String Property with a ChoiceList Control
<Property
	type="String"
	name="ChoiceListExample"
	displayName="Choice List Control Example"
	description="write your own description here"
	initial="SEGMENT">
	<Control>
		<ChoiceList>
		<Choice rawValue="SEGMENT" displayValue="Segment" />
		<Choice rawValue="ID" displayValue="ID" />
		<Choice rawValue="INPUT" displayValue="Input" />
		<Choice rawValue="TARGET" displayValue="Target" />
		</ChoiceList>
	</Control>
</Property>
A
ChoiceList control
enables you to present the user with a drop-down list that contains
predetermined values for a property. A String property
with a ChoiceList control consists of the
following items:
-
a
Propertyelement with attributes. -
a single
Controlelement. -
a single
ChoiceListelement. -
two or more
Choiceelements. EachChoiceelement represents one valid value for a program option or argument.
Each
Choice element
has the following attributes:
-
rawValue— the value that is passed to the node's SAS program. -
displayValue— the value that is displayed to the user in the Properties panel. It can be any character string. If nodisplayValueis provided, therawValueis displayed.
Note: Make sure that the value
of the initial attribute of the
Property element
matches the rawValue attribute of one of
the Choice elements. The value of the Property element's
initial attribute is the default value for the property; it is the
value that is passed to your SAS program if the user does not select
a value from the Properties panel. If the initial attribute does not
match the rawValue attribute of one of the Choice elements,
you could potentially be passing an invalid value to your SAS program.
To avoid case mismatches, it is a good practice to write the rawValue attributes
and the initial attribute using all capital letters.
String Property with a Dialog Control
There are three types
of
Dialog Control elements supported for
extension nodes in SAS Enterprise Miner. The Dialog elements
are uniquely distinguished by their class attributes. The class attributes
are as follows:
-
com.sas.analytics.eminer.visuals.VariablesDialog
-
com.sas.analytics.eminer.visuals.CodeNodeScoreCodeEditor
-
com.sas.analytics.eminer.visuals.InteractionsEditorDialog
In each of the three
cases, the class attribute must be specified verbatim. The
Dialog control
with class=com.sas. analytics.eminer.visuals.VariablesDialog is
the only Dialog control of the three that
does not require accompanying server code.
Dialog Control with class=com.sas.analytics.eminer.visuals.VariablesDialog
<Property
	type="String"
	name="VariableSet"
	displayName="Variables"
	description="Variable Properties">
	<Control>
		<Dialog
			class="com.sas.analytics.eminer.visuals.VariablesDialog"
			showValue="N" />
	</Control>
</Property>
This  ) is displayed in the Value column.
Property element
configuration provides access to the variables exported by a predecessor
Data Source node. Notice the class attribute of the Dialog element.
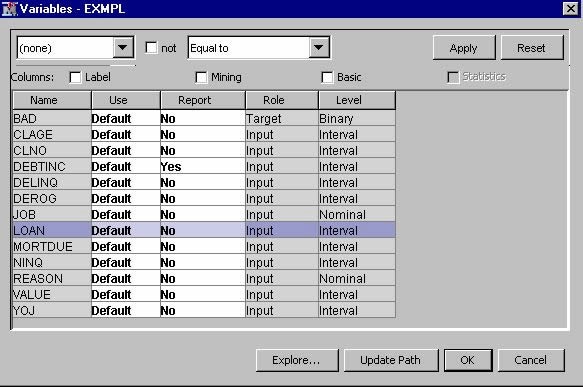
When you include a Property element of this
type, the displayName value is displayed
in the Properties panel and an ellipsis icon () is displayed in the Value column.
Clicking on the icon opens a window containing a variables table.
A filter based on the variable metadata column values can be applied
so that only a subset of the variables is displayed in the table.
The user can set the Use and Report status
for individual variables, view the columns metadata, or open the Explore window.
In the Explore window, the user can view
a variable's sampling information, observation values, or plots
of variables' distributions.
icon opens a window containing a variables table.
A filter based on the variable metadata column values can be applied
so that only a subset of the variables is displayed in the table.
The user can set the Use and Report status
for individual variables, view the columns metadata, or open the Explore window.
In the Explore window, the user can view
a variable's sampling information, observation values, or plots
of variables' distributions.
If you set the value
of the
showValue attribute to Y,
the name of the VariableSet data set name
is displayed beside the ellipsis icon.
Note: You use this
Property and Control configuration
only when you want the user to be able to control which variables
the node uses.
The other two types
of
Dialog
                        Control
elements are used to access
files or data sets that are not exported by predecessor nodes in a
process flow diagram. In order to access such files or data sets,
you must first register these files or data sets with Enterprise Miner.
This topic is explained later in a discussion about extension node
server code. Therefore, illustrations of the two additional Dialog
Control elements are presented in a later chapter after
you have gained the requisite knowledge for registering files and
data sets that are to be accessed by your extension node.
Integer Property with a Range Control
<Property
	type="int"
	name="Range"
	displayName="Integer Property with Range Control"
	description="write your own description here"
	initial="20"
	edit="Y">
	<Control>
		<Range min="1"
			excludeMin="N"
			max="1000"
			excludeMax="N"/>
	</Control>
</Property>
The addition of the
Range
                        Control
element to an Integer Property element
enables you to restrict the range of permissible values that a user
can enter. The Control element has no attributes
in this case. Instead, a Range element is
nested within the Control element. The Range element
has these four attributes:
-
min— an integer that represents the minimum of the range of permissible values. -
excludeMin— when this attribute is set to Y, the minimum value of the range that is declared in theminattribute is excluded as a permissible value. When this attribute is set to N, the minimum value is a permitted value. -
max— an integer that represents the maximum of the range of permissible values. -
excludeMax— when this attribute is set to Y, the maximum value of the range that is declared in themaxattribute is excluded as a permissible value. When this attribute is set to N, the maximum value is a permitted value.
If the user enters a
value that is outside the permissible range, the value reverts to
the previous valid value.
Double Property with a Range Control
<Property
	type="double"
	name="double_range"
	displayName="Double Property with Range Control"
	description="write your own description here"
	initial="0.33"
	edit="Y">
	<Control>
		<Range
			min="0"
			excludeMin="Y"
			max="1"
			excludeMax="Y" />
	</Control>
</Property>
The addition of the
Range
                        Control
element to a Double Property element
enables you to restrict the range of permissible values that a user
can enter. The Control element has no attributes
in this case. Instead, a Range element is
nested within the Control element. The Range element
has these four attributes:
-
min— an integer that represents the minimum of the range of permissible values. -
excludeMin— when this attribute is set to Y, the minimum value of the range that is declared in theminattribute is excluded as a permissible value. When this attribute is set to N, the minimum value is a permitted value. -
max— an integer that represents the maximum of the range of permissible values. -
excludeMax— when this attribute is set to Y, the maximum value of the range that is declared in themaxattribute is excluded as a permissible value. When this attribute is set to N, the maximum value is a permitted value.
If the user enters a
value that is outside the permissible range, the value reverts to
the previous valid value.
String Property with a SASTABLE Control
<Property
	type="String"
	name="SASTable"
	displayName="SASTABLE Control Example"
	description="write your own description here"
	initial=""
	edit="Y">
	<Control
		type="SASTABLE"
		showValue="Y"
		showSystemLibraries="Y"
		noDataSpecified="Y" />
</Property>
A
SASTABLE
                        Control
element enables the user to select the name of
a SAS data set. The default value of a String Property element
with a SASTABLE control is a null string.
When the user clicks
on the icon, a Select a SAS Table window
is displayed and the user is permitted to select a SAS data set from
the SAS libraries that are displayed.
icon, a Select a SAS Table window
is displayed and the user is permitted to select a SAS data set from
the SAS libraries that are displayed.

The
Control element
has these four attributes:
-
type— declares the type of control. This attribute value must be set to SASTABLE to produce the effect depicted here. -
showValue— when set to Y, this attribute displays the name of the data set selected by the user in the Value column of the Properties panel. When this attribute is set to N, the Value column of the Properties panel remains empty even when a user has selected a data set. -
showSystemLibraries— when this attribute is set to Y, SAS Enterprise Miner project libraries are displayed in the Select a SAS Table window. When this attribute is set to N, SAS Enterprise Miner project libraries are not displayed in the Select a SAS Table window. For example, in the previous example, notice the SAS Enterprise Miner project libraries Emds, Emlds, Emlmeta, Emmeta, and Emws2. If theshowSystemLibrariesattribute had been set to N, these SAS Enterprise Miner libraries would not be displayed. -
noDataSpecified— When this attribute is set to Y, a check box with the label No data set to be specified appears in the bottom left corner of the Select a SAS Table window. When checked, theSASTABLEcontrol is cleared and the value of the String Property is set to null. When set to N, this attribute has no effect.
The default values of
the property and the corresponding macro variable &EM_PROPERTY_propertyname
are null. When a user selects a data set, the name of the data set
is assigned to &EM_PROPERTY_propertyname and is displayed in the Value column
of the Properties panel. The property's value can be changed
to another data set name by clicking on the icon and selecting a new
data set. Clicking on the icon and then clicking on the No data
set to be specified check box clears the property.
icon and then clicking on the No data
set to be specified check box clears the property.
String
                        Property
with a TableEditor Control: A Preview
A
String
                        Property
with a TableEditor control
requires SAS code in order for it to function properly. Because this
control requires server code, which has not yet been discussed, a
complete discussion and example of this type of Property and Control configuration
is provided in Appendix 2: Controls that Require Server Code. This section provides a preview of
the most basic type of table editor. This preview also serves as a
reference example for the discussion on server code in the next chapter.
When a ) appears in the Value column
of the Properties panel next to the property name.
String
Property with a TableEditor control
is implemented, an ellipsis icon () appears in the Value column
of the Properties panel next to the property name.
Clicking on the icon
opens a Table Editor window, which displays
a table that is associated with the
Control element.
Depending on how the
Control element is configured, a user might then edit some or all
of the values in the table. You also have the option of writing specially
identified blocks of SAS code that execute either when the table first
opens or when the table is closed.
String Property with a DirectorySelector
<Property
	type="String"
	name="DirectorySelector"
	displayName="Directory Selector"
	description="Dialog to select a directory"
	edit="Y">

	<Control>
      <Custom class="com.sas.analytics.eminer.
      visuals.DirectoryBrowswer">
         <Option name="allowTyping" value="Y" />
      </Custom>
   </Control>
</Property>
A
DirectorySelector control
enables you to present the user with a Selector Server
Directory dialog box. This is useful if your node needs
to save several files to or import several files from the same directory.
The Views Element
General Information
The
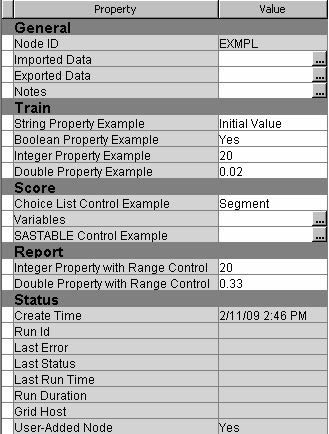
Views element
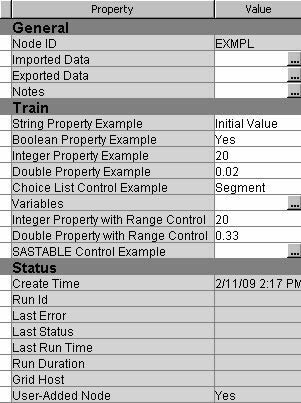
organizes properties in the Properties panel. The following Properties
panel contains one of each type of Property element:
Here is the
Views element
of the XML properties file that generates this Properties panel:
<Views>
	<View name="Train">
		<PropertyRef nameref="StringExample"/>
		<PropertyRef nameref="BooleanExample"/>
		<PropertyRef nameref="Integer"/>
		<PropertyRef nameref="Double"/>
		<PropertyRef nameref="ChoiceListExample"/>
		<PropertyRef nameref="VariableSet"/>
		<PropertyRef nameref="Range"/>
		<PropertyRef nameref="double_range"/>
		<PropertyRef nameref="SASTable"/>
	</View>
</Views>
Within the
Views element,
there is a single View element. That View element
has a single attribute — name —
and its value is Train. Nested within the View element
is a collection of PropertyRef elements.
There is one PropertyRef element for each Property element
in the properties file. Each PropertyRef element
has a single nameref attribute. Each nameref has
a value that corresponds to the name attribute of one of the Property elements.
When you add the
Train
                        View
element, SAS Enterprise Miner separates the node's
properties into three groups: General, Train,
and Status. The General and Status groups
are automatically generated and populated by SAS Enterprise Miner.
These two groups and the properties that populate them are common
to all nodes and do not have to be specified in the extension node's
XML properties file. The Train group contains
all of the properties that are specified by the PropertyRef elements
that are nested within the Train View element.
Now suppose that instead
of a single
View element, there were three View elements:
Train, Score, and Report. Suppose that we also remove some of the PropertyRef elements
from the Train View, put some in the Score
View, and put the rest in the Report View,
as follows:
<Views>
	<View name="Train">
		<PropertyRef nameref="StringExample"/>
		<PropertyRef nameref="BooleanExample"/>
		<PropertyRef nameref="Integer"/>
		<PropertyRef nameref="Double"/>
	</View>
	<View name="Score">
		<PropertyRef nameref="ChoiceListExample"/>
		<PropertyRef nameref="VariableSet"/>
		<PropertyRef nameref="SASTable"/>
	</View>
	<View name="Report">
		<PropertyRef nameref="Range"/>
		<PropertyRef nameref="double_range"/>
	</View>
</Views>
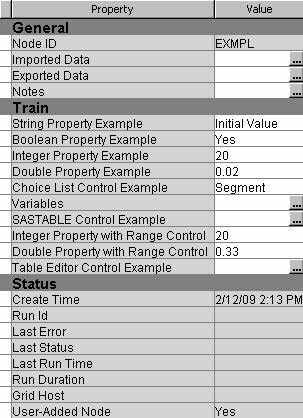
The following Properties
panel would appear as a result:
By convention, SAS Enterprise
Miner nodes use only three
View elements
with the names Train, Score, and Report. However, not all nodes need
all three View elements. Although it is recommended,
you are not required to follow this convention. Your node can have
as many different View elements as you like
and you can use any names that you want for the View elements.
The Group Element
You can indicate to
the user when a set of
Property elements
is related by placing the related Property elements
in a group. When a group is defined, all of the properties in the
group appear as items in an expandable and collapsible list under
a separate subheading. This is accomplished by nesting a Group element
within a View element and then nesting PropertyRef elements inside
the Group element.
Group elements
have three attributes.
-
name— uniquely identifies theGroupto the Enterprise Miner server. -
displayName— the name of theGroupthat is displayed in the node's Properties panel. -
description— the description of theGroupthat is displayed in the node's Properties panel.
For example, consider
the following Views configuration:
<Views>
	<View name="Train">
		<PropertyRef nameref="StringExample" />
		<PropertyRef nameref="BooleanExample" />
		<Group
			name="GroupExample"
			displayName="Group Example"
			description="write your own description here">
			<PropertyRef nameref="Integer" />
			<PropertyRef nameref="Double" />
			<PropertyRef nameref="ChoiceListExample" />
		</Group>
		<PropertyRef nameref="VariableSet" />
		<PropertyRef nameref="SASTable" />
		<PropertyRef nameref="Range" />
		<PropertyRef nameref="double_range" />
	</View>
</Views>
The following Properties
panel results:
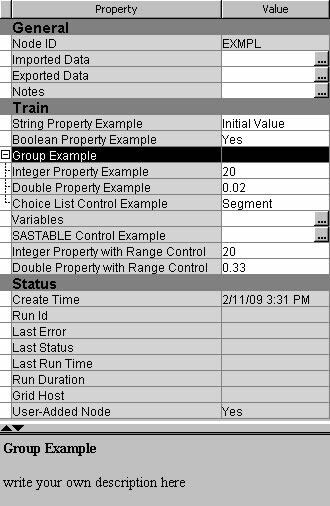
You can click on the
+ or - sign beside the group name to expand or collapse, respectively,
the list of properties that are included in a group.
You can examine the
XML properties files of existing SAS Enterprise Miner nodes and use
them as guides to constructing your own properties files. The exact
location of these files depends on your operating system and installation
configuration, but they can be found under the SAS configuration directory:
...\SAS\Config\Lev1\AnalyticsPlatform\apps\EnterpriseMiner\conf\components.
Be aware, however, that
SAS Enterprise Miner nodes can have features that are not supported
for extension nodes. If you see an attribute in a SAS node's
XML properties file that is not documented here, assume that the attribute
is not supported for extension nodes.
The SubGroup Element
You might also encounter
situations where your node's SAS program has many options and
arguments. In such cases, the list of properties can become too long
to conveniently display in the Properties panel. In such situations,
you might want to have related properties in their own separate Properties
panel. This is accomplished by using SubGroup elements. SubGroup elements
have essentially the same structure as Group elements. That is, SubGroup
elements have these three attributes:
-
name— uniquely identifies theSubGroupto the Enterprise Miner server. -
displayName— the name of theSubGroupthat is displayed in the node's Properties panel. -
description— the description of theSubGroupthat is displayed in the node's Properties panel.
Nest the icon appears in the Value column
of the Properties panel next to the icon opens a child window. The properties that are
nested within the
SubGroup element
within a View element, and nest PropertyRef elements
within the SubGroup element. When a SubGroup element
is used, an icon appears in the Value column
of the Properties panel next to the displayName of
the SubGroup. Clicking the icon opens a child window. The properties that are
nested within the SubGroup element are displayed
in that window. The Property elements and Control elements
within the subgroup's Properties panel function the same way
they function in the main Properties panel.
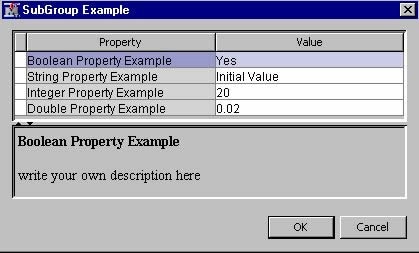
For example, consider
the following
Views element:
<Views>
	<View name="Train">
		<SubGroup
			name="SubGroupExample"
			displayName="SubGroup Example"
			description="write your own description here">
			<PropertyRef nameref="BooleanExample"/>
			<PropertyRef nameref="StringExample"/>
			<PropertyRef nameref="Integer"/>
			<PropertyRef nameref="Double"/>
		</SubGroup>
		<PropertyRef nameref="ChoiceListExample"/>
		<PropertyRef nameref="VariableSet"/>
		<PropertyRef nameref="SASTable"/>
		<PropertyRef nameref="Range"/>
		<PropertyRef nameref="double_range"/>
	</View>
</Views>
The following Properties
panel results:
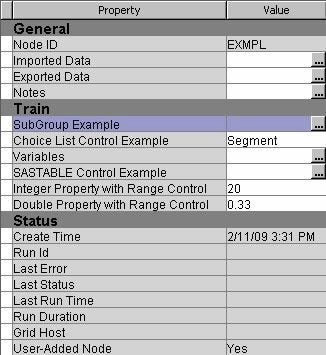
The four properties
that are nested in the icon opens the following child window:
SubGroup element do
not appear in the Properties panel. Instead, the SubGroup element's
name value is displayed. Clicking the adjacent icon opens the following child window:
Copyright © SAS Institute Inc. All rights reserved.