First, familiarize yourself
with the following documentation:
-
In the SAS 9.3 Intelligence Platform:
Application Server Administration Guide, see the section Add a New
Logical Server in an Existing SAS Application Server, located at
http://support.sas.com/documentation/cdl/en/biasag/62612/HTML/default/viewer.htm#n10005intelplatform00srvradm.htm.
-
In the SAS 9.3 Intelligence Platform:
Middle-Tier Administration Guide, see the section Job Execution Services,
located at
http://support.sas.com/documentation/cdl/en/bimtag/64207/HTML/default/viewer.htm#n08w66tf7khiu0n15tgt8rsow99u.htm.
Complete the following
steps to add a new workspace server to your SAS Enterprise Miner installation:
-
Start the SAS Deployment
Wizard from the highest-level directory in your SAS Software Depot
using the command that is appropriate for your operating system. On
Windows systems that file is setup.exe. For UNIX systems, use setup.sh.
-
Select
Install
SAS Software. Click
Next.
-
Select
Perform
a Planned Deployment, deselect
Install SAS
Software, and check only
Configure SAS Software. Click
Next.
-
You must use the same
deployment plan that was used when you installed the original server
component. This example uses one of the standard deployment plants.
Choose
Select a standard deployment plan, and
from the drop-down menu select
Enterprise Miner and Text
Miner, one Machine, JBoss. Click
Next.
-
Checking
System should already be complete. Click
Next.
-
In
Select
User Account Mode, you will most likely want to choose
Multiple-User Mode. Click
Next.
-
In
Select
Configuration Prompting Level, select
Typical. Click
Next.
-
In
Specify
Configuration Information, you must choose the same options
as your original installation. For this example, use the default settings.
Click
Next.
-
The SAS Deployment Wizard
will warn you that the configuration directory and level specified
contain existing files. Select
Yes.
-
In
Select
Products to Configure check
SAS Workspace
Server. Click
Next.
-
In
Local
Machine Name, accept the defaults. Click
Next.
-
In
Migration
Information, no migration should be performed. Click
Next.
-
In
Integrated
Windows Authentication, accept the default settings.
Click
Next.
-
In
SAS Metadata
Server, accept the default settings. Click
Next.
-
In
Deployment
Accounts: Type of Accounts, select
Use SAS
internal accounts when appropriate. Click
Next.
-
In
SAS Internal
Account: Unrestricted Administrator, enter the same password
that was used in the original installation. Click
Next.
-
In
Deployment
Accounts: First User, there is no need to set up a first
user ID. Click
Next.
-
In
Create
SAS Application Server Context, select
Create
a SAS Application Server Context. Click
Next.
-
In
SAS Application
Server: Server Context, enter
SASApp_2 in the field
SAS Application Server Context Name. Click
Next.
-
In
SAS Server
Dependencies, confirm that the value of
SAS
Application Server Context is
SASApp_2. Click
Next.
-
In
SAS Workspace
Server, enter the workspace server port. This example
uses the default value, 8592. Click
Next.
-
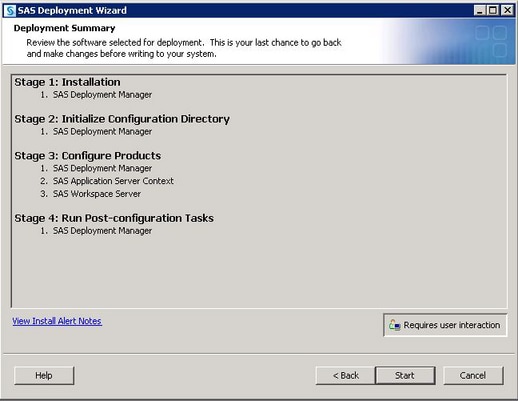
Check the deployment
summary and click
Start. Once the SAS Deployment
Wizard is finished, note the additional resources and click
Finish.
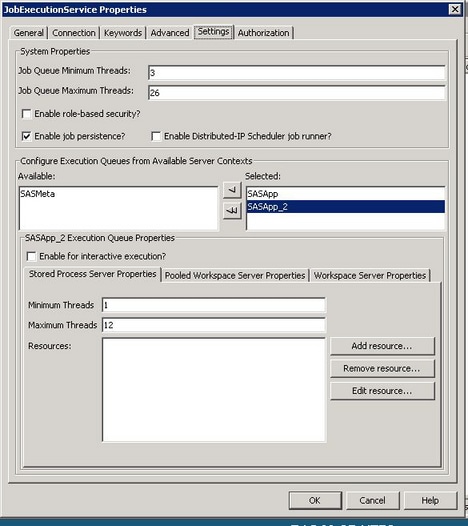
Now, run the SAS Management
Console and open the
Plug-ins tab. Select
SAS Application Management Configuration
ManagerSAS Application InfrastructureWeb Infra Platform Services 9.3JobExecutionService
Configuration
ManagerSAS Application InfrastructureWeb Infra Platform Services 9.3JobExecutionService. Right-click
JobExecutionService and select
Properties. Open the
Settings tab in the
JobExecutionService
Properties window and locate the
Configure
Execution Queues from Available Server Contexts section.
Select the new server, which is
SASApp_2 in
this example, and move it to the
Selected list. In the
SASApp_2 Execution Queue Properties section, deselect
Enable for interactive execution?.
Next, restart the Web
application server service. For example, in a default Windows install
this can be done from the Windows Management console for Services
by restarting the Service name,
JBoss — SASServer1.
To verify your new server
from Enterprise Miner, log on to Enterprise Miner and create a new
project that uses the new logical workspace server, create a diagram,
create a data source, place the data source on your diagram, and run
the diagram. You can select the new logical workspace server in
Step 1 of the New Project Wizard.
Important information
about managing and configuring your workspace server can be found
under Managing Workspace Servers and Stored Process Servers in the
SAS® 9.3 Intelligence Platform Application Server Administration
Guide.