Creating and Managing User-Defined Views
Create a User-Defined View
You can use the New
View window to create a user-defined view. You can save
these views, which adds them to the drop-down list in the View field.
Then you can apply them to the current SAS Lineage diagram. User-defined
views are available only to the user who created them.
To create a user-defined
view:
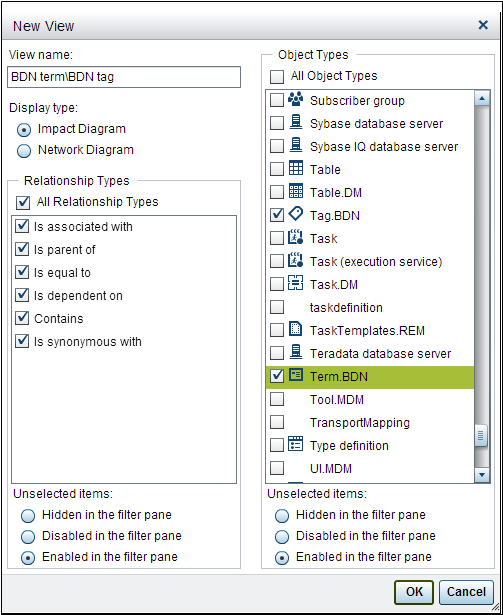
The following display
shows the completed New View window for the BDN
term\BDN tag user-defined view:
User-Defined View Definition
Note the presence of
the etldemo user in a portion
of the Governance view of the SAS Business Data Network term Social
Media in the following display:
Governance View

The user object type
is not included in the BDN term\BDN tag user-defined
view, so it should not be present when the view is applied to the
diagram for the term.
The following display
shows the partial diagram for the same SAS Business Data Network term
after the BDN term\BDN tag user-defined
view has been applied:
User-Defined View

Note that the diagram
contains three SAS Business Data Network terms (Consumer Banking,
Customer, and Profiles) and a tag (Banking _BDN_SAS SA), but it does
not contain a user.
Manage User-Defined Views
You can access the Manage
Views window by clicking the Action button
and opening the View submenu.
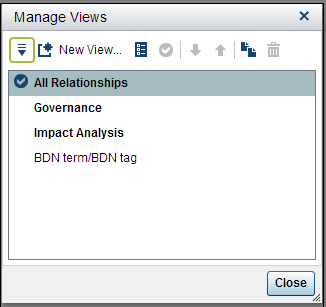
You can use the items
in the toolbar to perform the following functions:
-
create a new view
-
edit the properties of a selected view
-
set a selected view as the default view
-
move a selected view up or down in the list
-
copy the settings from a selected view into a new view
-
delete a selected view
Copyright © SAS Institute Inc. All rights reserved.