Import a File
Introduction
Use the Import a File
directive to copy a delimited source file into a target table in HDFS
and register the target in Hive.
The directive samples
the source data and generates default column definitions for the target.
You can then edit the column names, types, and lengths.
To simplify future imports,
the Import a File directive enables you to save column definitions
to a file and import column definitions from a file. After you import
column definitions, you can then edit those definitions and update
the column definitions file.
The directive can be
configured to create delimited Text-format targets in Hadoop using
an efficient bulk-copy operation.
In the source file,
the delimiter must be a single character or symbol. The delimiter
must have an ASCII character code in the range of 0 to 127 (\000 to
\177 octal).
To learn more about
delimiters and column definitions files, see the following example.
To copy database tables
into Hadoop using a database-specific JDBC driver, use the Copy Data to Hadoop directive.
Example
Follow these steps to
use the Import a File directive:
-
Copy the file to be imported, or copy a directory of files to be imported, into the directory
vApp-install-path\shared-folder\Files\MyData. A common name for the vApp shared folder isSASWorkspace. -
On the SAS Data Loader directives page, click Import a File.
-
In the Source File task, click to open folders as needed, click the file that you want to import, and click Next.TipTo open or save a copy of a selected file, click
 and select Download.
-
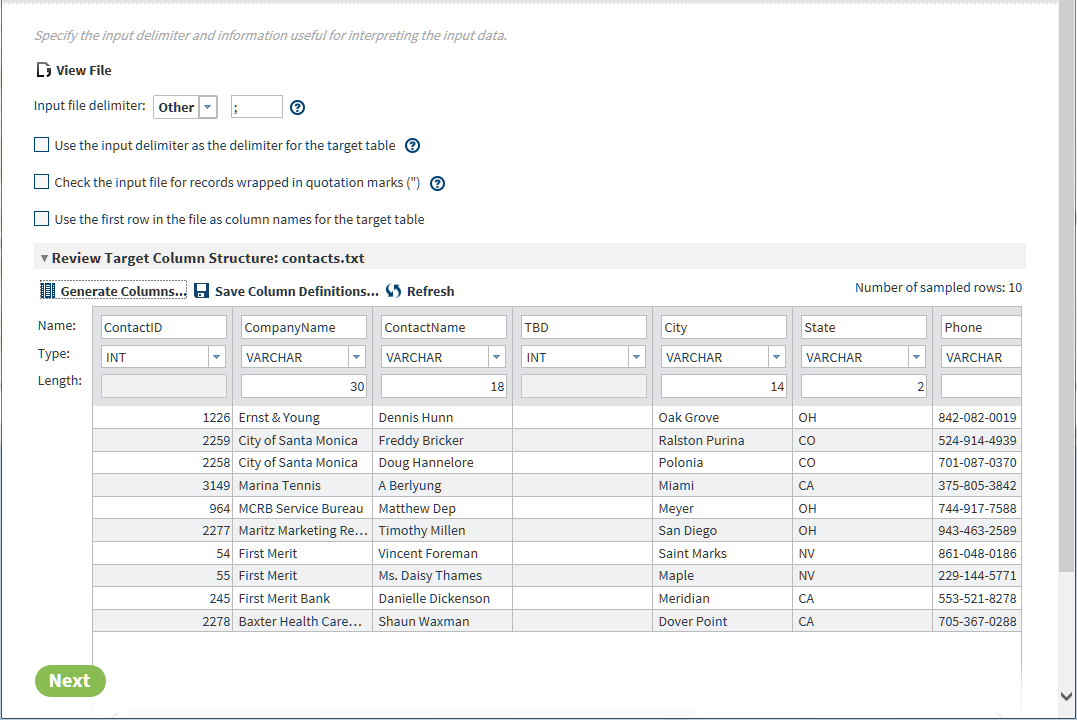
In the File Specification task, click the View File icon. Identify the delimiter that separates the variable values. Check to see whether the delimiter is used as part of a variable value.Notes:
-
In the source file, all variable values that contain the delimiter character must be enclosed in quotation marks (
"). -
In Hadoop distributions that run Hive 13 (0.13.0) or earlier, a backslash character ( \ ) is inserted into the target when the delimiter appears in source values. For example, the source data
One, "Two, Three", Fourwould be represented in the target as Column A:One, Column B:Two\, Three, and Column C:Four. In Hive 14 (0.14.0) and later, the backslash character is not inserted into the target.
-
-
Click Input format delimiter to display a list of available delimiters. Click the delimiter that you see in your source file, or click Other. If you clicked Other, then enter into the text field the single-character delimiter or the octal delimiter that you see in the source file. Octal delimiters use the format \nnn, where n is a digit from 0 to 7. The default delimiter in Hive is \001.Note: Input delimiters must have ASCII character codes that range from 0 to 127, or octal values that range from \000 to \177.
-
To efficiently register and store the source data in Hadoop using a bulk-copy, select (add a check mark to) Use the input delimiter as the delimiter for the target table. The bulk-copy operation is efficient, but the source data is not analyzed or validated in any way. For example, the directive does not ensure that each row has the expected number of columns.Note:
-
The bulk-copy operation is used only if the next two options are not selected. If this condition is met, then the source file is bulk-copied to the target. The format of the target is Text. The Text format is used even if another format is specified in the Target Table task.
-
If your source file uses
\Nto represent null values, you can preserve those null values in the target. A bulk-copy operation is required. In Hive, the default null value is\N.
CAUTION:Newline characters should be found only at the end of each record in the source data. If your source data contains newline characters within the field data, bulk-copies will include newline characters in the target without generating error messages or log entries. Newline characters in the target can cause data selection errors.Remove newline characters from the source as needed to create a usable target in Hadoop. -
-
If the source file is formatted accordingly, select Check the input file for records wrapped in quotation marks ("). Quotation marks are required when the delimiter appears within a variable value.Quotation marks that appear inside a quoted value must be represented as two quotation marks ("").CAUTION:Except for bulk-copy operations, jobs will fail if the source contains newline characters.For all jobs other than bulk-copies, ensure that the source file does not contain newline characters.
-
If your source file includes column names in the first row, then select Use the first row in the file as column names for the target table.
-
Click Review Target Column Structure to display a sample of the target table. The target columns are displayed with default column names (unless they were specified in the source), types, and lengths (based on type.) Review and update the default column definitions as needed, or apply a column definitions file as described in subsequent steps.Note: The default column definitions are generated by a programmatic analysis of sample data. You can change the default column definitions using the fields Type and Length. For example, a default column type could be DOUBLE. If you felt that the BIGINT type would be more useful, then you could select that type from the Length field.TipTo display a larger data sample, click the Generate Columns icon. In the Generate Columns window, enter a new value for Number of rows to sample.
 CAUTION:Time and datetime values in the source must be formatted in one of two ways in order for those columns to be assigned the correct type in the target.To accurately assign a column type, the directive requires that the source file use a DATE column format of
YYYY-MM-DDand a DATETIME column format ofYYYY-MM-DD HH:MM:SS.fffffffff. The DATETIME format requires either zero or nine decimal places after the seconds valueSS. Source columns that do not meet these requirements are assigned the VARCHAR type. In the directive, you can manually change a column type to DATE or TIMESTAMP. If the data in that column is improperly formatted, subsequent queries can return unexpected values. -
When your columns are correctly formatted, you can save your column definitions to a file. You can then reuse that file to import column definitions the next time you import this or another similar source file. To generate and save a column definitions file, click the Save Column Definitions icon. In the Save Column Definitions window, enter a filename to generate a new file, or select an existing file to overwrite the previous contents of that file. Click OK to save your column definitions to the designated file.
-
If you previously saved a column definitions file, and if you want to import those column definitions to quickly update the defaults, then follow these steps:
-
Click the Generate Columns icon.
-
In the Generate Columns window, click Use column definitions from a format file, and enter the filename or select the file using
 to display the Select a Format File window.
-
As needed in the Select a Format File window, click to open folders, select a column definitions file, and click OK.TipUse the Select a Format File to manage your column definitions files (refresh, rename, delete.) You can also download the files as needed.
-
In the Generate Columns window, click Generate to close the window and format the target columns as specified in the column definitions file.
 TipAs is the case with the default column definitions, you can enter changes to imported column names, types, and lengths. You can then save your changes to the original column definitions file or to a new file.TipDuring the definition of columns, you can replace your changes with the default column definitions at any time. Select
 , click Guess the columns based on a sample
of data , and click Generate.
, click Guess the columns based on a sample
of data , and click Generate.
-
-
In the Target Table task, click to open a data source and select a target, or click
 and choose a target. Existing targets are overwritten
entirely when you run your job.
To name a new target table, select a data source and click the New Table icon, enter the new table name, and click OK.
and choose a target. Existing targets are overwritten
entirely when you run your job.
To name a new target table, select a data source and click the New Table icon, enter the new table name, and click OK. -
The format of the target table is specified by default for all new directives in the Configuration window. To see the default target format, click the More icon
 , and then select Configuration.
In the Configuration window, click General
Preferences.
To override the default target file format for this one target, click the target and click Advanced Options
, and then select Configuration.
In the Configuration window, click General
Preferences.
To override the default target file format for this one target, click the target and click Advanced Options .
Note: If you are using a bulk-copy operation, as described in Step 6, then the target will always receive the Text format, regardless of the selections in the Advanced Options and Configuration windows.
.
Note: If you are using a bulk-copy operation, as described in Step 6, then the target will always receive the Text format, regardless of the selections in the Advanced Options and Configuration windows.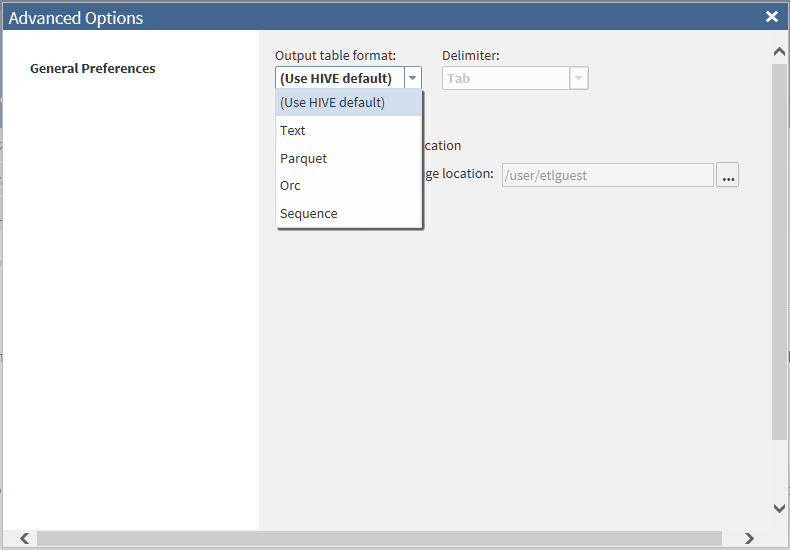 To save the table data to a non-default Hive storage location, click Specify alternate storage location, and then click. You need appropriate permission to store your imported
table or file to a non-default Hive storage location.
When your target selection is complete, click Next.
To save the table data to a non-default Hive storage location, click Specify alternate storage location, and then click. You need appropriate permission to store your imported
table or file to a non-default Hive storage location.
When your target selection is complete, click Next. -
In the Result task, click Start Importing Data to generate code and execute your job. You can monitor long-running jobs in the Run Status directive. At the completion of execution, you can click the Code, Log, and possibly the Error Details icon to learn more about your job.
-
Click Save or Save As to retain your job in Saved Directives.
Copyright © SAS Institute Inc. All Rights Reserved.