Configuring Workflow in SAS Business Data Network

Overview

This document lists the steps for deploying and using workflows that enable the collaborative term review and approval process in SAS Business Data Network. The SAS Workflow Studio client is needed to deploy the workflows, but it does not have to be installed on the same machine as the server.

Set Permissions in Web Administration Console

Perform the following steps:
  1. Log on to http://<your server:>:port/SASAdmin as an administrative user. If a user-defined port number is supplied during installation, place it after the server name.
  2. Select the Assign Roles action in the tree (SAS Web Administration Consolethen selectEnvironment Managementthen selectAuthorizationthen selectAssign Roles).
  3. Add roles to each workflow user, as appropriate. These roles can include those of Administrator, Workflow Administrator, Workflow Viewer, and Workflow Editor. You must perform this task for each user separately.

Turn On Workflow Events

In the file C:\SAS\Config\Lev1\Web\WebAppServer\SASServer1_1\sas_webapps\sas.workflow.war\WEB-INF\spring-config\messaging-config.xml, change the default-request-channel value for workflow events from nullChannel to workflowEventFilterTransformChannel. Note that the exact path might differ depending on your deployment’s server definitions.
The original tag is shown in the following display:
Original Tag
Original Tag
The modified tag is shown in the following display:
Modified Tag
Modified Tag
Afterward, restart the following services:
  • SAS httpd - WebServer
  • SAS WebAppServer SASServer1_1
  • SAS WebAppServer SASServer2_1
  • SAS WebAppServer SASServer13_1
Note that this list might differ depending on your deployment.

Add Connection Information to SAS Workflow Studio

In the file C:\Program Files\SASHome\SASWorkflowStudio\1.3\environments.xml, add an entry to specify your connection information.
The following display shows a sample connection information entry:
Connection Information
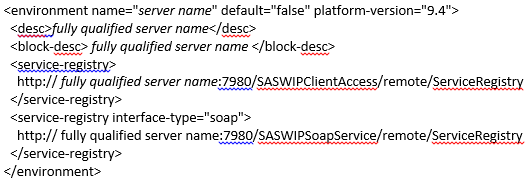
This entry must specify the actual machine name and not an alias. Otherwise, SAS Workflow Studio displays an error when it tries to resolve the alias.
For more information about workflow configuration, see the SAS Intelligence Platform: Web Application Administration Guide.

Deploying Workflows in SAS Workflow Studio

Perform the following steps:
  1. Start SAS Workflow Studio.
  2. Log on as an administrative user. Use the path Serverthen selectLog On to connect to the server that you added to the environments file in the Add Connection Information to SAS Workflow Studio section.
  3. Navigate to Manage Templates in the Server section. Click New Tags and create a new tag named BusinessData. This tag marks a workflow as one that is usable in SAS Business Data Network.
  4. Open a workflow file that you want to deploy. You can find the default SAS Business Data Network workflows at the following location: SASHome\SASBusinessDataNetworkMidTier\3.1\Config\workflows.
  5. Navigate to Save to Repository under Server. Select the Activate check box and click OK to deploy the workflow.
  6. Repeat steps 4 and 5 for each workflow that you want to deploy.

Associating Workflows with Term Types

Open the Manage Term Types view in SAS Business Data Network. Then open a term type. You can choose a workflow that you deployed in the previous section as the Create, Edit, or Delete workflow for the term type.