Creating Prompted Section Filters
Create a Prompted Section Filter for an Alphanumeric Category
To create a prompted
section filter for an alphanumeric category in a relational data source,
complete these steps:
-
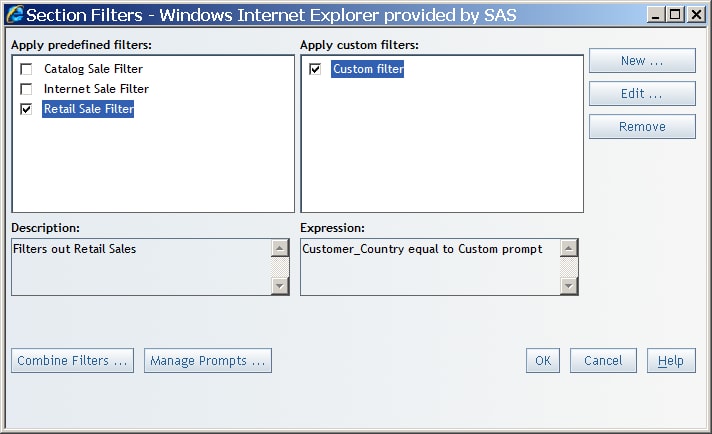
In the Filter name field, accept the default name or provide a different name. For example, if you are creating a prompted filter that will enable users to select a country, type a name such as
Prompted
                                 Country Selection
. The filter name appears in the Apply custom filters box in the Section Filters dialog box. -
-
Select the Include “all possible values” as a value check box. This option is limited to prompts that enable users to specify more than one value when filling in a prompt in View mode.Note: This option is limited to the Dynamically generate values and Create a list of values prompt types. If the prompt type is Dynamically generate values, then “all possible values” acts as if there is no filter and all values are shown in the results. If the prompt type is Create a list of values, then “all possible values” refers to all the values in the list that the prompt author created. If there are values for that data item that do not exist in the list, then they will not appear in the results.
-
(Optional) If the selected data item enables you to filter on formatted values, then you can select the Filter on formatted values option. Regardless of your selection, the query results show formatted values. (footnote1)
-
If you selected Contains, Does not contain, Matches pattern, or Does not match pattern, then complete these steps:
-
If you are creating a prompt with the type of Create a list of values, then at least one value must appear in the Selected values list. The first item in the Selected values list becomes the default value. When the report is run, the prompts window will verify that a valid value has been supplied before the report can be viewed.
If you selected Is equal to, Is not equal to, Is between values (inclusive) or Is not between values (inclusive), then your next steps depend on the type of prompt that you selected. The steps are explained in the following table.Note: The data source administrator determines whether the Dynamically generate values option is available.Operators and Prompt TypesIf you selected Create a list of values, then complete these steps: -
-
You can also select Browse or Search to find available values. For more information, see Browsing or Searching for Filter Values.
-
If you accessed the Create Custom Filter dialog box from the Section Filters dialog box, then you can see that the filter you just created is now displayed and selected in the Apply custom filters box on the Section Filters dialog box. When the filter name is selected, the filter expression is shown in the Expression box.TipCustom filters can be saved for future use. To turn off the filter, clear the check box next to the filter name. For more information, see Apply Existing Section Filters.


New section filters
are automatically added to the existing filter combination expression.
By default, new section filters are joined using the AND operator,
which means that the query results must match all selected section
filters. For more information,
see Combine Section Filters.
Create a Prompted Section Filter for a Date Category
To create a prompted
section filter for a date, time, or timestamp in a relational data
source, complete these steps:
-
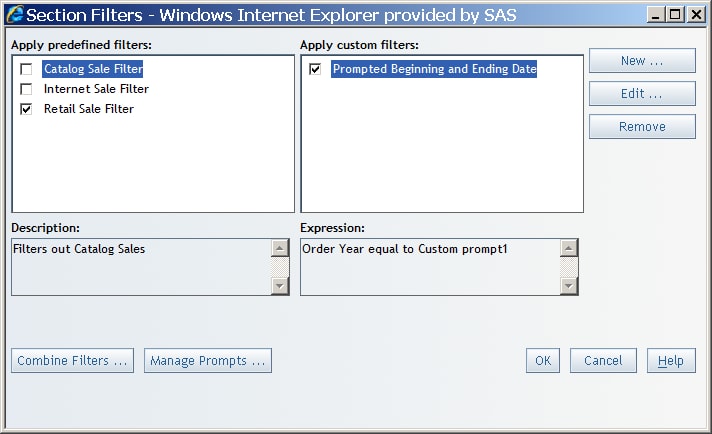
In the Filter name field, accept the default name or provide a different name. For example, if you are creating a prompted filter that will enable users to select a date range, type a name such as
Prompted
                                 Beginning and Ending Date
. The filter name appears in the Apply custom filters box in the Section Filters dialog box. -
When you access the Create Custom Filter dialog box from the Section Filters dialog box, the filter that you just created is automatically selected in the Apply custom filters box. When the filter name is selected, the filter expression is shown in the Expression box.TipCustom filters can be saved for future use. To turn off the filter, clear the check box next to the filter name. For more information, see Apply Existing Section Filters.
New section filters
are automatically added to the existing filter combination expression.
By default, new section filters are joined using the AND operator,
which means that the query results must match all selected section
filters. For more information,
see Combine Section Filters.
FOOTNOTE 1: Filtering on formatted values
can sometimes adversely affect query performance. If you have questions
about whether you should select this option, contact your data source
administrator.[return]