Scheduling Reports, Stored Processes, and Folders

About Scheduling

For faster rendering, you can schedule a time for queries to be pre-generated for selected reports and stored processes, including an entire folder of reports.
To schedule a report, a scheduling server must be available and you must have the authorization to schedule reports. For more information, contact your system administrator.

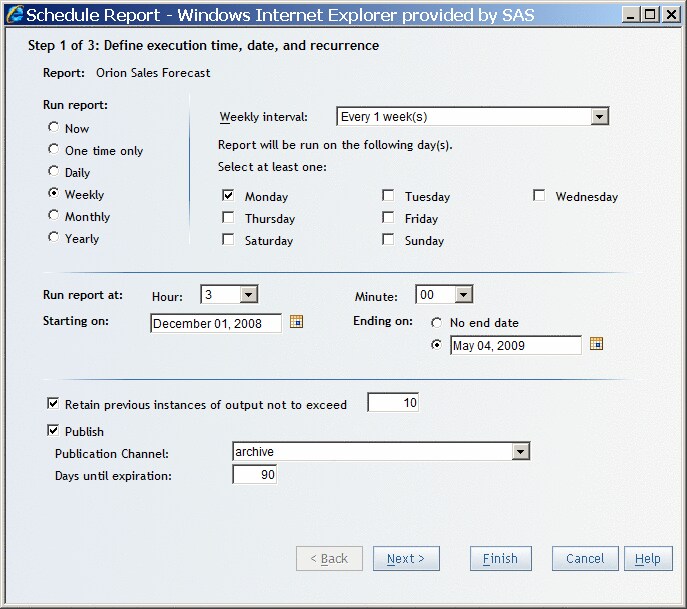
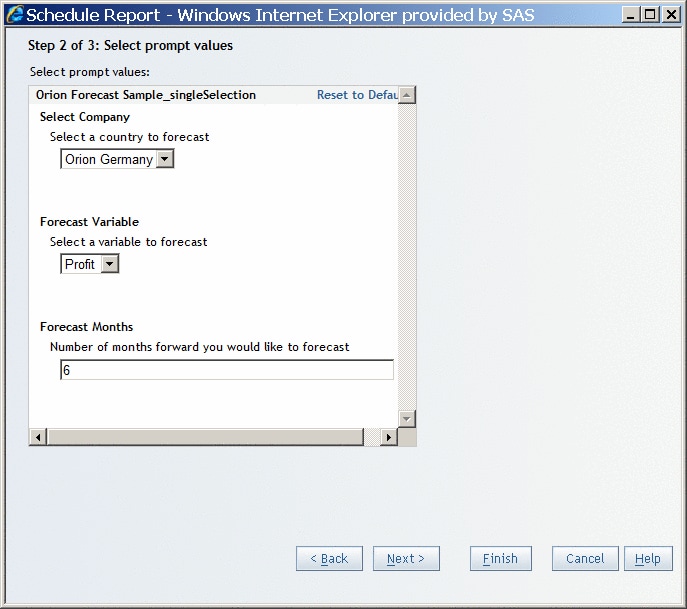
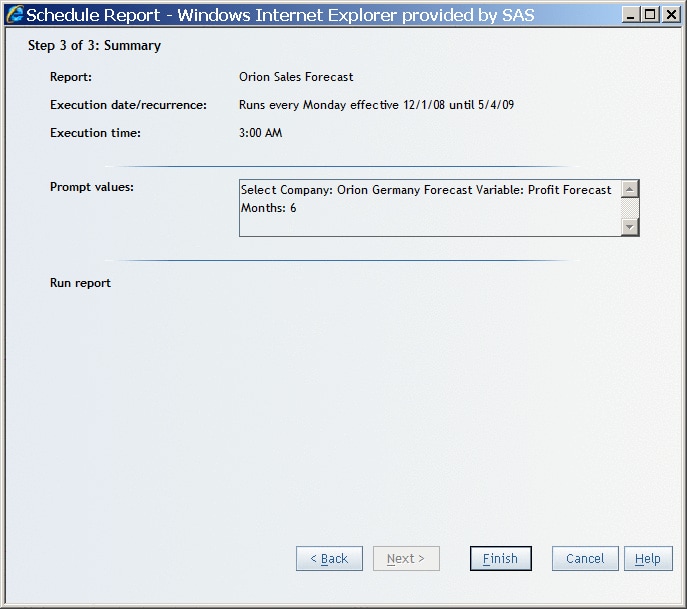
Schedule a Report, Stored Process, or Folder

To schedule a report, stored process, or folder, complete these steps:
  1. To launch the Schedule Report Wizard, perform one of these tasks:
    • When a report or stored process is displayed in View mode, select Filethen selectSchedule.
    • In the File Management window, next to the name of the report, stored process, or folder that you want to schedule, click actions icon in the Actions column, and then select Schedule.
    The first wizard page appears.
  2. Specify the interval for running the report, stored process, or folder.
    The rest of the information that you must provide depends on your selection. If you select Now, then you do not need to select any other options.
  3. For any Run report option other than Now, specify the time that you want to run the report. You can also specify the starting and ending (if applicable) date range for the schedule.
  4. (Optional) To archive the report, select Retain previous instance of output not to exceed. Archived reports are saved in PDF file format and can be opened from the Open dialog box or from the File Management window.
    Note: Only one copy of a report can be saved per day. If a report is saved multiple times in one day, then only the next-to-last saved report is used as that day's archived report.
    Note: Only authorized users can choose to archive a report. If you have questions about your authorization, contact your system administrator.
    Note: This option is not available for folders.
  5. (Optional) If publication channels are defined, then select the Publication Channel to which the report should be saved. The list of available channels is supplied by your system administrator.
    Note: A publication channel is an information repository that has been established by using the SAS Publishing Framework. It can be used to publish information to users and applications. If you publish your report to a publication channel, then authorized users and applications can access your report by subscribing to the channel.
    Specify a number in the Days until expiration field. The default is 90 days.
    Schedule Report Wizard for Step 1
    Schedule Report Wizard for Step 1
  6. Click Next to go to the next wizard page, or click Finish.
    Note: If the report has prompts that do not have defaults, you must specify prompt values before exiting.
  7. If the report has prompts, a wizard page appears displaying those prompts.
    Schedule Report Wizard for Step 2
    Schedule Report Wizard for Step 2
  8. After you enter the required prompt values, click Next to go to the next wizard page, or click Finish. The summary page displays the name of the report, the time that it is scheduled to run, and any prompt values.
    Note: To make changes to your selections on previous wizard pages, click Back.
    Schedule Report Wizard for Step 3
    Schedule Report Wizard for Step 3
  9. Click Finish to save your settings and exit the wizard.
Note: When you schedule a stored process, SAS Web Report Studio saves the results in a report with the same name as the stored process. The report is saved in the same folder as the stored process.