Host Access to SAS Tables
Direct Access versus Mediated Access
A
SAS table (data set) is stored as a file in a host operating system.
In general, a SAS table can be directly accessed and read by anyone
who has the necessary host operating system permissions to that file.
You can use the SAS metadata authorization layer to further constrain
access. However, those additional constraints apply only when the
user requests that data in a metadata-aware context.
As a simple example,
assume that you have registered a library and several tables in the
metadata. In SAS Management Console, you deny userA the ReadMetadata
permission for a table named Salary. This prevents userA from seeing
the Salary table in metadata-aware applications. However, if userA
has host access to the physical file that contains the table data,
userA can open that file in Base SAS and examine all of the data.
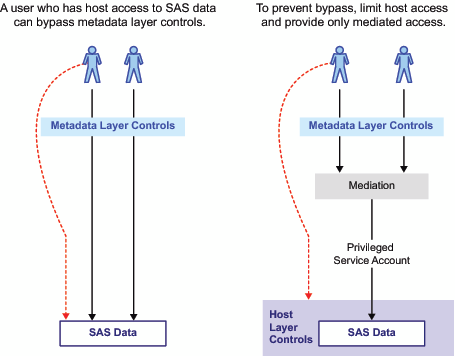
When the table is accessed directly, the metadata layer denial of
ReadMetadata permission isn't applied. In the following figure, the
first image illustrates the issue and introduces the concept of mediated
access.
With mediated access,
a workspace server or stored process server retrieves SAS data from
the host operating system using a service account called a launch
credential. The server uses one account to retrieve data on behalf
of each requesting user. Mediation is an integral part of a standard
configuration as follows:
Managing the Risks of Mediated Host Access
The following table
describes techniques for reducing risk. Keep in mind that there is
no absolute security and that you must balance security goals against
other considerations.
Alternatives for Reducing Mediation Risks
|
This measure is necessary
as one part of making row-level permissions that are defined in information
maps fully secure. See Limit the Availability of Relational Information Maps That Implement Row-Level Security in SAS Intelligence Platform: Web Application Administration Guide.
|
||
|
See Secure Environment for BI Row-Level Permissions in SAS Guide to BI Row-Level Permissions.
|
Example: Multiple Levels of Host Access
The preceding figure depicts a simple case where there
is only one level of host access. You can establish multiple levels
of host access by setting up multiple servers, each with its own launch
credential. This can involve a trade off of granularity ("how many
different levels of access will I establish?") against administrative
effort ("how much server metadata will I create and manage?").
For example, the following
instructions show how you can physically isolate sensitive data that
is accessed through a logical workspace server that uses SAS token
authentication.
-
In SAS Management Console's User Manager, select the SAS General Servers group, right-click, and select the Accounts tab. For each service account that you created in step 1, click New and enter the service account credentials as an additional login for the SAS General Servers group. Include a password in each of these logins. For example, you might enter the HR login as follows:
DefaultAuth | WIN\hrsrv | password
Note: Each of these logins will be directly associated with a particular server, instead of being looked up by authentication domain. For this reason, it doesn't matter which authentication domain you use. You can ignore any warnings about the SAS General Servers group having multiple logins in the same authentication domain.Note: Users should not be members of the SAS General Servers group. This group is for service identities only. Users don't retrieve these credentials, so users shouldn't have access to these logins. In a standard configuration, these logins are available only to the privileged service identity (the SAS Trusted User) that the spawner uses to read all server metadata. -
-
Select the server, right-click, select Properties, and select the Options tab. In the Launch credentials drop-down list, select one of the service accounts (use a different account for each server). For example, for the Human Resources server, you would first select More logins and then search for and select the login that references the hrsrv account.
-
If you want to also
enable power users to access data using their own accounts, set up
a separate application server  for those users. In that application server, add
a logical workspace server
  that uses some form of host authentication. Even
though regular users wouldn't be able to authenticate (because they
wouldn't have host accounts for the workspace server machine), it
is a good practice to limit ReadMetadata access to the additional
application server.
 for those users. In that application server, add
a logical workspace server
  that uses some form of host authentication. Even
though regular users wouldn't be able to authenticate (because they
wouldn't have host accounts for the workspace server machine), it
is a good practice to limit ReadMetadata access to the additional
application server.
You can use a similar
approach to set up multiple levels of host access for a stored process
server or a server-pooled workspace server. For multiple levels of
host access from a client-pooled workspace server, set up multiple
puddles. Always ensure that the server's host identity meets all of
the requirements for a launch credential.


