Establishing Connectivity to a Microsoft Access Database By Using ODBC

Overview of Establishing Connectivity to a Microsoft Access Database By Using ODBC

The following figure provides a logical view of using Microsoft Access as a data source and connecting to the database with a SAS/ACCESS ODBC interface.
Establishing Connectivity to Access Databases By Using ODBC
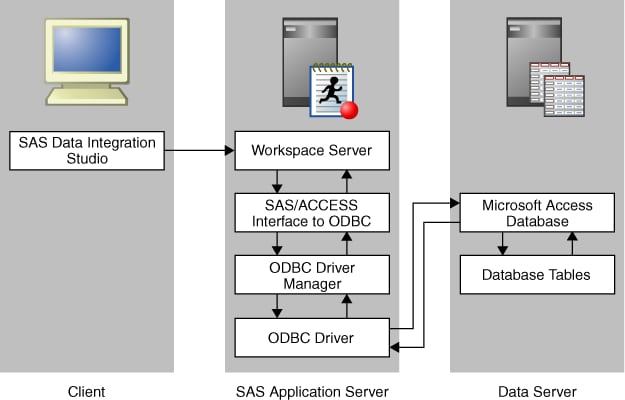
Setting up a connection from SAS to a Microsoft Access database by using ODBC is a three-stage process:
  1. Define an ODBC data source.
  2. Register the database server.
  3. Register the database library.
This example shows the process for establishing a SAS connection to an Access database. It assumes that the software for the database has already been loaded with the standard installation wizard for the database client. In addition, SAS/ACCESS Interface to ODBC must be installed on the SAS server that will access the Access database.

Stage 1: Define the ODBC Data Source

First, you must define the ODBC data source. To define the ODBC data source on Windows systems, perform the following steps:
  1. Open the Windows Control Panel. Then, double-click Administrative Tools. Finally, double-click Data Sources (ODBC) to access the ODBC Data Source Administrator dialog box.
  2. Click Add to access the Create New Data Source dialog box. Click the Microsoft Access driver listed in the window (for example, Microsoft Access Driver [*.mdb]). Click Finish to access the ODBC Microsoft Access Setup dialog box.
    Note: System data sources and user data sources store information about how to connect to the indicated data provider. A system data source is visible to all users with access to the system, including Windows services. A user data source is visible only to a particular user, and it can be used on the current machine only.
  3. Enter the following configuration settings:
    Configuration Settings
    Field
    Sample Value
    Data Source Name
    MS Access
    Database
    Click Select to browse for your Access database file, such as Northwinds.mdb in the Microsoft Office Samples directory.
  4. Click OK to save the configuration settings and return to the ODBC Data Source Administrator dialog box. Then, click OK to save the data source.

Stage 2: Register the Database Server

To register the database server, perform the following steps:
  1. Open the SAS Management Console application.
  2. Right-click Server Manager and select the New Server option to access the New Server wizard.
  3. Select ODBC Server from the Database Servers list. Click Next.
  4. Enter an appropriate server name in the Name field (for example, MS Access Server). One server is required for each DSN. Note that you can supply an optional description if you want. Click Next.
  5. Enter the following server properties:
    Server Properties
    Field
    Sample Value
    Major Version Number
    3
    Minor Version Number
    7
    Data Source Type
    ODBC - Microsoft Access
    Software Version
    3.7.0
    Vendor
    Microsoft
    Associated Machine
    newserver.na.sas.com This is the server where the database is running. (Select this value from the drop-down list. If the value that you need is not available, click New to access the New Machine dialog box. Then enter the appropriate value in the Host Name field.)
    Click Next.
  6. Enter the following connection properties:
    Connection Properties
    Field
    Sample Value
    Datasrc
    MS Access (Use the value entered in the Data Source Name field in the ODBC Data Source Administrator dialog box.)
    Authentication type
    User/Password
    Authentication domain
    ODBCAuth (You might need to create a new authentication domain. For more information, see How to Store Passwords for a Third-Party Server in SAS Intelligence Platform: Security Administration Guide.) Click New to access the New Authentication Domain dialog box. Then enter the appropriate value in the Name field and click OK to save the setting.
    Click Next.
  7. Examine the final page of the wizard to ensure that the proper values have been entered. Click Finish to save the wizard settings.

Stage 3: Register the Database Library

After you have registered the database server, you can register the database library. To register the database library, perform the following steps:
  1. In SAS Management Console, expand Data Library Manager. Then, right-click Libraries and select the New Library option to access the New Library wizard.
  2. Select ODBC Library from the Database Data list. Click Next.
  3. Enter an appropriate library name in the Name field (for example, MS Access Library). Note that you can supply an optional description if you want. Click Next.
  4. Select an application server from the list and use the right arrow to assign the application server. Click Next.
  5. Enter the following library properties:
    Library Properties
    Field
    Sample Value
    Libref
    ACCESREF
    Engine
    ODBC
    You can also click Advanced Options to perform tasks such as pre-assignment and optimization. Click Next to access the next page of the wizard.
  6. Enter the following settings:
    Server and Connection Information
    Field
    Sample Value
    Database Server
    MS Access Server (Use the database server that you created in the New Server wizard.)
    Click Next.
  7. Examine the final page of the wizard to ensure that the proper values have been entered. Click Finish to save the library settings. At this point, register tables as explained in Registering and Verifying Tables.