Adding a Custom Attributes Window to a Component
An editor is used to set a single attribute value. By contrast, a custom attributes window (which is also known as a “customizer”)
can be used to set attribute values for an entire component. You can add a custom attributes window to a class to provide an alternate way to set attribute information (that is, to replace the
use of the Properties window
for a specific class) or to provide another way to access specific
attributes by appending the custom window to the Properties window.
You must first create a frame to serve as your custom attributes window. The SCL for the frame must contain an ENTRY statement. For example:
entry optional= objectID:object;
init:
   /* ...insert SCL for your frame... */
return;
In this example, the objectID argument that is passed represents the current object that is being edited. This object argument enables you to use dot notation in the
SCL code that sets attribute values based on the selections a user makes in the custom
attributes window.
To specify a FRAME entry to use as a custom attributes window for a component:
-
In the Class Editor, select View
 Class
Settings.
Class
Settings.
-
Select Use Custom Attributes Window, and then enter the name of the frame you want to use as the custom window.
-
Select Append to include the custom attributes window with the Properties window, or select Replace to use the custom attributes window instead of the Properties window.
-
Click OK.
If you select
Append, a user of your component can access your custom attributes window by selecting the
row labeled (Custom) in
the Properties window and clicking the ellipsis
(...) button in the Value cell.
If you select
Replace, a user of your component will see the custom attributes window instead of the Properties window. It is the responsibility of the component developer to account for all attribute
values in the design of the frame and in the SCL code that processes the frame. The
SCL for a custom attributes window that “replaces”
the Properties window must still include the ENTRY OPTIONAL= statement described
above.
Consider a component that is a subclass of
sashelp.classes.graphoutput_c.class. You could create a frame named sasuser.test.attrgrph.frame that could provide a simple interface for setting values for the major attributes in the component. This frame could be
appended to the Properties window.
The frame SCL must contain the following code:
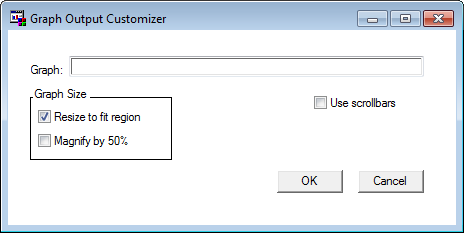
/* sasuser.test.attrgrph.scl */
entry optional= objectID:object;
init:
  /* ...insert SCL that initializes the values... */
  /* ...of the controls in your frame... */
return;
  /* ...insert additional SCL code here... */

term:
   /* SCL must set the value of the attributes for objectID. */
   /* Assume that the following object names are the names   */
   /* of the controls on the frame:                          */
   /*   - graphName is the text entry control                */
   /*   - graphSize is the radio box control                 */
   /*   - scrollbarsCheckBox is the check box control        */

   /* set graph name */
   objectID.graph=graphName.text;
   /* set resizeToFit or magnify */
   if graphSize.selectedIndex=1
      then objectID.resizeToFit='Yes';
      else if graphSize.selectedIndex=2
         then objectId.magnify=50;
   /* set the scrollbars option */
   objectID.scrollbars=scrollbarsCheckBox.selected;
return;
To create the subclass of the graph output control that uses the custom attributes window:
-
Create a new class whose parent is
sashelp.classes.graphoutput_c.classand whose description isGraph Output Control with Customizer. -
Select ViewClass Settings to view the Class Settings dialog box. Select Use Custom Attributes Window, and then enter
sasuser.test.attrgrph.frameas the frame. SelectAppend, and then click OK to close the dialog box. -
Save the class as
sasuser.test.CustomGraphOutput.class, and then close the Class Editor.
If you add this class to a frame, you can then use either the custom attributes window
or the Properties window to set the
graph, resizeToFit, magnify, and/or scrollbars attributes. You can open the custom attributes window from the Properties window by selecting the row labeled (Custom)
and clicking the ellipsis (...) button in the Value cell.
Copyright © SAS Institute Inc. All Rights Reserved.
Last updated: May 27, 2017