| The Data Table |
Recoding Ranges
In performing an analysis, you may want to work with a particular factor as a classification variable rather than as a continuous variable. Recoding ranges enables you to create a new variable with discrete levels based on the ranges of values of an existing variable.
Select Data ![]() Transform
Transform ![]() Recode Ranges ... to designate the column whose ranges you want to use.
Recode Ranges ... to designate the column whose ranges you want to use.
 |
Figure 2.17: Recode Ranges Information Dialog
Click on the arrow next to Column to recode: to select a numeric column from the current data table.
Specify the name of the new column that will contain the new data values. The new column has a default name, which you can type over with a name of your choosing.
The new column type can be character or numeric. If you select Character, you can use a character string to correspond to each range.
You must specify the number of groups that the current range will be divided into.
To help you decide how many groups to form, the range of the existing column is displayed at the bottom of this dialog.
After you have selected a column to recode and the number of groups that you want the new variable to have, click OK to display a dialog in which you can specify the recoding to be performed.
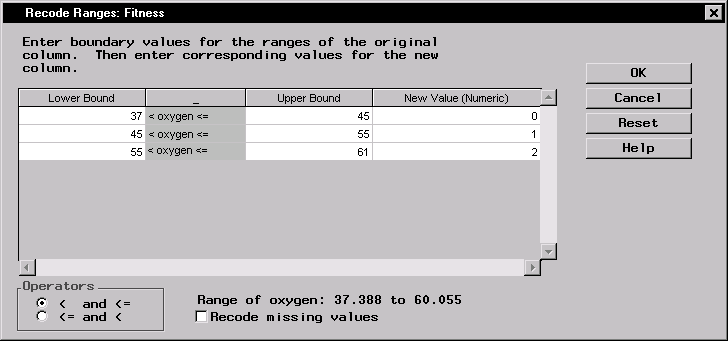 |
Figure 2.18: Recode Ranges Dialog
Use this dialog to substitute new values for the original ranges of the column specified in the Recode Ranges Information dialog. The number of rows in the table corresponds to the number of groups.
The Lower Bound is the lower boundary of a range. The Upper Bound is the upper boundary of a range. The upper boundary is automatically transferred to the next range's lower boundary. Only the first N-1 cells of the Upper Bound need to be filled in.
Type in a character or numeric value to correspond to the range. If you do not type in a value, a missing value (blank) is assigned to the range.
Under Operators, you can control what happens to column values that fall on a range boundary. The first option groups these values with smaller values; the second option groups these values with larger values.
If you select Recode missing values and the lowest lower bound is left blank, missing values are placed in the lowest new group. If you don't select Recode missing values, missing values remain missing.
The range of the existing column is displayed at the bottom of this dialog.
Copyright © 2007 by SAS Institute Inc., Cary, NC, USA. All rights reserved.